The way to smooth editing in Final Cut Pro

When working with high-resolution video (like UHD and higher) or when your computer struggles to provide sufficiently high processing speed, video editing can become a tedious and extensively long process. Add some heavy effects to this mix and Final Cut’s playback and preview update will get too slow.
Here are some examples of typical issues that may show up in such a situation.
Choppy playback and skipped frames:
- when you try to start playback directly (without rendering)
Slow preview update in Final Cut:
- immediately after applying a heavy effect, like Neat Video, to a clip
- after applying additional effects to the same clip or changing their parameters
- when jumping quickly between different frames in the timeline
Sluggish Final Cut interface:
- when preparing preview in clips with heavy effects
- when starting or stopping playback
- when doing other operations while Final Cut is doing some background rendering
There are several key reasons why such kind of sluggishness can happen:
- Working with large resolution video requires more time to process each frame on the side of Final Cut, on the side of Neat Video, and on the side of other effects applied. If the processing time of each frame is large, then smooth playback and quick update of the preview becomes technically impossible. Then Final Cut cannot update the preview quickly enough anymore and you have to wait. If you start playback, then Final Cut will skip frames because of that as well.
- Working with large resolution video requires more system memory and more GPU memory. A shortage of those resources can cause an additional slowdown in the processing of each frame because MacOS will have to use slower swap memory.
- If available computing resources (CPU cores and GPUs) are not used effectively by the software (including Final Cut, Neat Video, other effects and video codecs), then the speed of processing suffers too.
- If some components of the project are especially slow (for example some video codecs), then this can cripple the responsiveness of Final Cut as well. Neat Video may be not fast itself (because of the large amount of processing it has to do), but there may also be other components that can cause an extra slowdown as well.
The good news is there are ways of making video editing less annoying and more enjoyable for you. Let’s explore those in detail now.
Optimize Use of CPU and GPU
Things always work better if you get the main settings right from the beginning. Every time you start working on a new project that needs denoising, it is worth making sure that Neat Video is set to use optimal hardware parameters. That will allow the denoiser to achieve the best performance.
Once you set up a new project with its key settings, such as frame size, add Neat Video to one of the clips in the project, open Neat Video’s Options Window and then go to its menu Tools > Preferences > Performance > Optimize Settings… and click Start. Once the test is complete, you will see the best speed Neat Video can achieve on your computer with the frame size used in this project and with the current filter settings (please keep in mind that the measured number of the frames per second in this test shows the maximum speed that Neat Video can reach without the overhead of Final Cut and other effects that may be using the same resources, so it is the speed of Neat Video itself, not speed of the whole Final Cut render process, which will be somewhat lower). Please click the Accept Best Combination button to use the found combination of CPU and GPU to let Neat Video work at the highest speed with the current frame size and current filter settings.
Also, check the allowed GPU memory usage in Preferences > Performance page. Allowing Neat Video to use too much GPU memory may cause the denoiser and other GPU users (including Final Cut) to hinder each other, which may lead to some extra slowdown. On the other hand, giving Neat Video a too small amount of the GPU memory will make the filter itself slower. Try experimenting with the slider and see what value gives you better results. Do not go into the red area indicating the part of memory used by other GPU users. Also, look for the green triangle indicating the amount of memory wanted by the denoiser. The ‘Check Speed’ button is helpful for a quick speed measurement after each adjustment of the GPU memory setting. If you need a more accurate measurement (for example, before starting a several hours render), you can also measure the time needed to fully process some small test project with one short clip and Neat Video applied to it and set GPU memory usage to the value providing the shortest render time.
We have created this video for more guidance:
If you are on MacOS 11.0 or newer, we recommend making sure Neat Video uses Metal instead of OpenCL, as Metal usually offers better performance. You can switch the mode in Preferences > Performance > Advanced Settings dialog.
Turn Off Background Render
Rendering is done automatically by Final Cut processes any applied effects and adjustments and then creates temporary video and audio render files for segments of your project. This is usually done by Final Cut to speed up playback of those segments during further editing. When you edit more and add a clip that uses a different codec that you're editing in, or you add a color adjustment, or you key frame an image, add a lower third or other items that require rendering for playback in high-quality, the rendering indicator (a light grey dotted line) appears below the ruler at the top of the timeline. It indicates that the computer may need to process that section of your video before you can play it back smoothly.
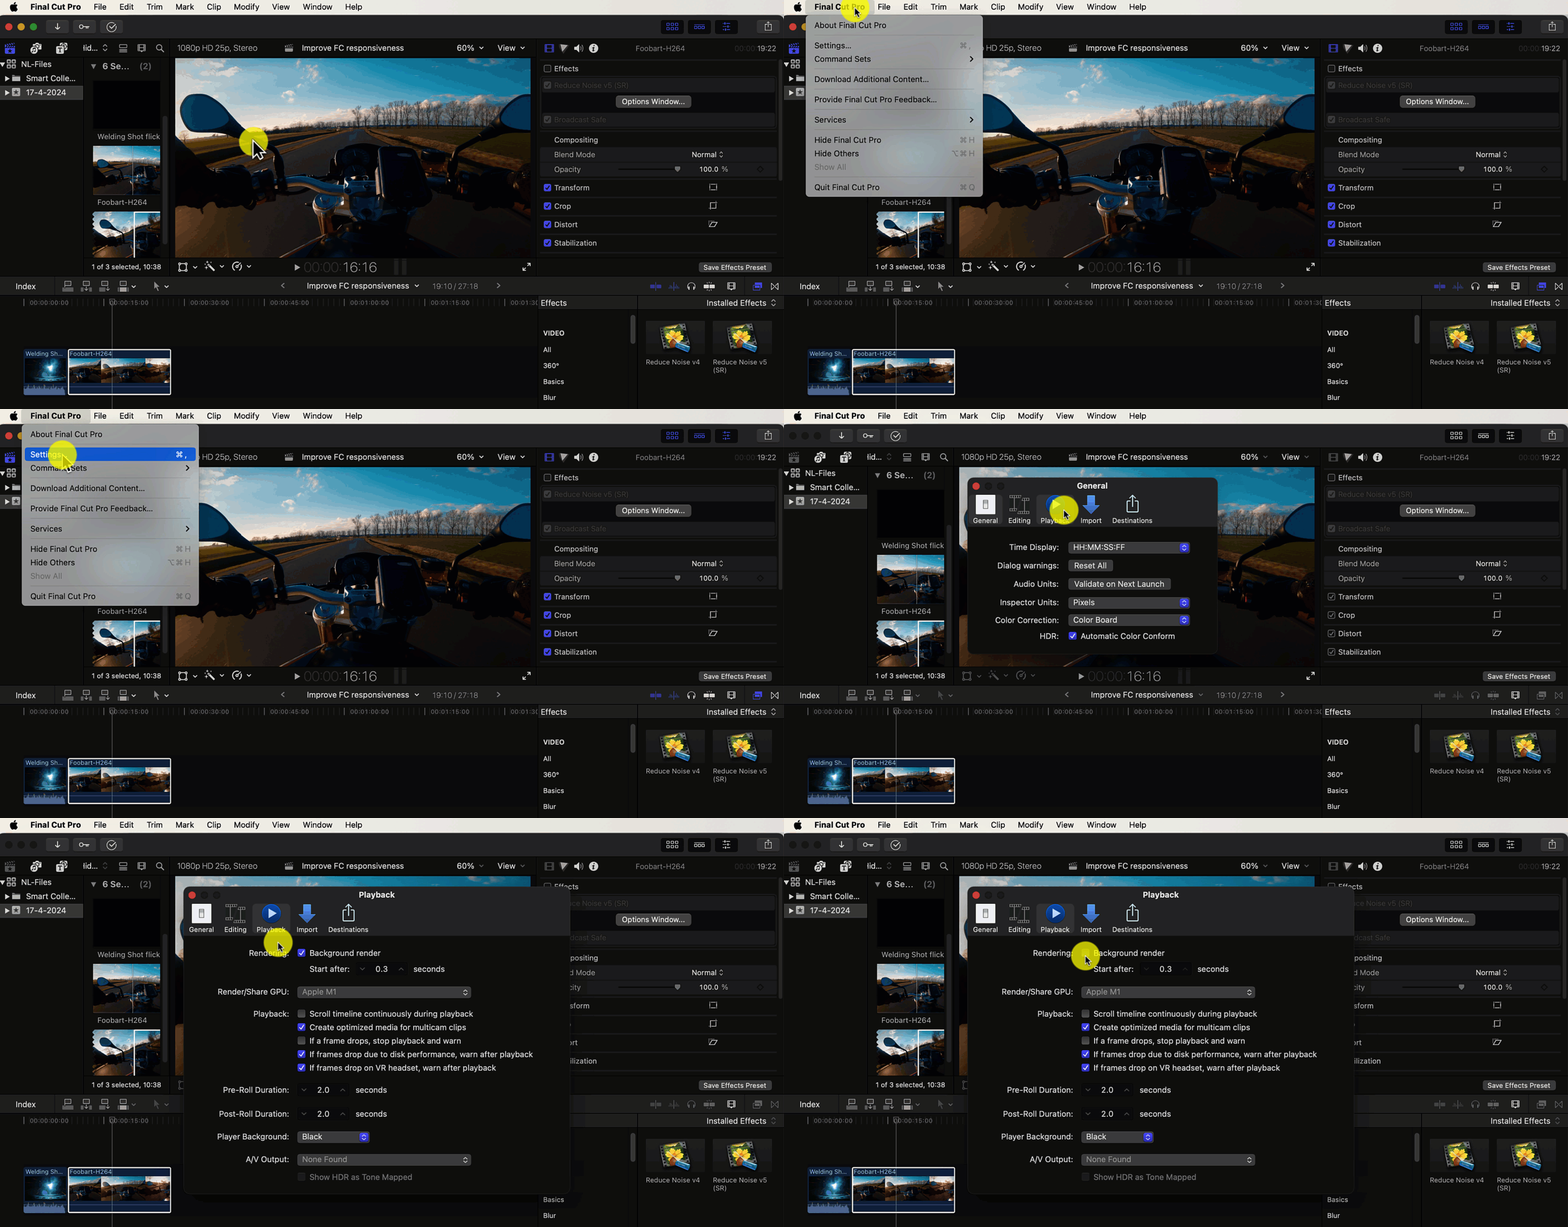
By default, such rendering in Final Cut begins in the background 0.3 seconds after you stop working and moving the mouse pointer.
The problem with the background render is it can take the lion's share of all computer resources. If you work on a not-very-powerful computer or with large-resolution video, you won’t be able to efficiently and easily do much else until the process is complete. Even the latest Mac machines can become sluggish when doing background rendering with heavy effects on high-resolution timelines.
Rather than allowing Final Cut to start rendering things automatically, we suggest taking control into your own hands. Start rendering certain parts of the timeline manually (more on that in the next section below), and only when you need those parts to be rendered. Don’t waste your time waiting for Final Cut’s automatically starting background rendering to complete when you have to work of the edit now.
To turn the background rendering off go to Final Cut’s Settings > Playback and tick off the Background render option.
Ready to Watch? Render. Play
When you want to check your last touches to see how they complement the whole video, it’s time for play it back. Having background playback switched off to allow Final Cut to be more responsive means you need to start the render process yourself.
To render a portion of your project select the clip or clips that you want to render in the timeline, then choose Modify > Render Selection (or press Control+R).
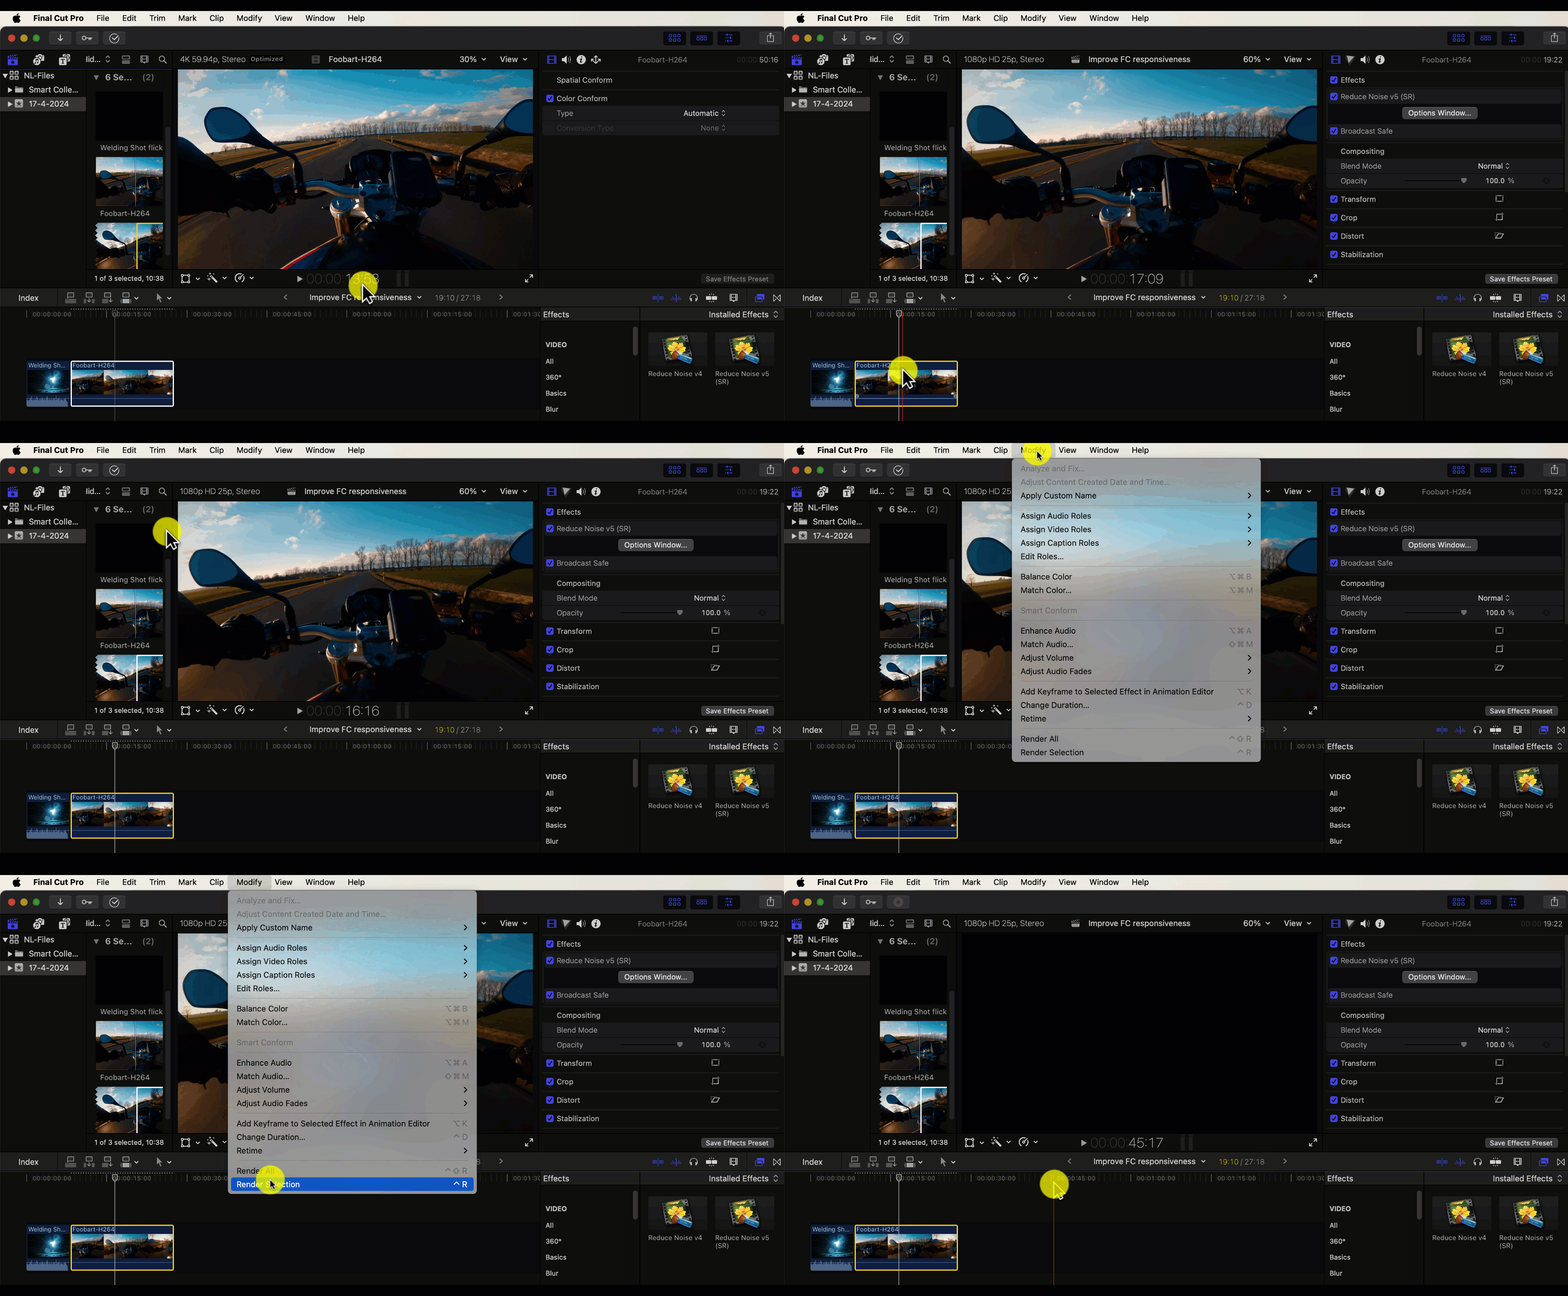
If you want to render all portions of your project, then go to Modify > Render All (or press Control+Shift+R).
Once the render is done, you can play that selected clip (clips) at full speed in Final Cut’s preview.
Create Optimized or Proxy Media
Final Cut Pro can read and playback many media formats, but it doesn’t mean all of them are suitable for editing. RAW files encoded with “slow” codecs can make editing and rendering very sluggish. To avoid that Final Cut offers transcoding to the Apple ProRes 422 format. Using optimized media will allow you to edit faster. The only downside of this option is the relatively large size of the optimized media files that may require some space on your hard drive.
If you have originally large frames and the final product also has to have the same high resolution, then using proxy media can also come in handy. When Final Cut creates proxy files they are encoded with Apple ProRes 422 Proxy format and usually are only 1/4 of the size of the original file. That allows to reduce and even avoid sluggish playback and dropped frames.
There are two places where you can transcode media and create proxy files:
- During the import of media into Final Cut
In the the Media Import dialog, enable the option Create optimized media or Create proxy media or both.
- In the Browser
Right-click the media file that is already present in the Browser, select Transcode Media… > Create optimized media or Create proxy media or both and click OK. (Note: If the original camera format can be edited with good performance, then the Create optimized media option is dimmed)
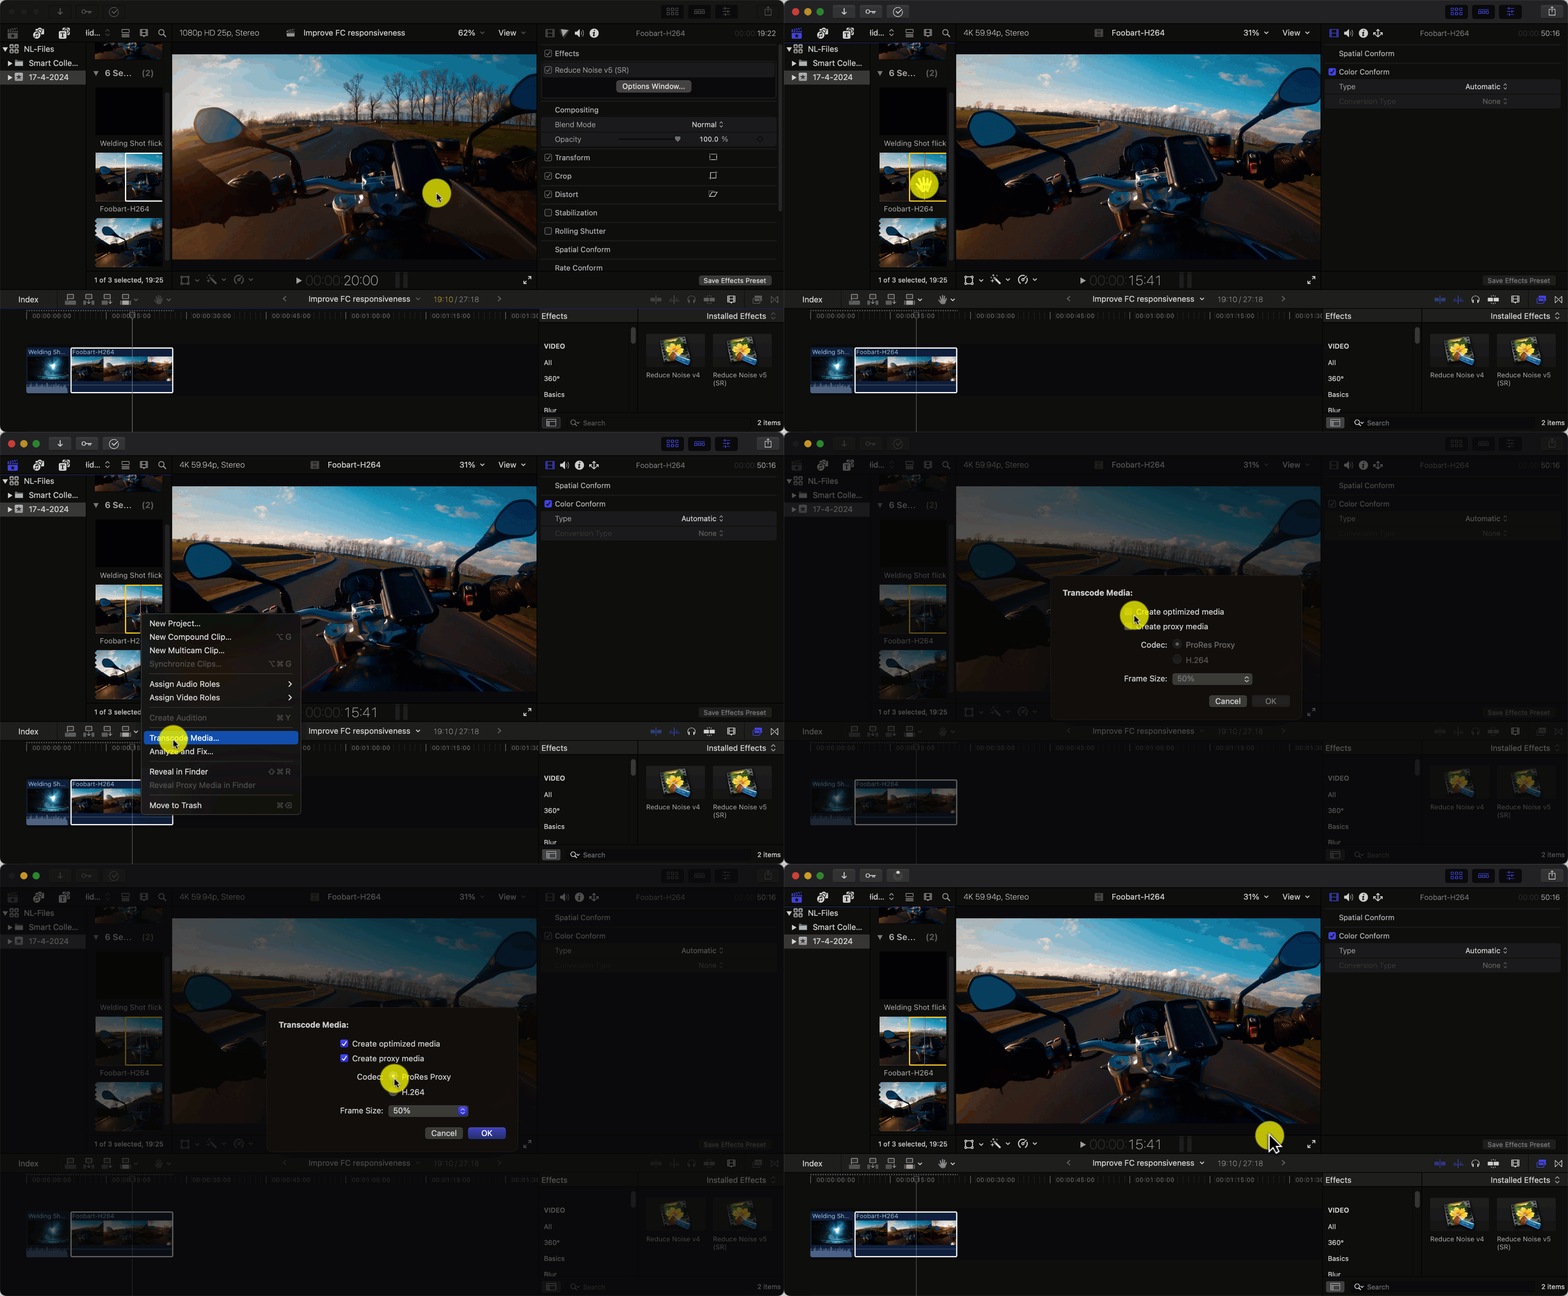
All transcoding happens in the background. When the process is complete, Final Cut automatically switches from camera native to optimized files and that speeds up playback and editing.
If you want to use proxy media for even faster playback, you can choose that manually using Final Cut’s View pop-up menu in the upper right corner of the viewer: choose Proxy Only there. Then the viewer works with lower-resolution media and that is significantly faster.
When using proxy media, don’t forget to use the View pop-up menu to switch back to the original ( Optimized/Original) files in two situations:
1. Before opening Neat Video’s Options window when you go there to build a noise profile for your clip. Switching to originals allows Neat Video to analyze the original noise of the clip. If Neat Video receives frames from proxy files instead, then the analysis and noise reduction will be inaccurate.
2. Right before the final render/sharing of your project. Unfortunately, Final Cut doesn’t do that automatically in this case and you have to manually disable proxy here as well.
Define Required Resolution and Reduce Larger Clips
These days almost any modern phone can shoot 4K clips, not to mention professional cameras and their capabilities. However, you do not always need to produce the final video in the same high resolution. For example, large frame formats are not always used in online video platforms. High-resolution video typically gets heavily transformed by the platform’s video codecs and sometimes gets downsized. It may be sufficient in some cases to upload a lower-resolution version.
At times, you may also need to downsize a clip in the edit, for example, when you bring a larger clip to a lower-resolution project or when you need to crop a part of the larger frame.
If done correctly, the size reduction can help to speed up the render process because applying Neat Video noise reduction (and any other video effects) to smaller frames is always faster than to larger frames.
In Final Cut, you can control the size of the frames used in the project using a Compound clip. For example, if you need to downsize a 4K clip to FullHD resolution to use it in a FullHD project:
- Open/create a FullHD project.
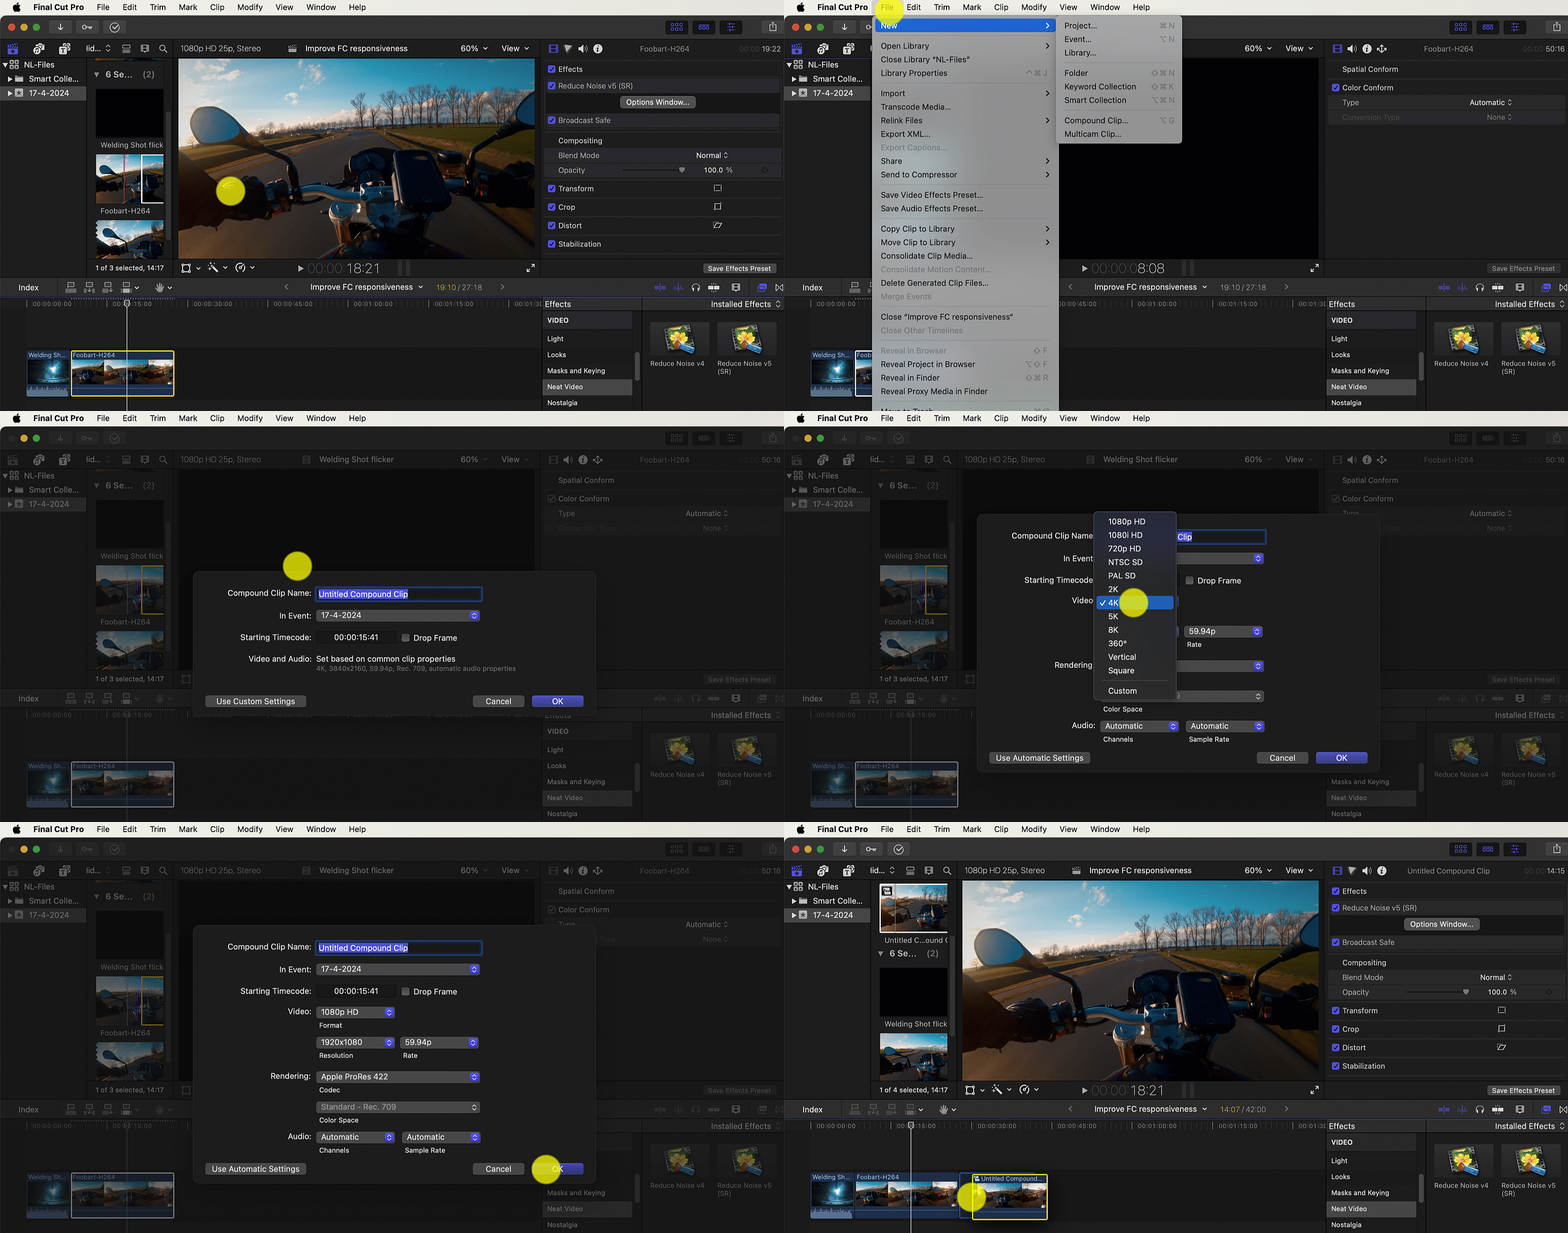
- elect the original 4K clip and create a compound clip from it: use the menu File > New > Compound Clip (or keys Option+G).
- In the pop-up settings window, select Custom in Video Properties and choose 1080p HD Format and 1920x1080 resolution (or different settings depending on your needs).
- Put the compound clip into the timeline of the FullHD project. Apply Neat Video to the compound clip in the timeline. Then Neat Video will receive FullHD frames for profiling and rendering and will work faster than it would with the original 4K clip. If the 4K clip was added to the same project without using a compound clip, then Final Cut would send the original 3840x2160 frames to Neat Video, and that would be slower).
Disable Heavy Effects
Another option to avoid slowdown during editing in Final Cut is temporarily disabling resource-intensive effects (Neat Video's Reduce Noise v5 (SR) is also one of them) once they're set up on your clip(s).
To disable specific effects, simply use Final Cut's controls to deactivate individual instances of those effects in one or more clips, individually for each clip. This ensures they won't impact performance as you edit.
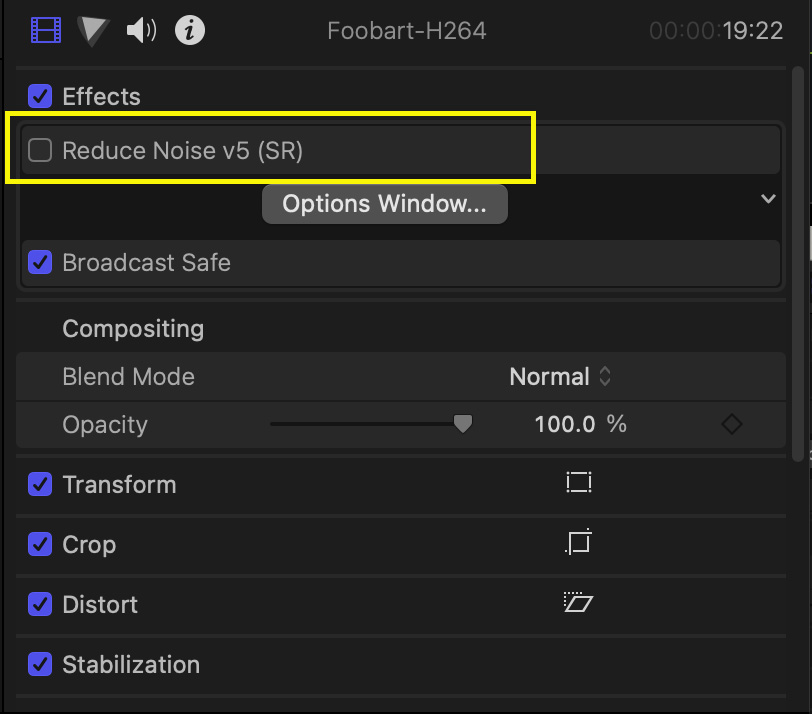
Alternatively, you can disable all effects applied to a clip by selecting it on the timeline and unchecking the Effects option in Inspector. You can do that for several clips simultaneously if you select them and then uncheck the Effects option for the whole selection.
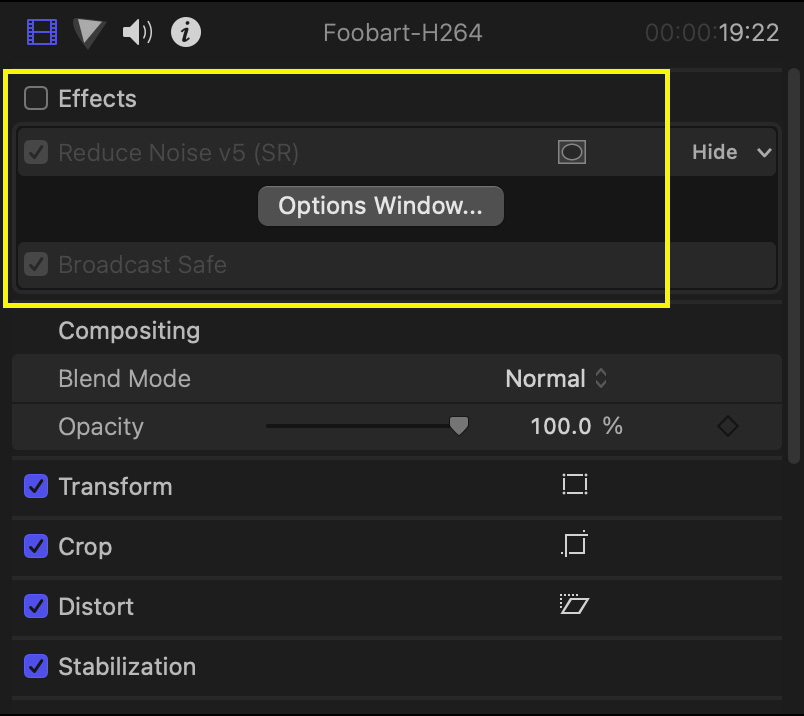
Remember to re-enable each disabled effect individually or all effects (disabled using the Effect option) before finalizing your project for export. Remember that those settings are individual for each clip in the timeline, so make sure you re-enable them in each clip. You can do that for several clips simultaneously if you select them and then enable the Effects option for the whole selection.
Stop Unnecessary Software
Every software currently running utilizes your computer’s resources. While some of this software is necessary for system operation or your current task, others may be a leftover from previous activities and may be not needed at the moment. To free up the limited resources, close all applications that are running but are not necessary for your current work. For example, many web browsers can use a lot of system memory even when not being actively used.
To identify all the applications currently running and utilizing significant amounts of system memory, check the Activity Monitor (further details below) and close those that are unnecessary at the time.
Check Available System Memory
Experiencing a slowdown may also occur due to insufficient system memory. If you see that the computer is running low on memory (you can check that using Activity Monitor and its indicators shown in the Memory tab; for example check the Memory Used and Swap Used indicators in the bottom of the window) when working on your project or when rendering/exporting the project, then please consider upgrading/increasing the physical memory installed in it or using a different machine with more memory resources. Apple recommends having 32 GB RAM or higher for complex 4K projects. Opting for that or even more memory can provide a buffer for smoother performance of Final Cut in the future as well.
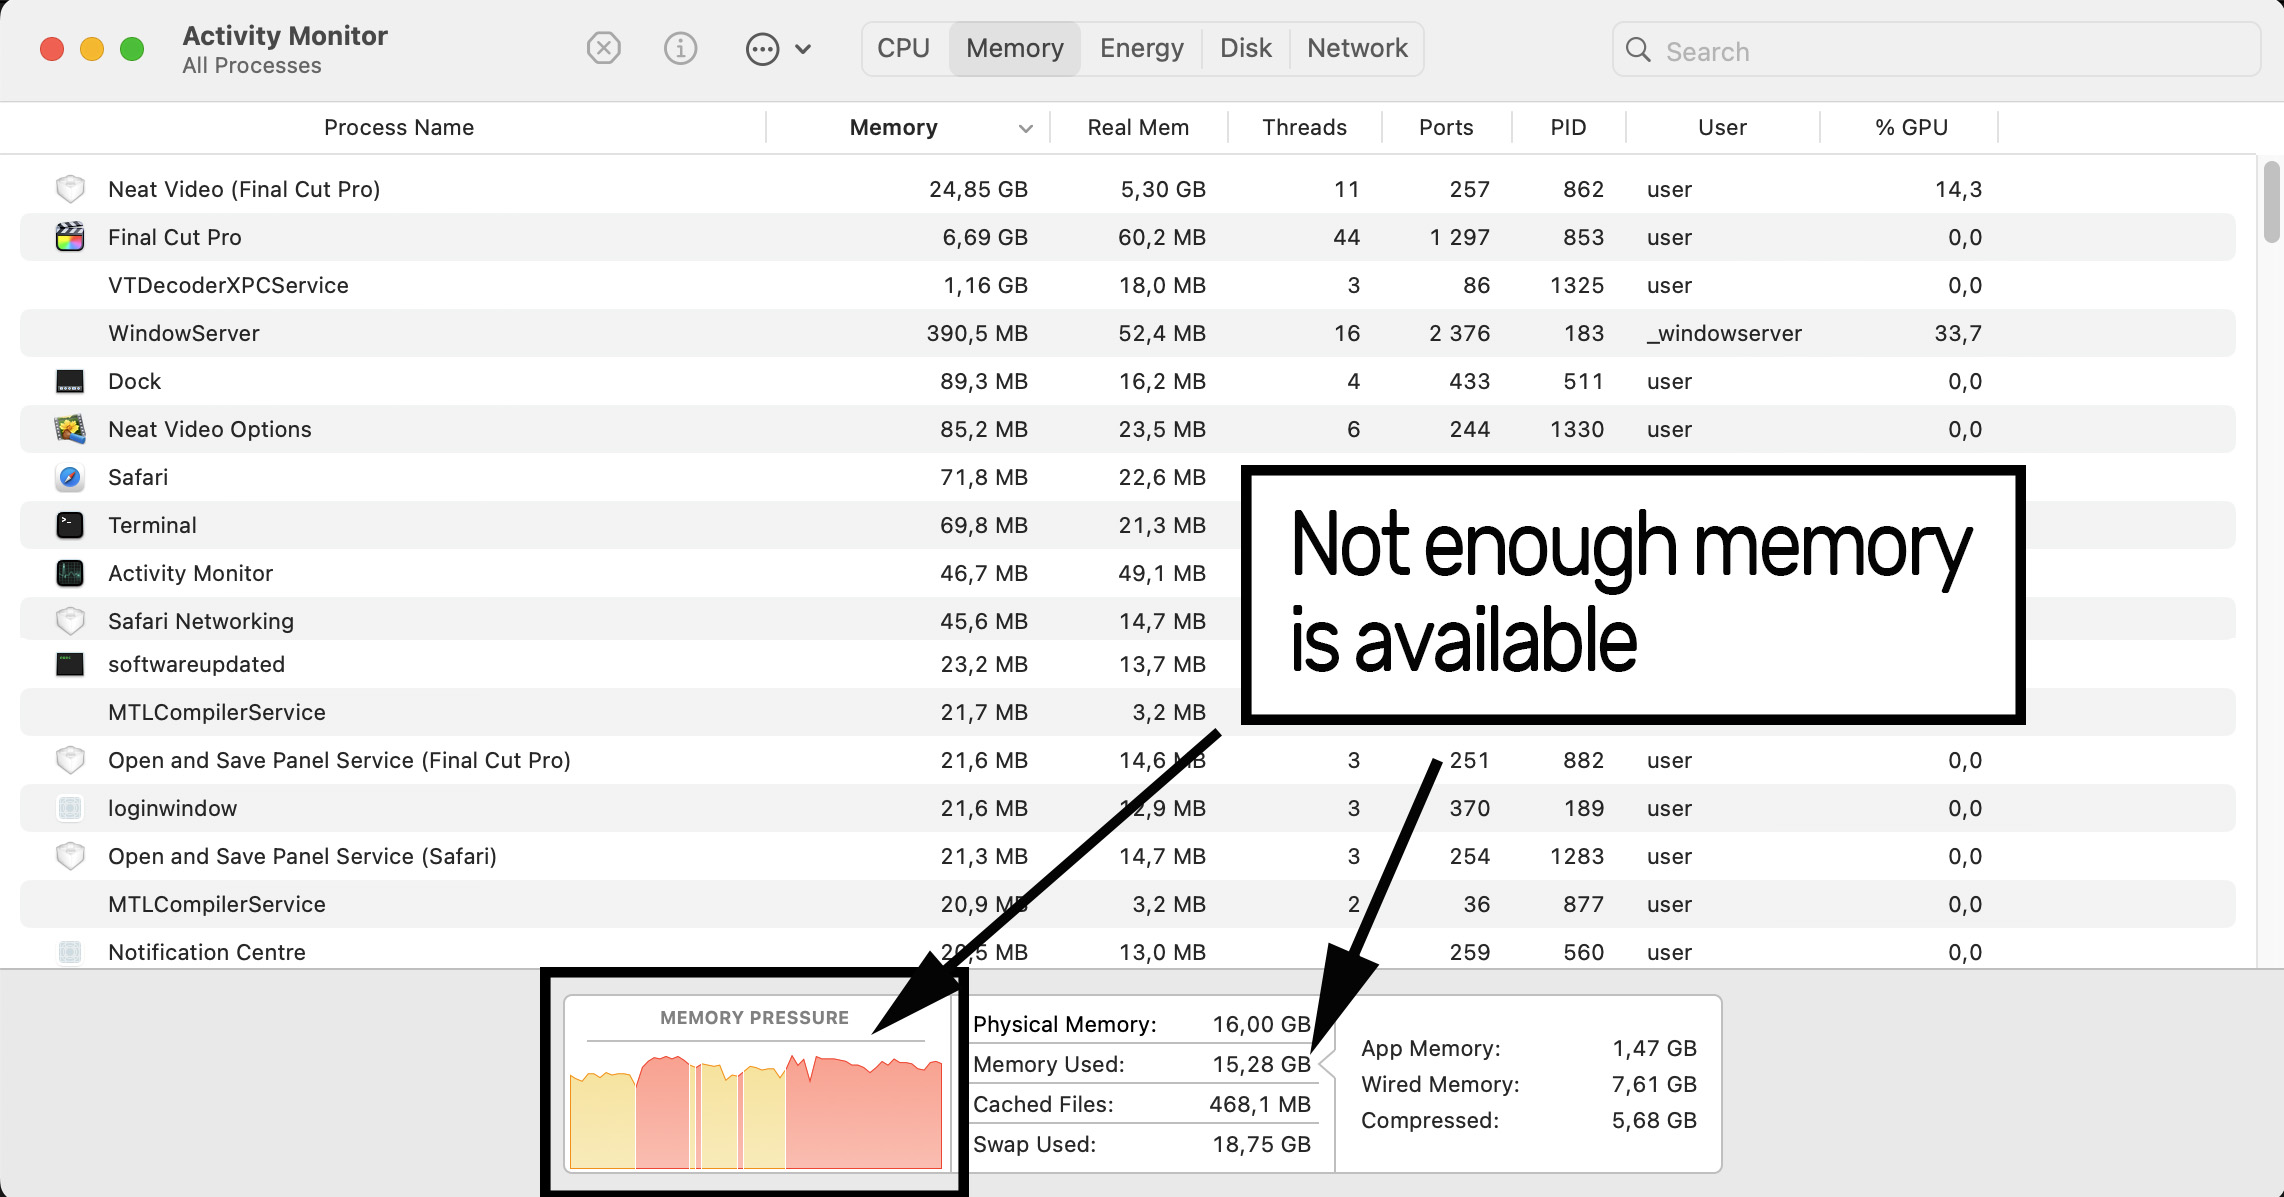
If you cannot change the amount of physical memory and cannot use a different computer, then please revisit the ideas listed above in the ‘Define Required Resolution and Reduce Larger Clips’ section, as lower resolution project/video usually needs less memory to begin with.
Use High Quality Only When Necessary
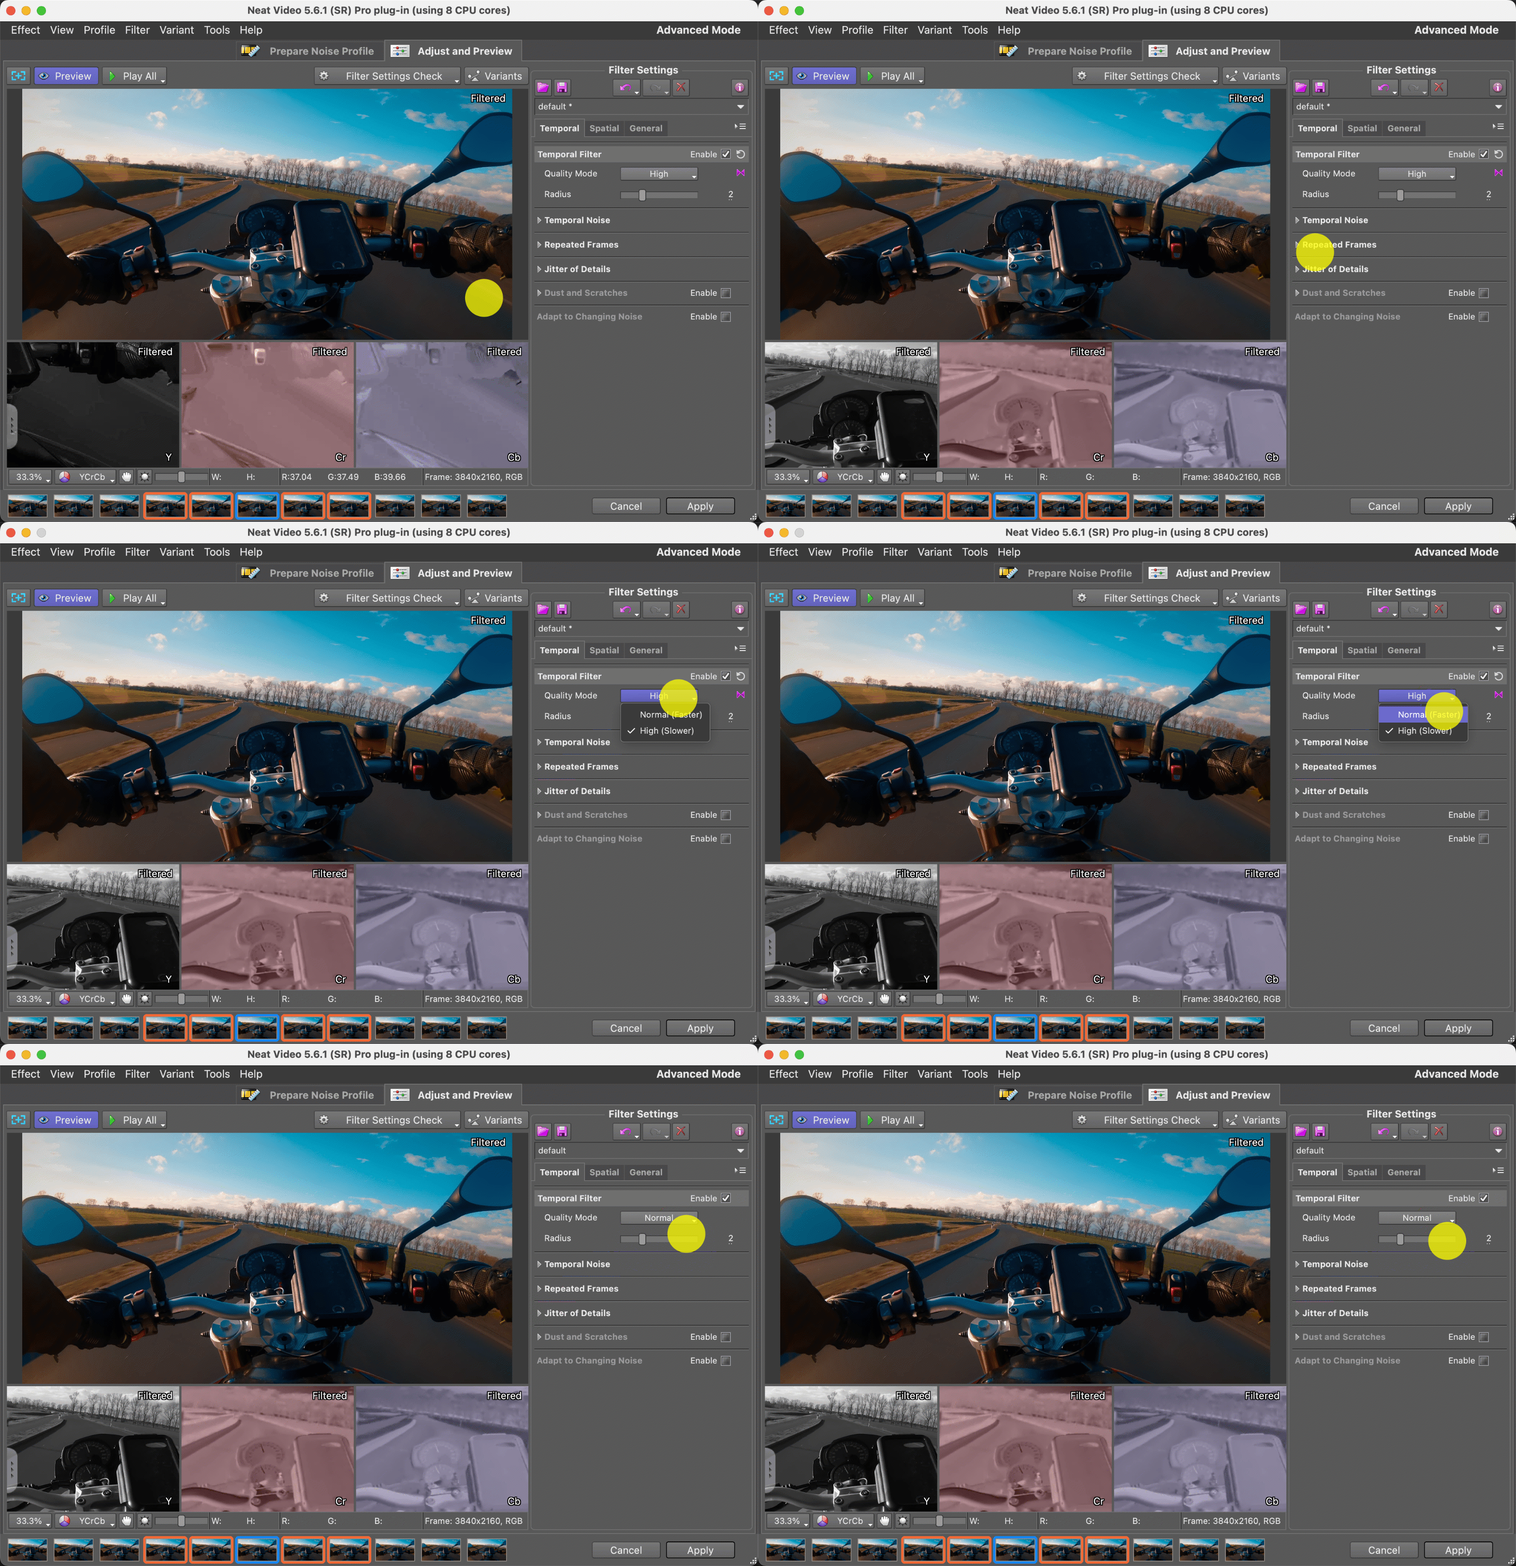
Neat Video has the Quality Mode: High settings in the Temporal and Spatial filters. Those high quality modes are not default (the default is Quality Mode: Normal) but you may be tempted to enable them trying to get a bit better denoising results (preserving a bit more details while reducing the same amount of noise in some cases). The high quality modes require longer processing so if you are not sure there is a significant improvement in visual quality of the results from using that option, then it is best to leave the Quality Mode setting at Normal and save processing time.
Turn Off Skimming
Skimming is another option that can suck out a significant chunk of your computer resources. When you work with large frames and have both skimming and background render enabled, Final Cut can become extremely slow. The waiting time for each frame to be updated can easily get to several seconds.
On the other hand, skimming is an extremely useful feature of Final Cut. It can save you a ton of time if you are working on a massive project with multi cam editing.
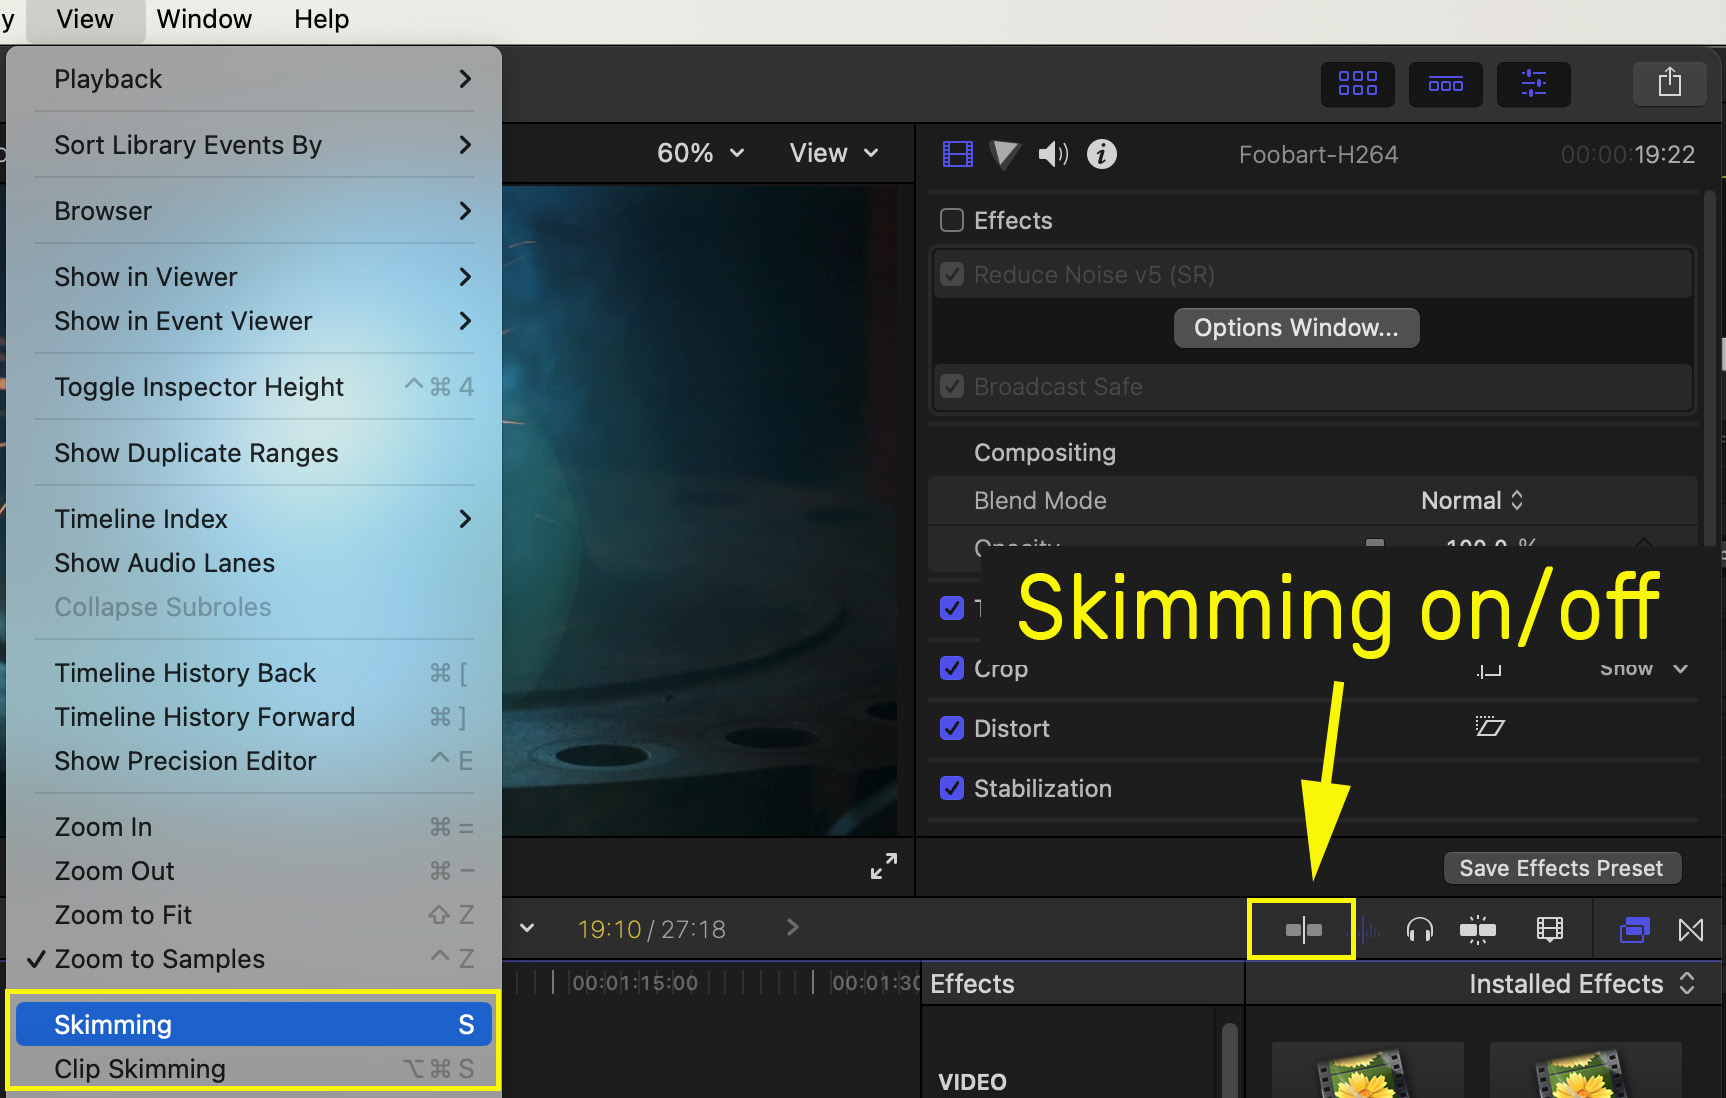
So if you see that your computer is choking, try turning off both normal (timeline) skimming and clip skimming. You can control normal skimming with the S key, in the menu View > Skimming or turning on/off the Skimming icon in the toolbar. Clip Skimming can be switched off using the Option+Command+S key combination or using the menu View > Clip Skimming .
Assign GPUs and Measure Performance
If you have two or more GPUs in the system, in some cases (not always) they can be distributed or divided between Final Cut itself and effects such as Neat Video. This may be possible to do in the following way. First go to Final Cut's Settings… > Playback > Render/Share GPU and check if you can select one GPU that you want to be used by Final Cut itself (this choice may not always be offered by Final Cut though), so that the other GPU(s) would be left available for the needs of 3rd party effects and other GPU users. If you can explicitly choose one of two (or more) GPUs there, this this method can be used. Then you can proceed to Neat Video’s Options Window, to its menu Tools > Preferences > Performance and there you can instruct Neat Video to use only that other GPU (or GPUs) not used by Final Cut. Such separation of GPUs can improve Final Cut’s performance and make playback smoother.
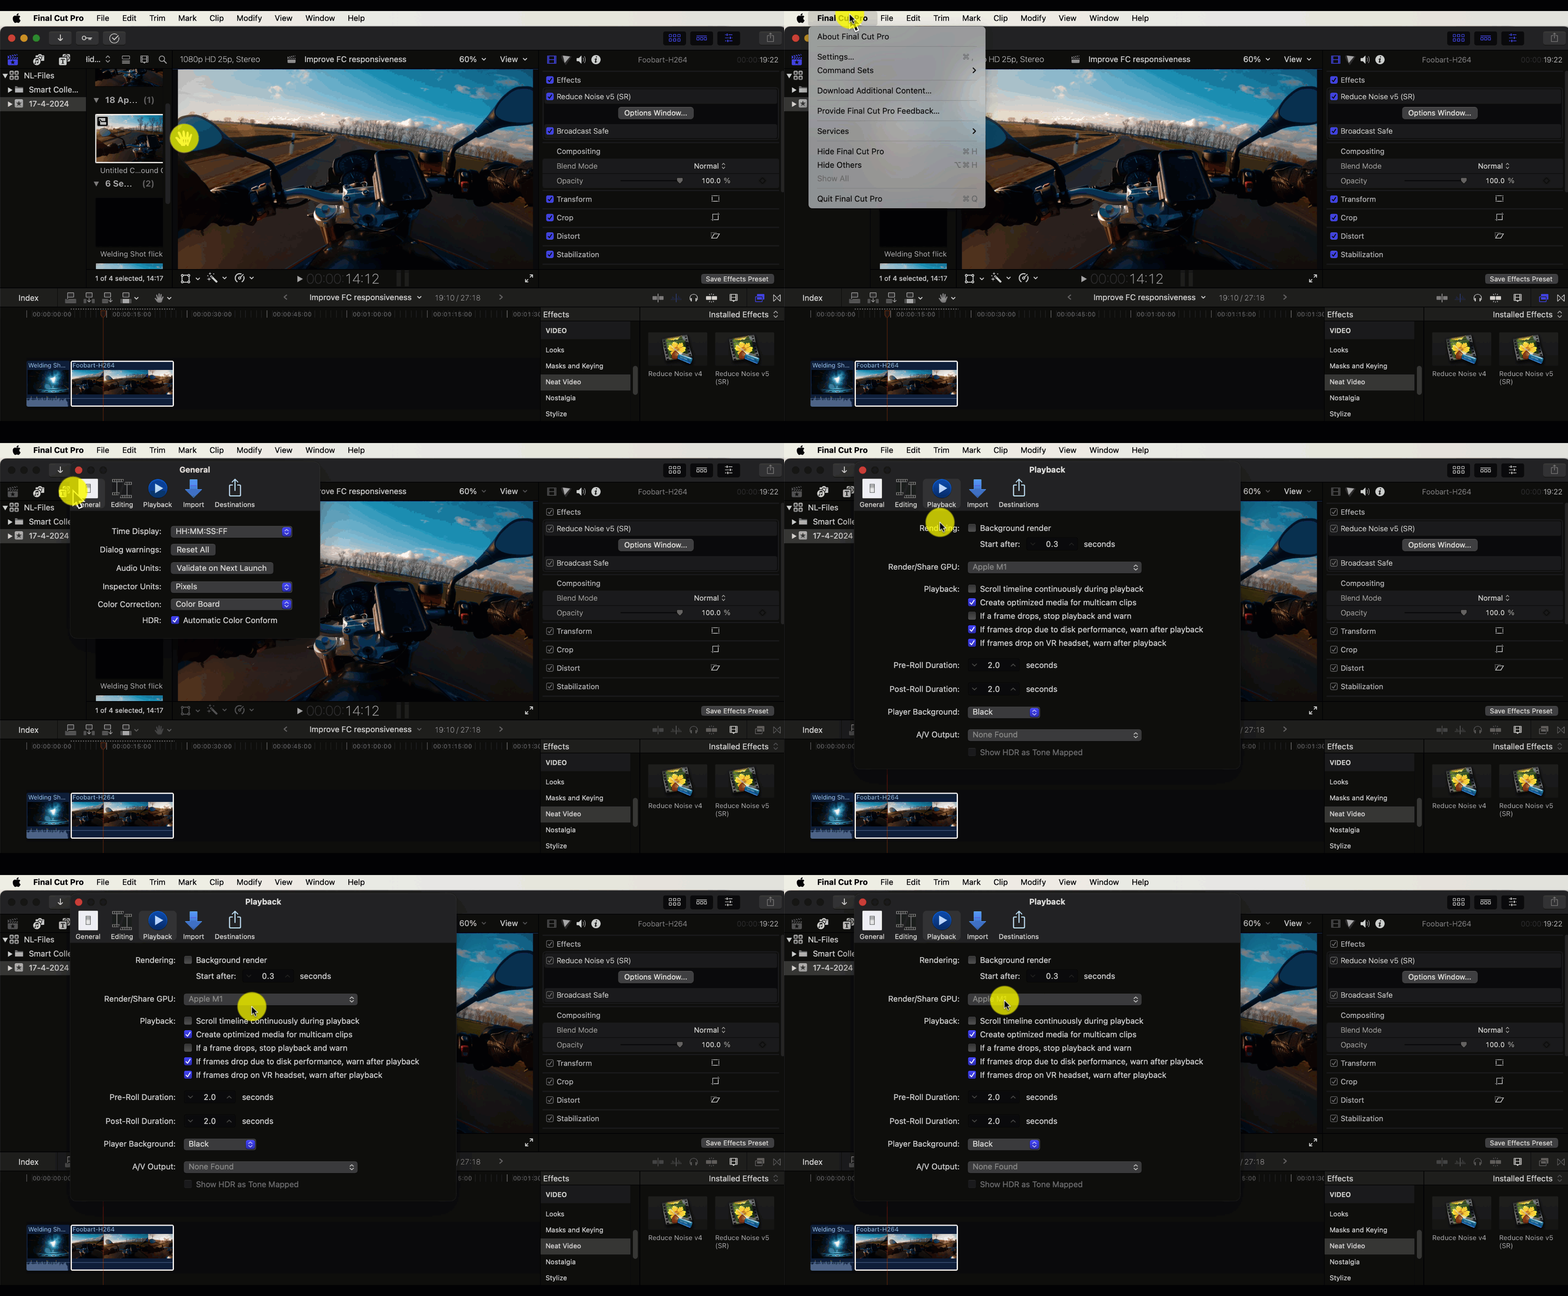
As you can distribute the GPUs between Final Cut and Neat Video in different ways or not distribute at all (letting them both use the same fastest GPU for example), you may want to run speed tests (for example you can render a small test project with one relatively short clip and measure the render time) with different combinations of the Render/Share GPU option in Final Cut’s Playback settings and GPU(s) selected in Neat Video Preferences. The fastest combination may depend on your hardware and your project settings.
Using Another Mac to Render
If your current computer is struggling when rendering/sharing the project, then you may want to consider using a different machine for that final render/share.
When choosing such a render machine you would likely first of all want to know if that machine would actually be faster. You can check the specifications of the machines and compare the CPU, GPU and memory size to get a rough idea of whether it can do it faster or not.
You may also want to check its actual performance. You can do that using the standalone tool called NeatBench available in this page. You can download and run it freely on any machine to measure the speed of the machine and compare it with the same measurements done on your current computer. This will give you a rough idea of whether it would help to use the alternative machine for render.
If the alternative computer is faster, you can copy or move your project there for further editing or just for final render/share. Just ensure that the new computer has Final Cut and other necessary software, including the Neat Video plug-in, installed and correctly licensed. If you need any help with transferring your license for Neat Video or require an additional license, please get in touch with our support team. We're here to help!
Conclusion
As you can see there is more than one thing you can do to make your Final Cut editing smoother. Try these ideas, combine them and let us know what worked for you. If you have more ideas or tricks that you use in your work to help Final Cut and Neat Video work better together, please share those with us. We want to learn from you too.
First published on December 1, 2020