Battling dust, scratches and flicker in animated films of long ago
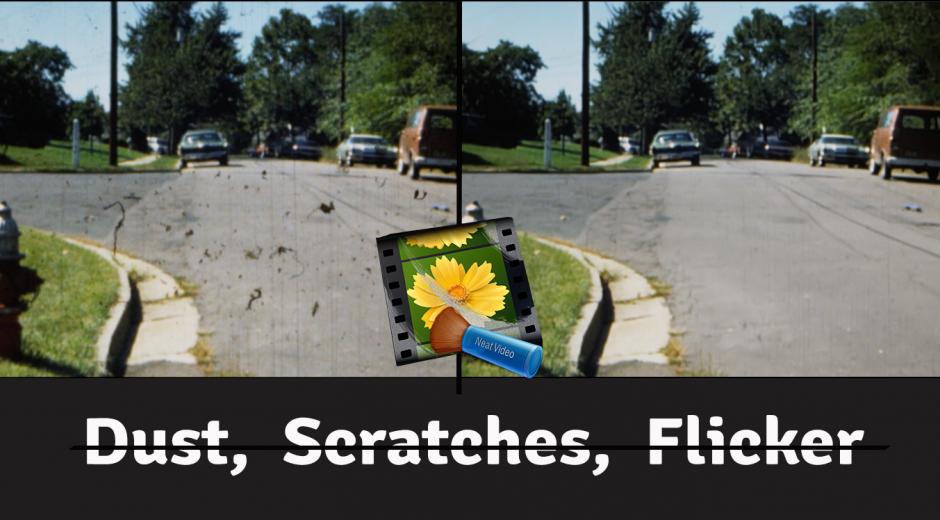
Guest article by Alan Feldman
Back in the summer of 1976, my best friend, George Chartier, and I thought it would be fun to make an animated movie of a race between a skateboard and a soccer ball and the antics that occur between them. We shot the film in Super 8. Being animation, it took a long time to shoot! We shot the outdoor scenes in 1976 and finished shooting the titles in 1977, which is also when I finished the editing. The film is called The Great Race (TGR).
Fast forward a few decades. I had all of my Super 8 movies transferred to digital by MyMovieTransfer.com. Defects that were not all that noticeable when played with a movie projector on a movie screen across the room become quite noticeable when viewed on a bright monitor across the keyboard! Especially bad were all the dust and scratches. Their presence made the film almost unwatchable. But this is where Neat Video comes in. You can see the before and after versions of the movie here:
Enjoy the finished product first:
Then see what I started with:
Pretty amazing, eh?
There were many technical problems, but I will concentrate on noise, dust and scratches, and flickering this time, and share my knowledge with others who might find themselves trying to save memories of long ago.
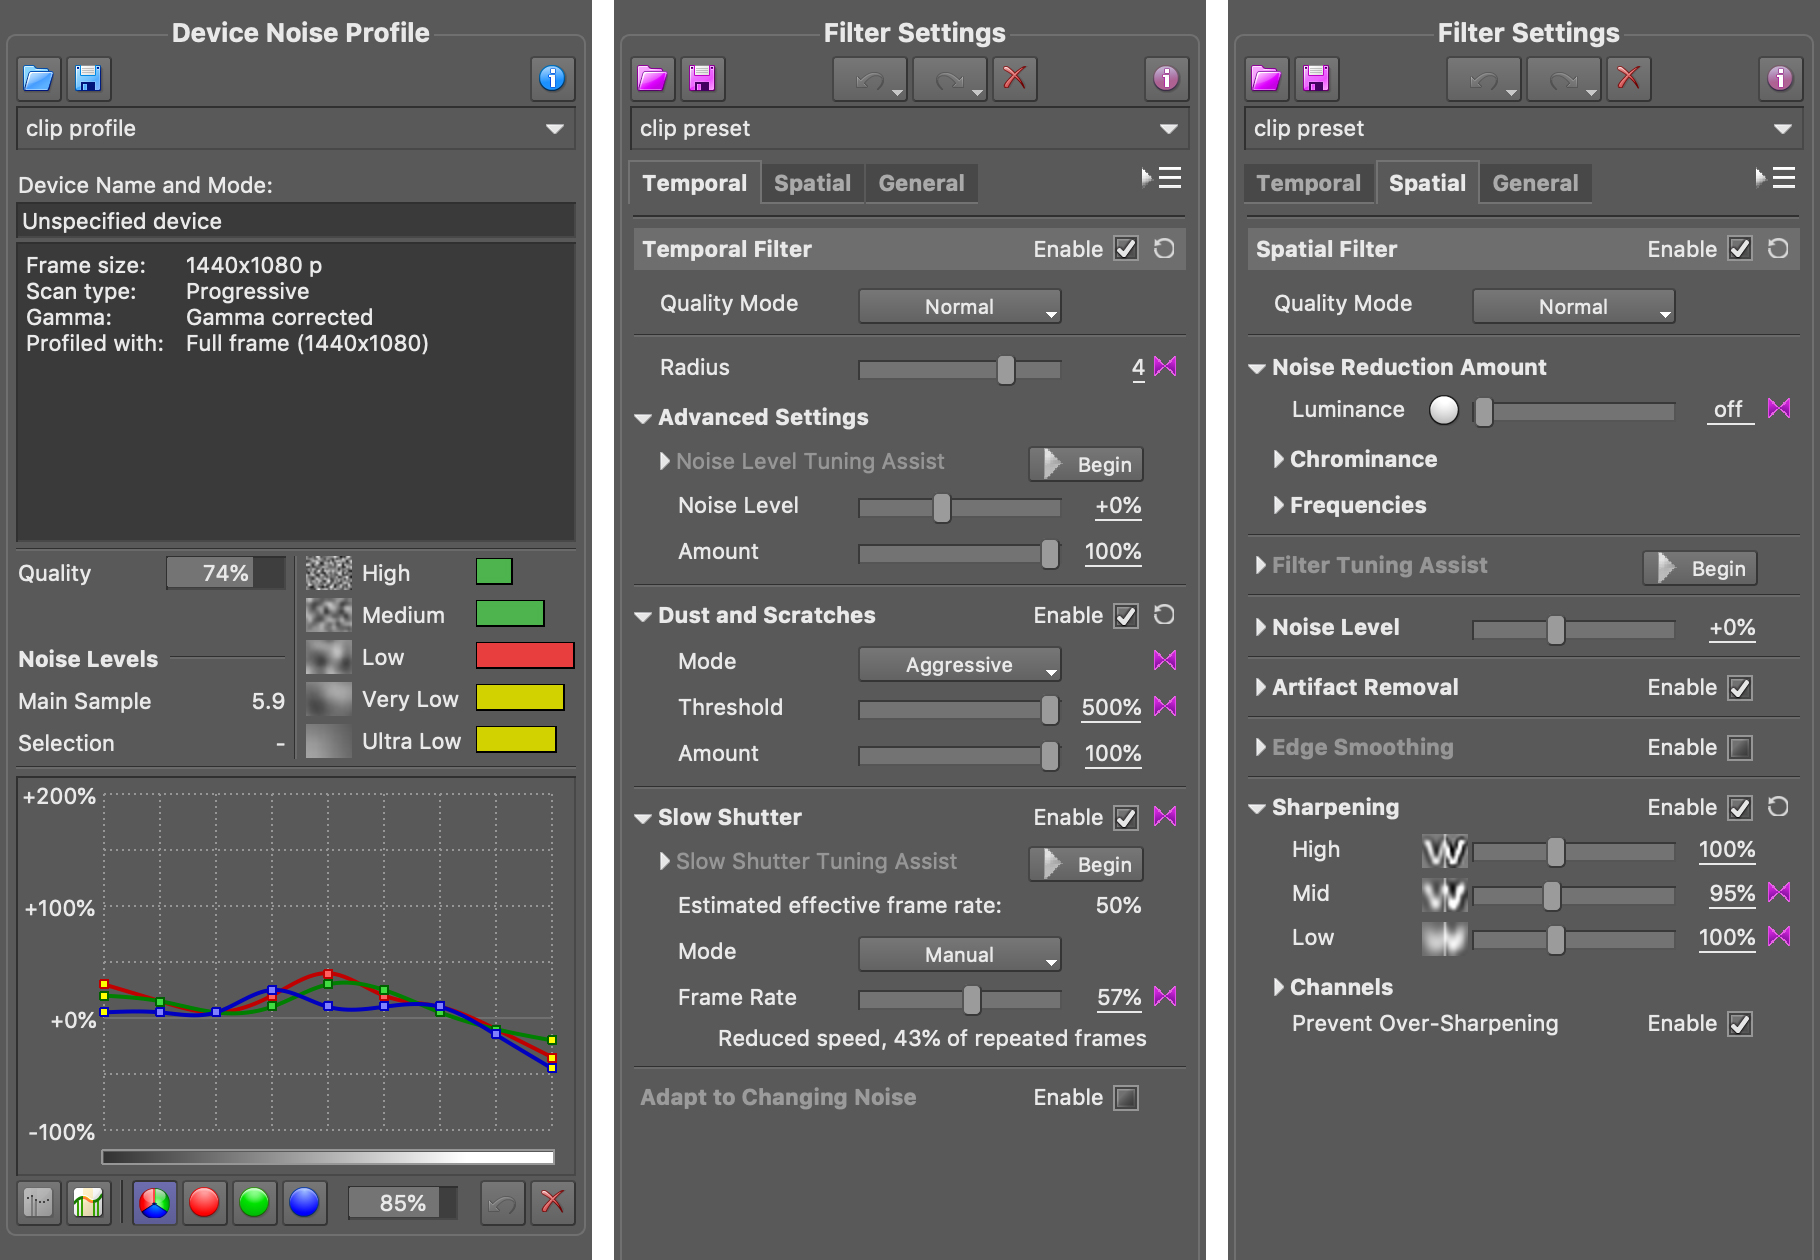
The editing was done in Final Cut 10.4.6. Neat Video v4.8.5 was used for noise reduction and the removal of dust and scratches. Later, when Neat Video v5 came around, it was added to the mix primarily for its flicker filters.
Do general filter adjustments first
It’s a good idea to have Neat Video applied first, followed by any clip effects you need. There may be cases where it might be helpful to put a color board and/or color curves effect to help smooth out the flickering before Neat Video, but then you’re doing some of the work that Neat Video can do. The remainder of the effects should definitely be placed after Neat Video.
On the Temporal tab, I experimented with the radius and I ended up using values from 2 to 5, most often 4. If there was some flickering, I almost always used 5.
You’ll find yourself leaving most of the settings on the Spatial tab alone. Sometimes turning the Luminance down to 0 helped to make the image sharper without affecting the noise level. In the Sharpening section, I almost always had High, Mid, and Low set to 100%. Low seems to help the most with sharpening.
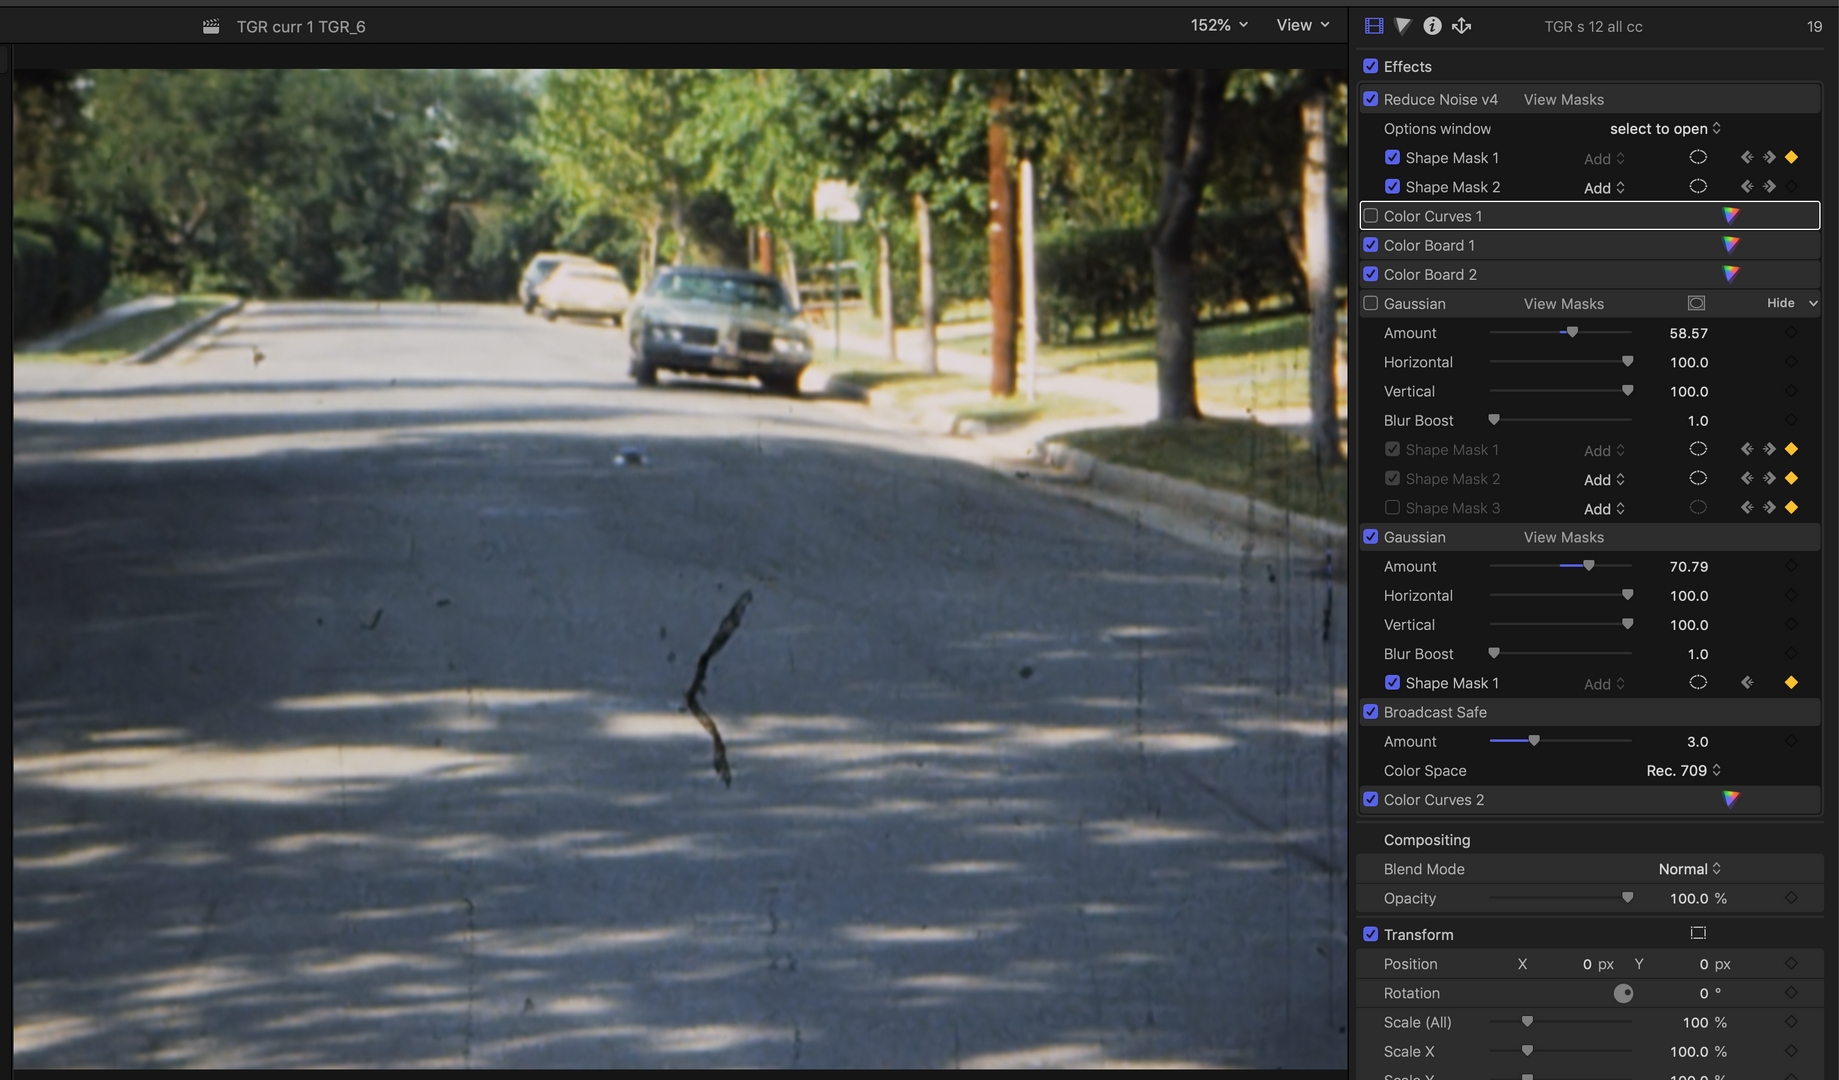
Reduce flicker
If you have worked with archive footage before, most likely you are aware of flickering that may be present in such old films. Neat Video v5 introduced two flicker filters: Local Flicker and Frame Flicker (global) that I found to be very handy.
Since most of the de-noising and the reduction of dust and scratches was already finished when v5 came out, I used it primarily for eliminating flicker. To avoid having two instances of Neat Video applied to a clip, I would take a clip where v4 was used, export it using an intermediate codec such as Apple ProRes 422, re-import it, and only then apply v5. Otherwise, render times and sluggishness of Final Cut would kill the edit. In some cases I had to use two passes of v5.
In the most difficult cases you can find some low-frequency flicker left over. This is easily fixed by doing Video Animation on the controls in the Exposure Panel of the Color Board or similar tools in other video editing software. Usually you only need to add relatively few keyframes. (For how, see, e.g., https://help.apple.com/finalcutpro/mac/10.4.6/#/ver8e3f2325.) When you do this you must use the LUMA waveform (or similar tool) to see what you’re doing. Sometimes the RGB waveform will be of use. Either way, the video scope is your friend! What you need to do is animate the Exposure controls in the color board to keep the brightness steady.
When flicker is localized in certain areas, you will find Local Flicker filter to be useful. There are a couple of caveats when using the Local Flicker filter. First, you must use the noise reduction feature. If you disable it, the filter will not do anything. Second, it sometimes makes parts of animated objects disappear, just like the Dust and Scratches filter does. That is happening because the filter can mistake fast motion with flicker signal.
At times you may need to use the manual trick for battling local flicker, the steps are going to be similar to dealing with difficult cases of frame flicker. That will result in the need to use a mask and animate the Exposure parameters.
Here is an example that shows what the Local Flicker filter can do for you. No manual frame-by-frame adjustments (animation of the Exposure settings) were needed for this particular clip.
[A quick side note: Even if the flickering is not blatantly obvious, it is still worth fixing because it will provide a more pleasing image, even if the viewer wouldn’t consciously notice the original flickering. Also, flickering in your peripheral vision is quite distracting, meaning that it is just as important to fix it when it is not the subject that is flickering!]
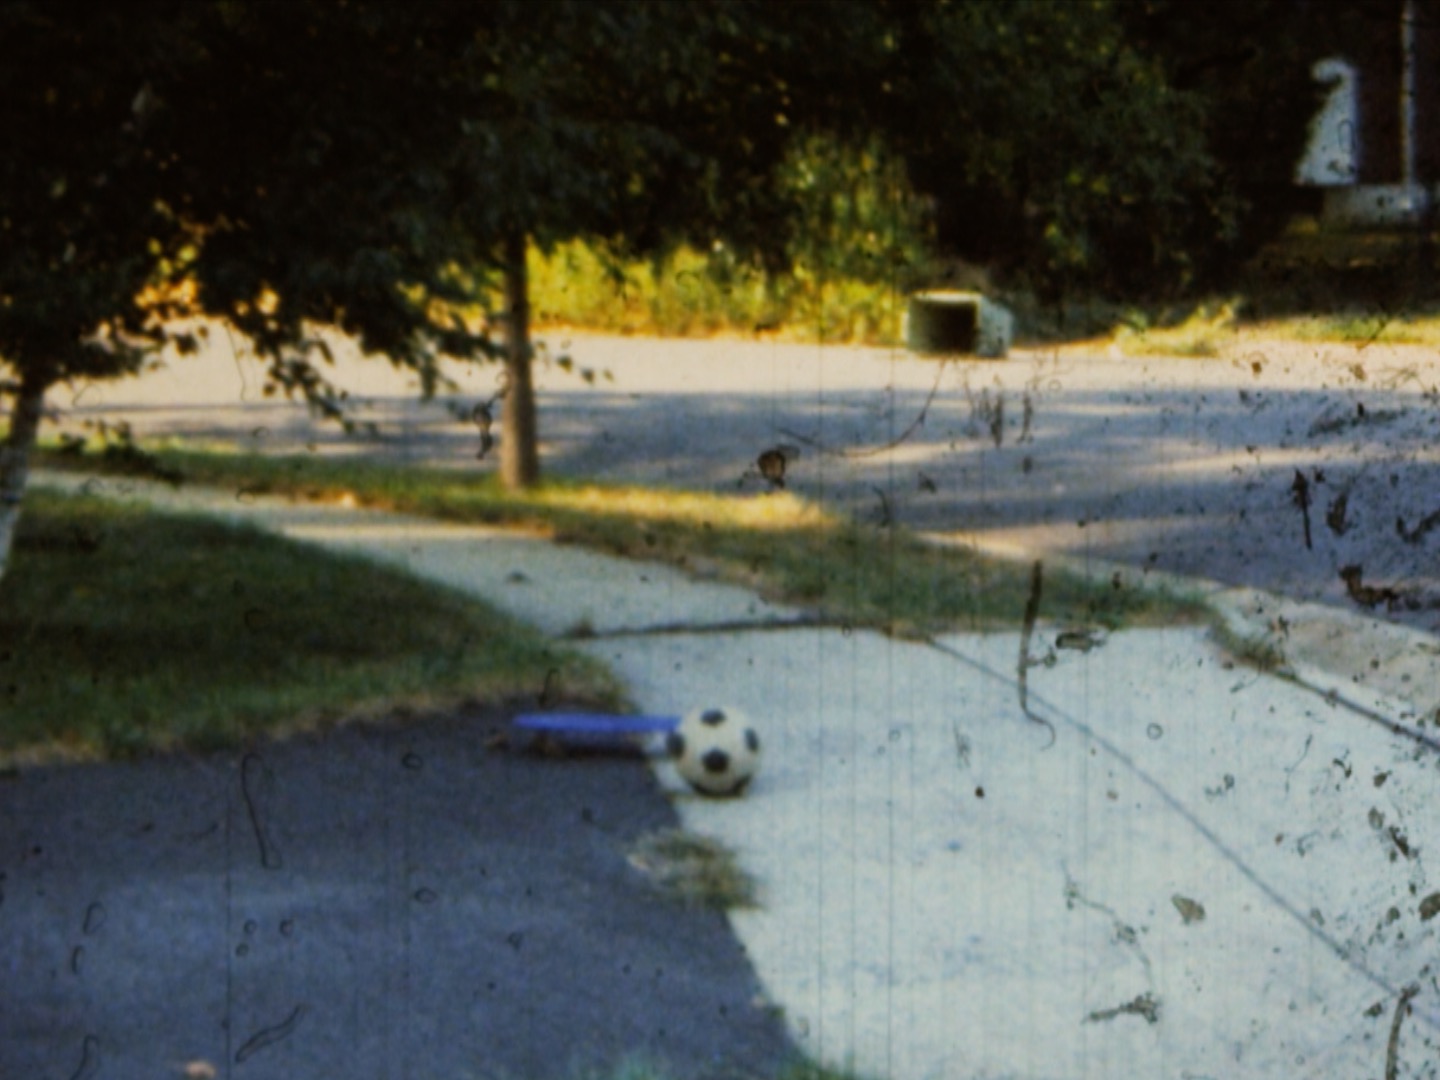
Utilize Slow Shutter/Repeated Frames
Frame rate conversion and retiming (required in this project, see below) generally add duplicate frames to the footage in the Timeline. This duplication has to be taken into account by Neat Video via Slow Shutter (v4)/Repeated Frames (v5). The Slow Shutter/Repeated Frames feature needs to be told the repeat rate and is critical for the Dust and Scratches filter to work properly (and perhaps the Local Flicker filter, too, but I did not test that).
Conform frame rate
In my case, the original footage was shot at 18 fps, but that’s not a supported frame rate in Final Cut, so I had it convert it to something else. I chose 29.97 fps. Final Cut duplicates the first and second frames out of every group of three consecutive frames, resulting in a group of 5 frames (2 2 1) for every original group of three. That is how you convert 18 fps to 30 fps. Final Cut then slows down playback by 0.1%, giving you 29.97 fps. You can pick other frame rates, of course.
Audio/Video sync
There are nine sync points in the movie. So I used Final Cut’s “Retime” function to slow down some of the clips accordingly. At last I could have proper synchronization with the music!
Here is what you can achieve with a properly set Repeated Frames/Slow Shutter.

Set Dust and Scratches filter
For the Dust and Scratches filter, I increased the values to the point of diminishing returns. Every shot was unique! I used Threshold values of 150%, 330%, and 500%. I didn’t have any need for finer steps. Sometimes Aggressive helped a lot; other times it didn’t help at all.
Here’s an example in which Neat Video v4.8.5 literally obliterated a huge dust clump and all the dust specks around the image:
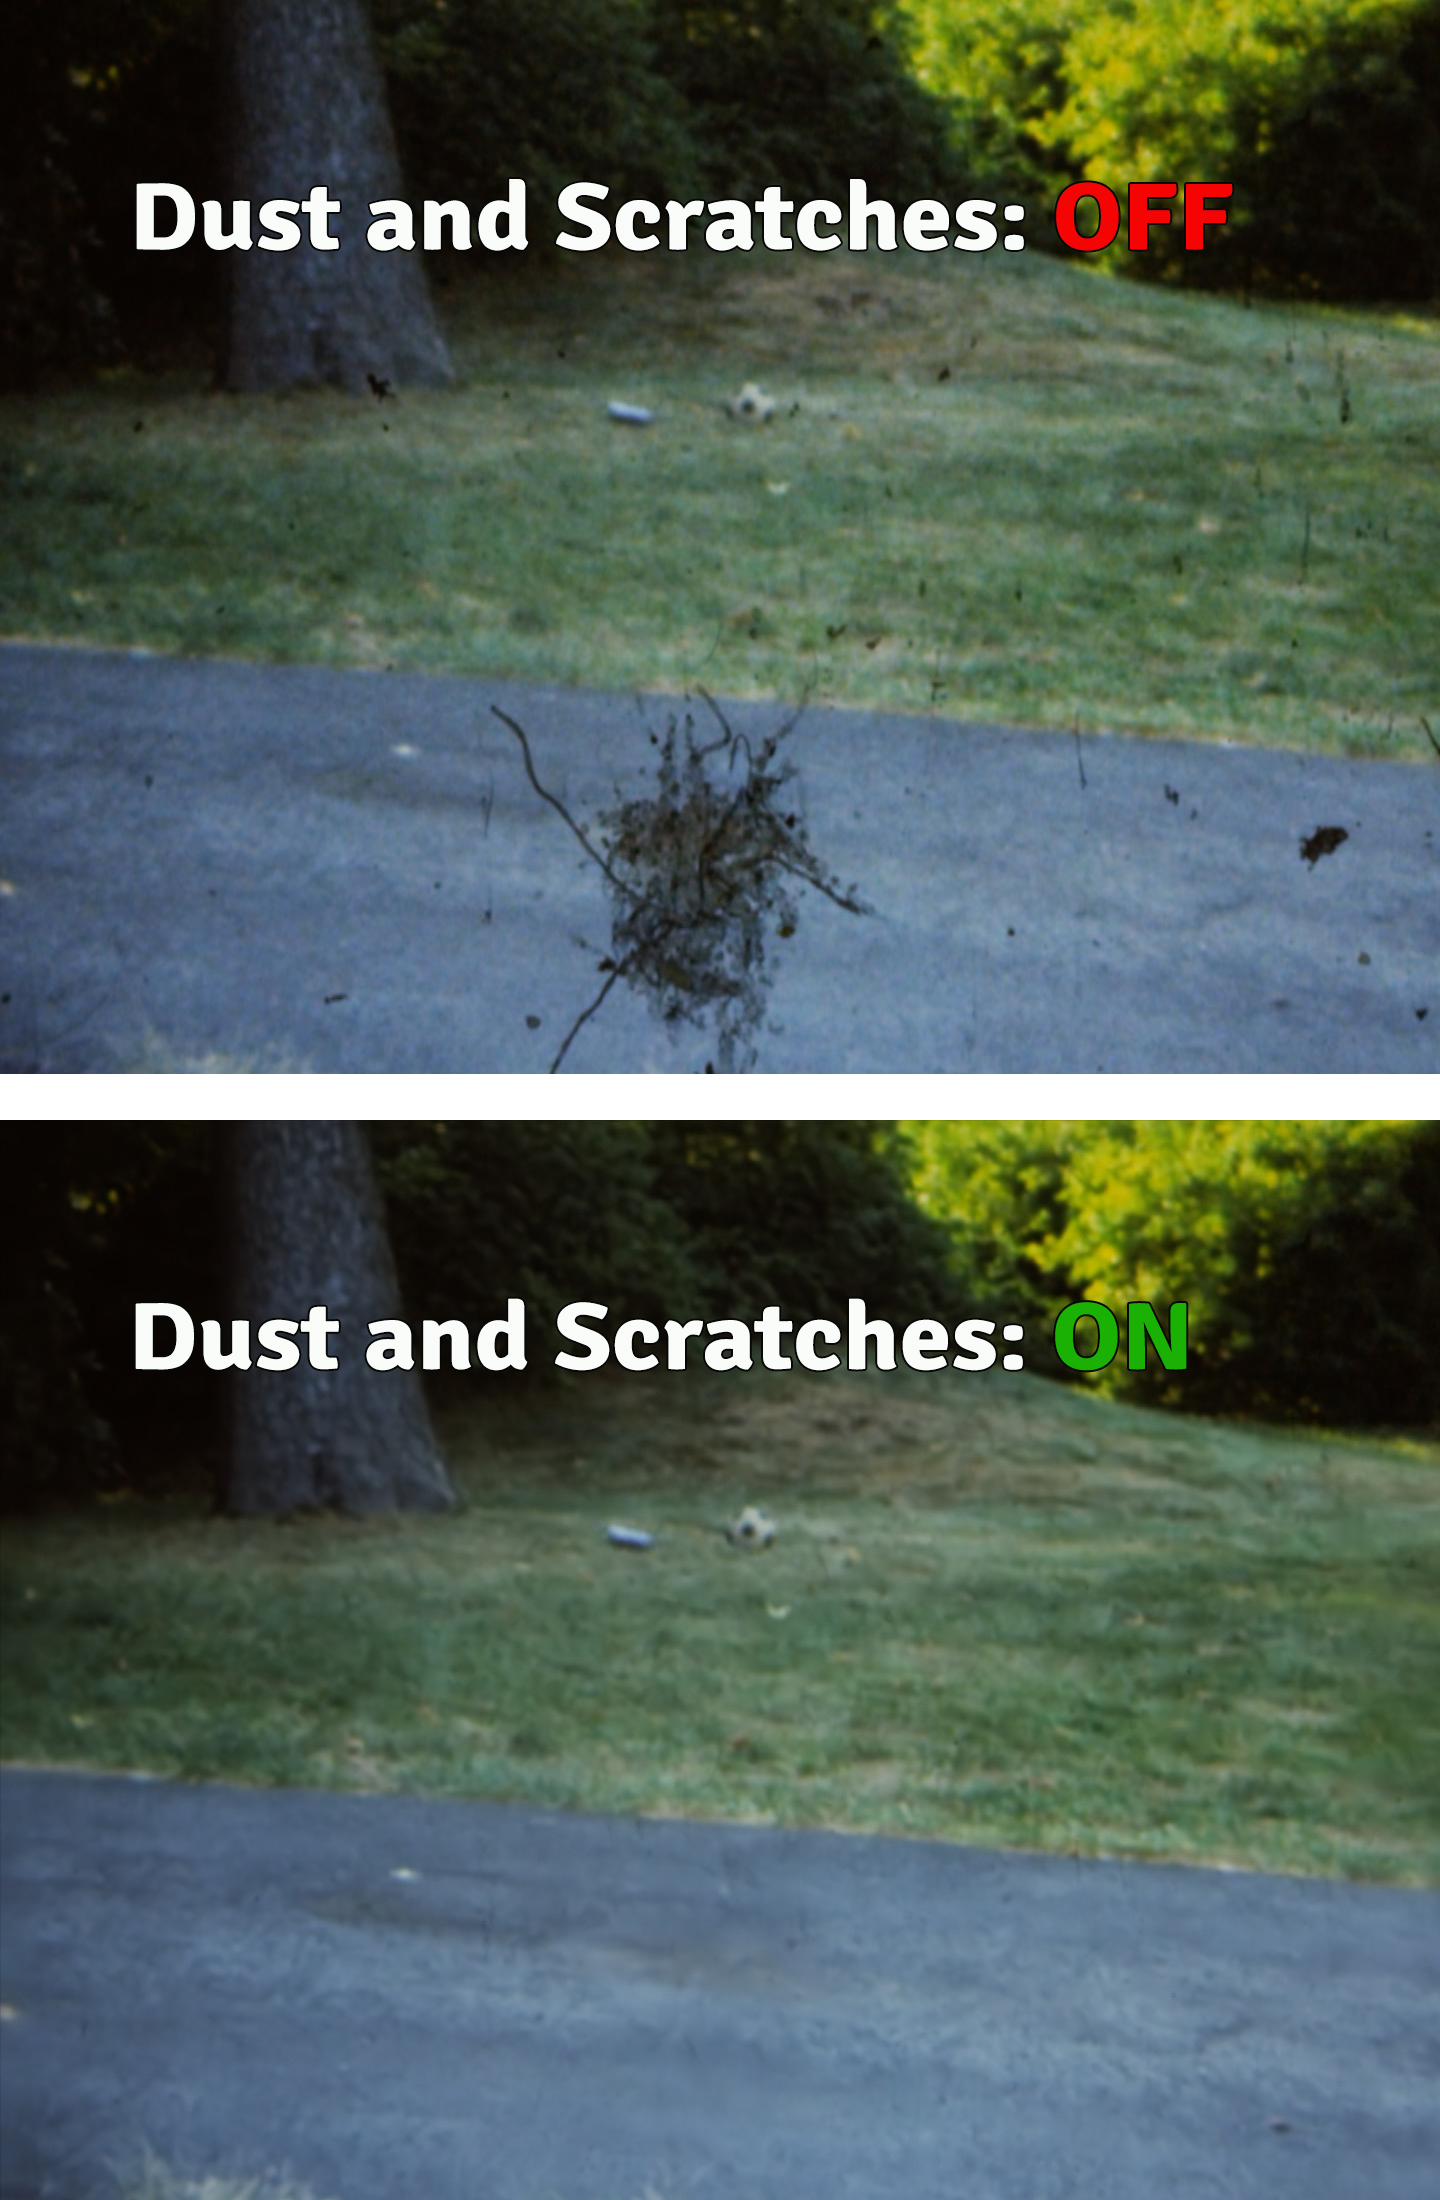
That’s pretty hard to believe, so I made a video to prove I didn’t cheat:
The settings used for the above example:
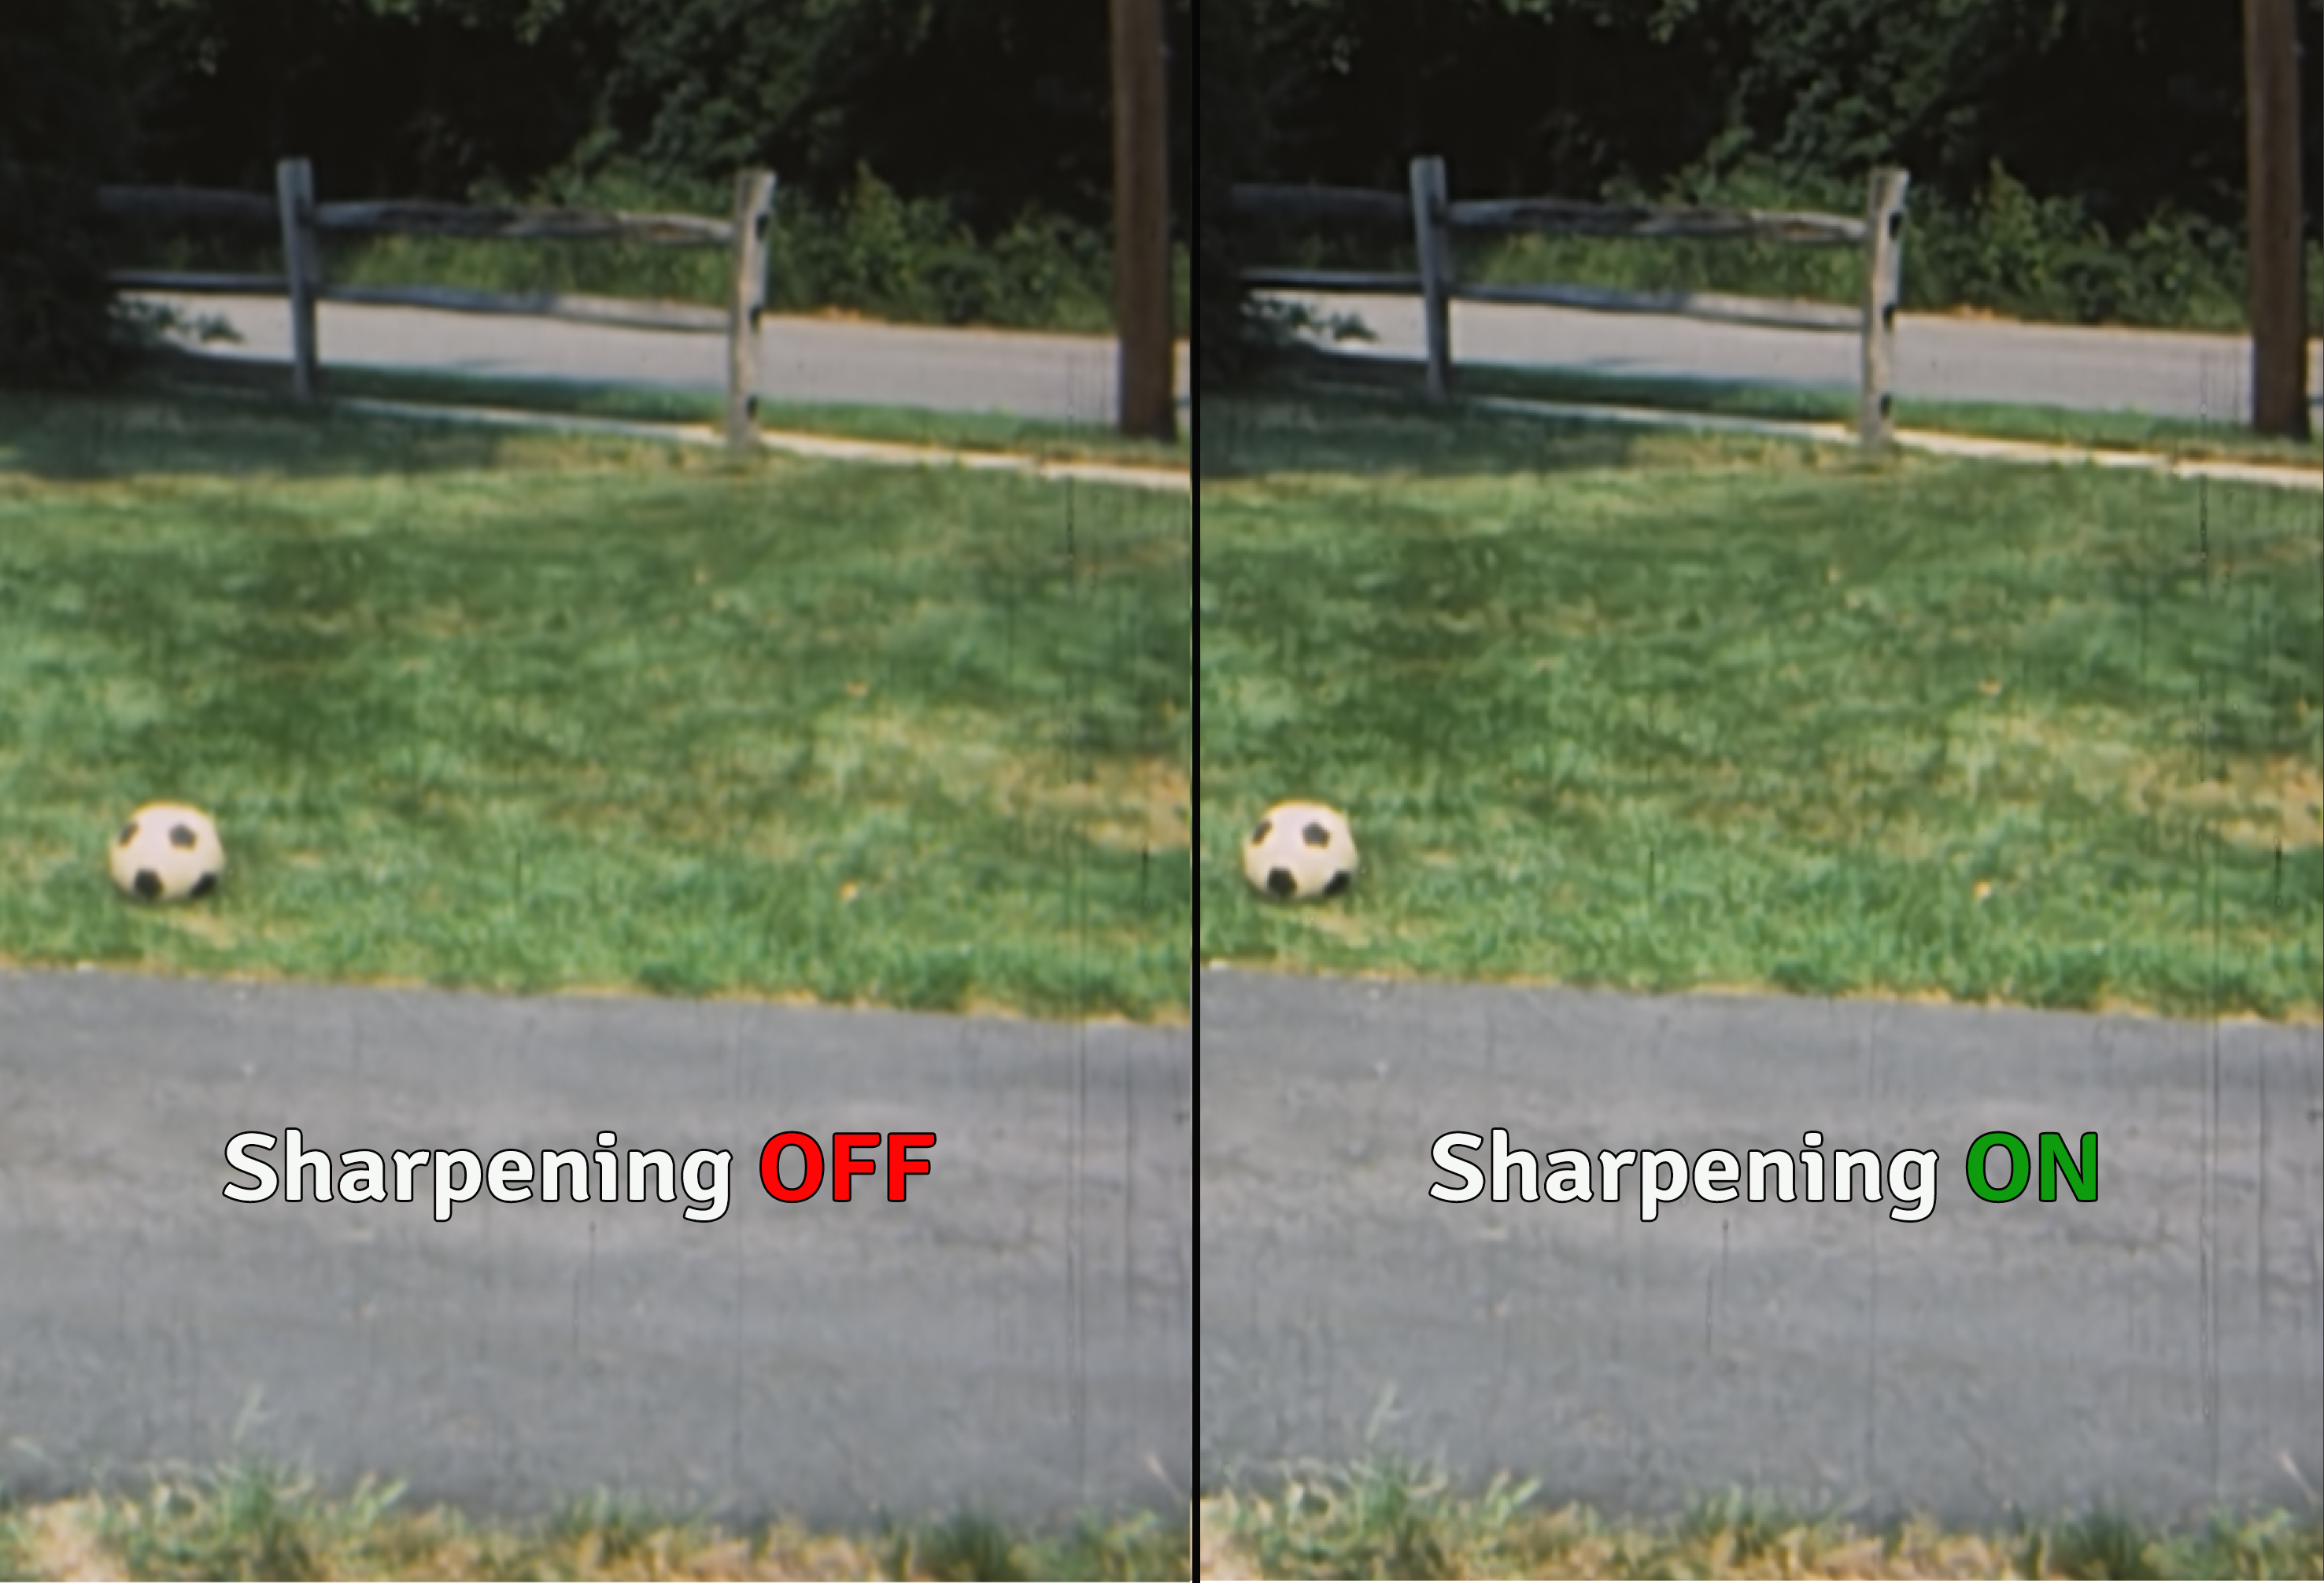
Adjust sharpening
I almost always set the High, Mid, and Low filters in the Sharpening panel to 100%. The Low filter sharpened the most. I’ve also found that two sharpenings is the limit. Using three sharpenings or more reduces overall image quality, adding harshness to the image. If you are doing more that two passes with Neat Video to beat the flicker, be sure to disable Sharpening in the following passes.
Here is an example adding v4 sharpening, then exporting and re-importing to allow adding v5 sharpening.
Optimize performance
For the best performance run Neat Video's optimizer tool: go to Tools > Preferences > Performance > click Optimize Settings and Start. When the Optimizer finishes analyzing your hardware, click Accept Best Combination. For more information check out this tutorial.
Mask disappearing objects
When using the Dust and Scratches filter and Local Flicker, Neat Video would in many frames make the animated objects vanish in part or in whole, thinking they were pieces of dust, probably due to their “unnatural motion,” rapid movement, or when there was rapid panning. So I had to do some frame-by-frame masking. Many frames didn’t need masking, which was welcome! Sometimes this happened when I used the Local Flicker filter, but to a much lesser degree. I’m not certain as to why.
TIP: Turn off Background Render in Preferences (for Final Cut, use Modify > Render Selection or Modify > Render All) and render manually only when needed.
TIP: Your video editing application can be very sluggish when you are adjusting masks with NV turned on. Sometimes it is helpful to use the “Stop Neat Video Processing” feature in NV itself. Using this method unfortunately means you can’t toggle Neat Video ON and OFF for each frame to see when the object needs to be rescued by a mask. So this is useful mostly if the object disappears in part or in whole in most or all of the frames of a clip in which it is present. You can then just mask it in all those frames, seeing the object and avoiding the sluggishness. When you are done masking, re-enable Neat Video Processing, close the NV window, run Delete Generated Event Files, check Delete Render Files, check All, and finally click OK.
Example of using masking to recover missing parts of animated objects:
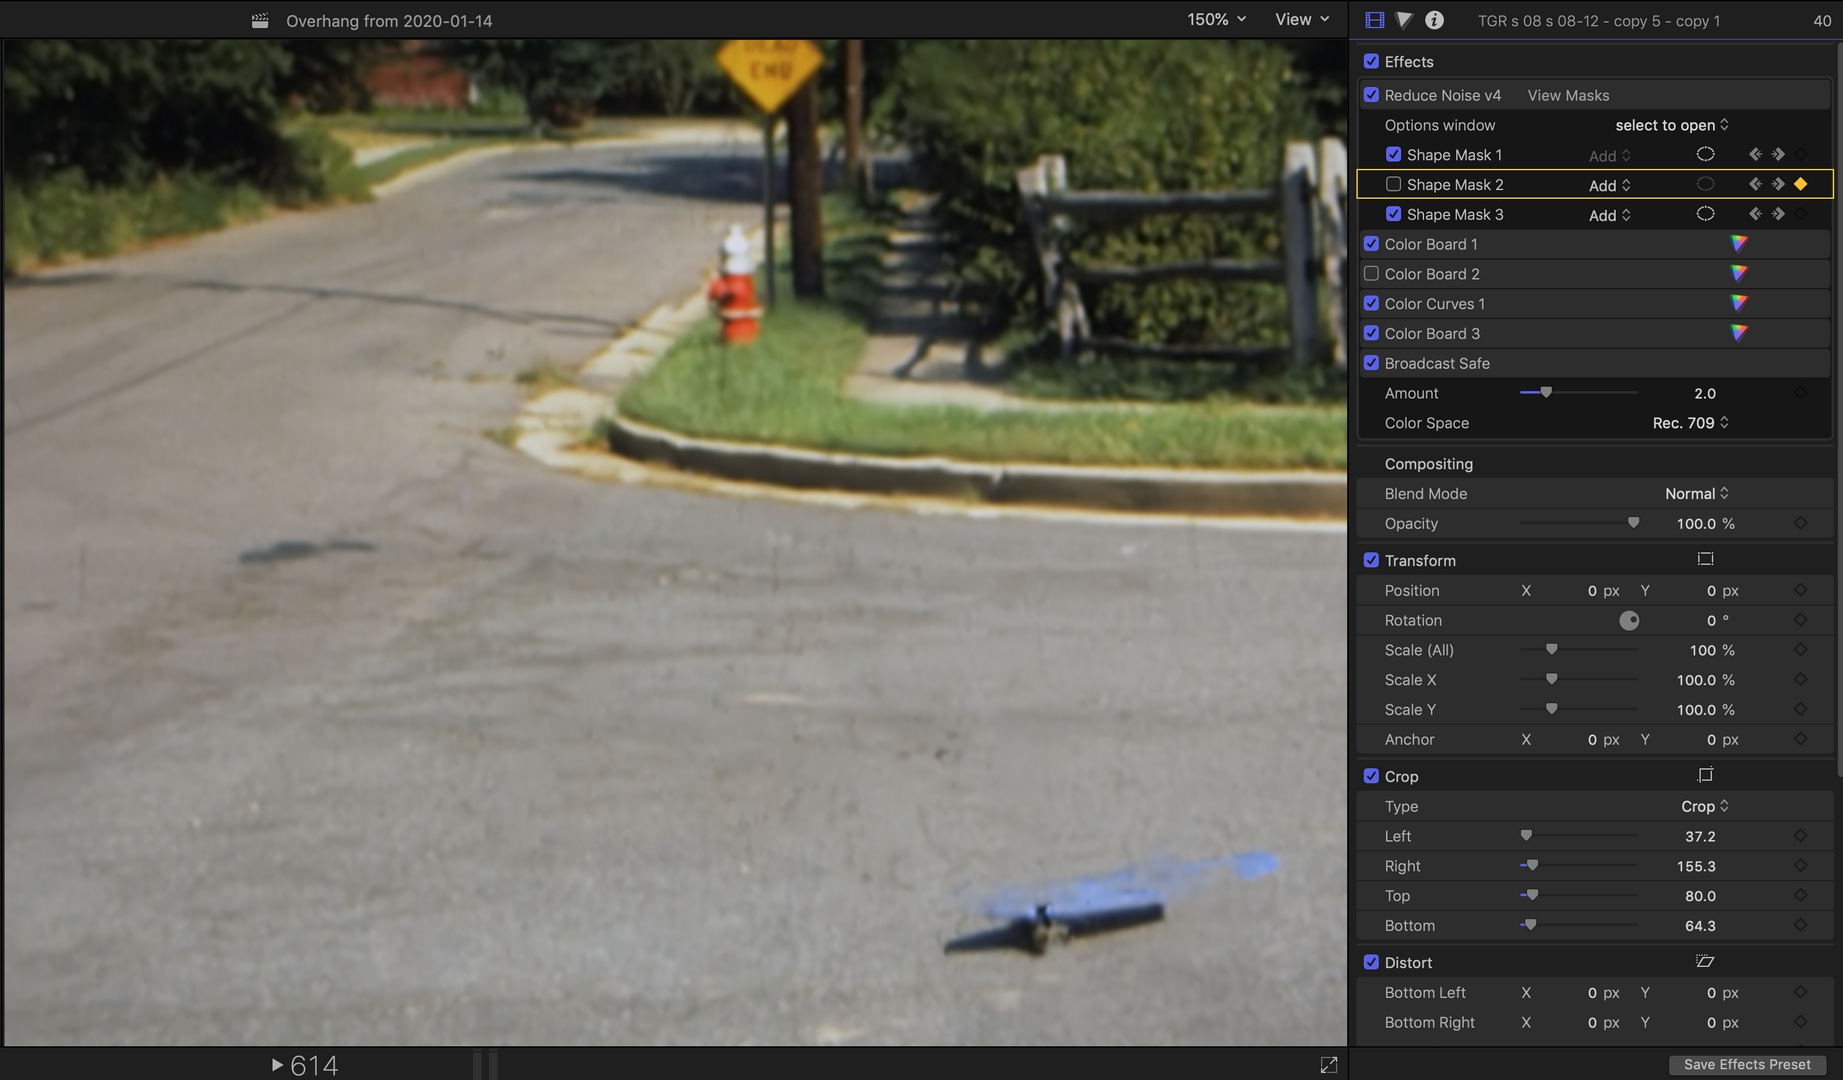

Yes, there is some dust on the board, but this is still a vast improvement over the really big blotch that was present in the original (see the Slow Shutter/Repeated Frames section). And it goes by pretty quickly.
Fix shots with rapid panning and motion
Shots with rapid movement and rapid panning are usually very challenging. Since Neat Video needs to compare the current frame with several adjacent frames, a rapid pan doesn’t give it much to work with! In these cases you can blur out some persistent pieces of dust in a few shots using the Gaussian clip effect. What’s required is a background of uniform gray (like pavement), which works for most pieces of dust, or a background of uniform color (like grass) behind a small or thin piece of dust. Rapid pans also help hide any small pieces of dust. But it’s still better in many cases to blur out the more noticeable dust if the background is uniform. You do this by adding the Gaussian effect to the clip, putting a mask on the piece of dust, then adjust the parameters until you get a blur that matches the background.
Here is an example.

In some cases when the same or very similar dust and scratches pattern was present in several consecutive frames Neat Video had really hard times and the Dust and Scratches filter was leaving some artifacts. For example, four consecutive frames in the shot of the final stretch have blurry artifacts that cover a large area, but the panning is so fast that no one notices them. And the original dust is noticeable when watching the movie.
The aforementioned artifacts:

I am grateful to Neat Video for their great product. I am also grateful to Kodak for their kick-ass Kodachrome Super 8 movie film. The colors didn’t change or fade over the decades!