How to reduce only flicker
Neat Video includes a few different tools
Neat Video is widely known and highly regarded (Yay!) software for removing digital noise from video. From its early stages though, Neat Video was not just a denoiser, it also included a smart sharpening filter. Then it added another tool for film restoration: dust & scratches filter. After that, Neat Video introduced two more tools: a flicker filter and a filter to reduce jitter of details. These tools are available in Neat Video 5 within a single plug-in and are often used together for a combined effect.
Can I reduce only flicker?
Recently we have also received several questions about applying flicker reduction alone, without touching the noise or grain present in the video. Something like this:
“Is there a way I can deflicker without any noise reduction at all? ”
Well, that is partially possible in the current version of Neat Video. Some temporal noise reduction is still inevitable, and the best thing you can do to achieve the desired effect at this time is to balance the amount of temporal noise reduction to achieve enough flicker reduction while not getting too much noise reduction (when it is not needed).
Why the noise reduction cannot be turned off completely? The thing is that all Neat Video’s filters are currently based on and closely coupled with the noise reduction filter itself. In a sense, they use the noise reduction filter to do the things that they themselves need to do, such as the flicker reduction for example. They also use the same input data to do their image processing. For example, when you build a noise profile, you provide Neat Video with a ton of valuable information that is then used by all of the filters including the flicker reduction filter. This is why a noise profile is still needed even if you do not want to reduce any noise but just want to remove flicker.
Most of the time it’s not a problem, but in some cases, you don’t need or want to remove any noise or are concerned about losing fine details and crispness of the image.
Steps to reduce flicker and keep noise untouched
Whenever you’re working with a clip where the main concern is flicker while noise reduction is not needed, try following these steps:
- Build a noise profile as usual. The noise profile is needed in any case.
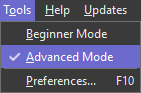
- If you work in Basic Mode, switch to Advanced Mode using the menu Tools.
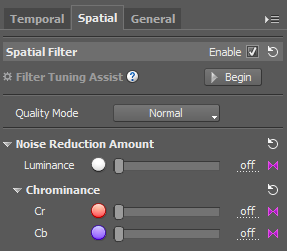
- In Spatial Filter, set Noise Reduction Amounts ( Luminance, Cr, Cb) to 0%.
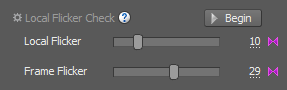
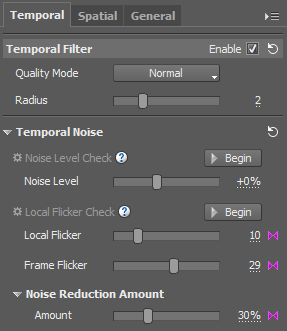
- In Temporal Filter, adjust Local Flicker and Frame Flicker to reduce the flicker itself.
- Vary Noise Reduction Amount in Temporal Filter up and down to find the balance between the sufficient reduction of flicker and excessive noise reduction or smoothing. In addition to that, vary Temporal Filter Radius. That will also make the flicker reduction stronger or weaker.
While doing the adjustments in steps 4 and 5, use the Play All function to see the filter preview in motion. That will help to see the flicker and evaluate its reduction.
If you do get too much noise reduction or smoothing, then the problem is likely in the noise profile. Try to re-build it using another area with no details. If there is no suitable area, use Generic Profile.
How to get some of the sharpness back
Even though some of the noise is removed there is always a way to gain back the sharpness and crispness of fine details.
Simply switch to the Spatial Filter tab, enable Sharpening and set the values in different frequencies to your liking, but don’t go too far to avoid overdoing it and getting the halo effect.
P.S. We are very glad to hear positive (and at times negative) feedback about Neat Video’s deflicker. Our team can see that the tool is used a lot and we are determined to improve it further for you.