Optimized performance. Better performance.
Neat Video is an effective denoising, deflickering and restorative filter, but it is also hardware demanding software. It is a very computation-intensive temporal effect, which has to process multiple input frames to produce every single output frame. To do all that efficiently, it needs to use the available hardware resources in a smart way. To find the best combination of hardware parameters allowing to achieve the fastest denoising, Neat Video has got a special set of tools for optimizing performance.
The performance optimizing tools control how Neat Video is using your computer’s resources. You can run the speed test and choose if CPU, GPU or both CPU and GPU should be involved in the denoising process. Also you can select the amount of GPU memory Neat Video can use. When the settings are set to optimum values, renders with Neat Video will be finished in the least possible time. Wrong settings however can increase rendering time and cause your video editing application to slow down. For optimum performance you should optimize Neat Video for each new project where the denoiser is used.
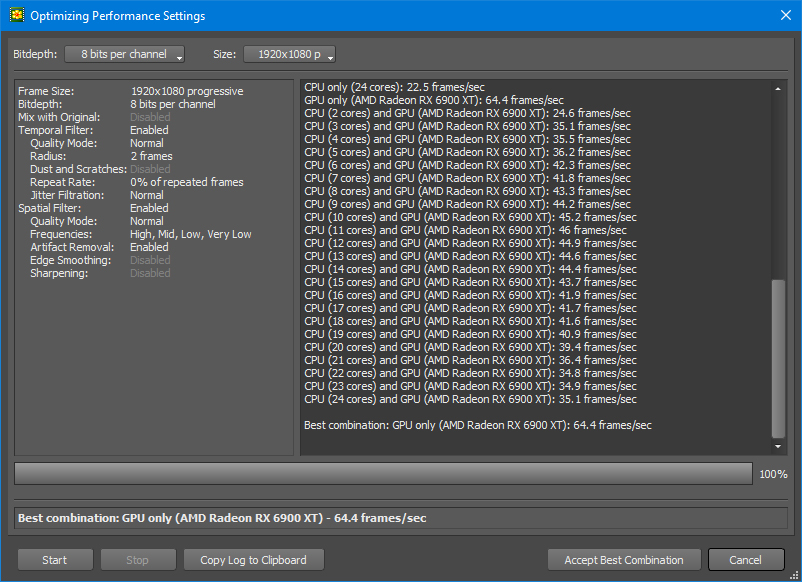
To optimize the denoiser’s settings go to Neat Video’s menu Tools > Preferences… and then to the Performance tab. Neat Video has three working modes: CPU only, GPU only and CPU+GPU. Depending on your specific hardware and frame size, one of those options may work better than the other two.

To help you choose the best combination of CPU cores and/or GPUs, Neat Video has a special test where different combinations can be automatically benchmarked and then the fastest combination can be chosen. To use that test, click the Optimize Settings… button and then Start to initiate the test. When the test is complete, you will see the best possible speed* that is achievable on that hardware for the current frame size of the video and for the current filter settings. If you then click Accept Best Combination, then that found best combination of CPU cores and/or GPU will be applied in the Performance settings.
*Please keep in mind that this test is only showing how quickly Neat Video can process the frames without the overhead of the main video editing software and other plugins. The actual render speed is always lower than Neat Video’s, as processing time is also spent on those other components of the render process.
If you have a GPU and it is used by Neat Video either in the GPU-only or CPU+GPU mode, then you may benefit from adjusting the amount of GPU memory Neat Video is allowed to use. The green triangle is showing the optimum amount of memory required for the best performance of Neat Video on videos with the current frame size. The red bar on the right shows how much memory is used by the operating system, video editing software and other programs, so don’t go there to avoid clashes.
We generally recommend to only change these settings if the green triangle is within the red bar or if you are getting GPU errors during render or are looking to extract every drop of performance from your hardware. If you decrease the allowed GPU memory percentage to improve stability, Neat Video’s speed may decrease, but the drop in speed may not necessarily be very noticeable. The impact of such change can be checked directly by the ‘Check Speed’ tool.
If the amount of GPU memory is set to a higher value than the recommended percentage (the green triangle), Neat Video will not use more GPU memory that it actually needs (with the current frame size) and its speed will not increase. However, if you switch to a video with larger frames, then the green triangle will move to the right and the higher limit will help Neat Video work faster. So if you work with frames of different sizes, like 1920x1080 and 4K, then it may be a good idea to set the memory percentage to be good for 4K. Then it will be good for 1920x1080 as well.

You can also see how the above tests are done in this video: