Chasing Aurora. All you need to know
Guest post by Justin Nederkoorn,
travel photographer and videographer
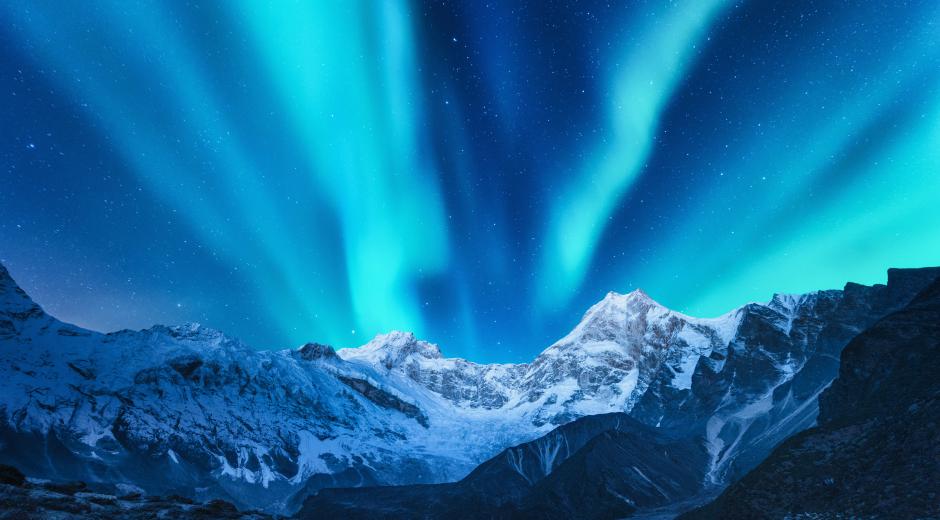
Aurora Borealis, or also called Northern Lights, is a spectacular phenomenon that can predominantly be seen in high-latitude regions. They display dynamic and vibrant lights that appear as rays, arcs or flickers covering the night sky. It is truly a unique sight for those who don’t live in the arctic regions, but they often come at a cost. Planning is essential, adapting to the evolving situation is a must and sleep is a luxury. Chasing Aurora Borealis is not for everyone, but it’s fun and exciting when done right and can yield some worthwhile results. Today I will help you through the basics of preparation, chasing and monitoring Aurora to maximize your opportunity at witnessing them.
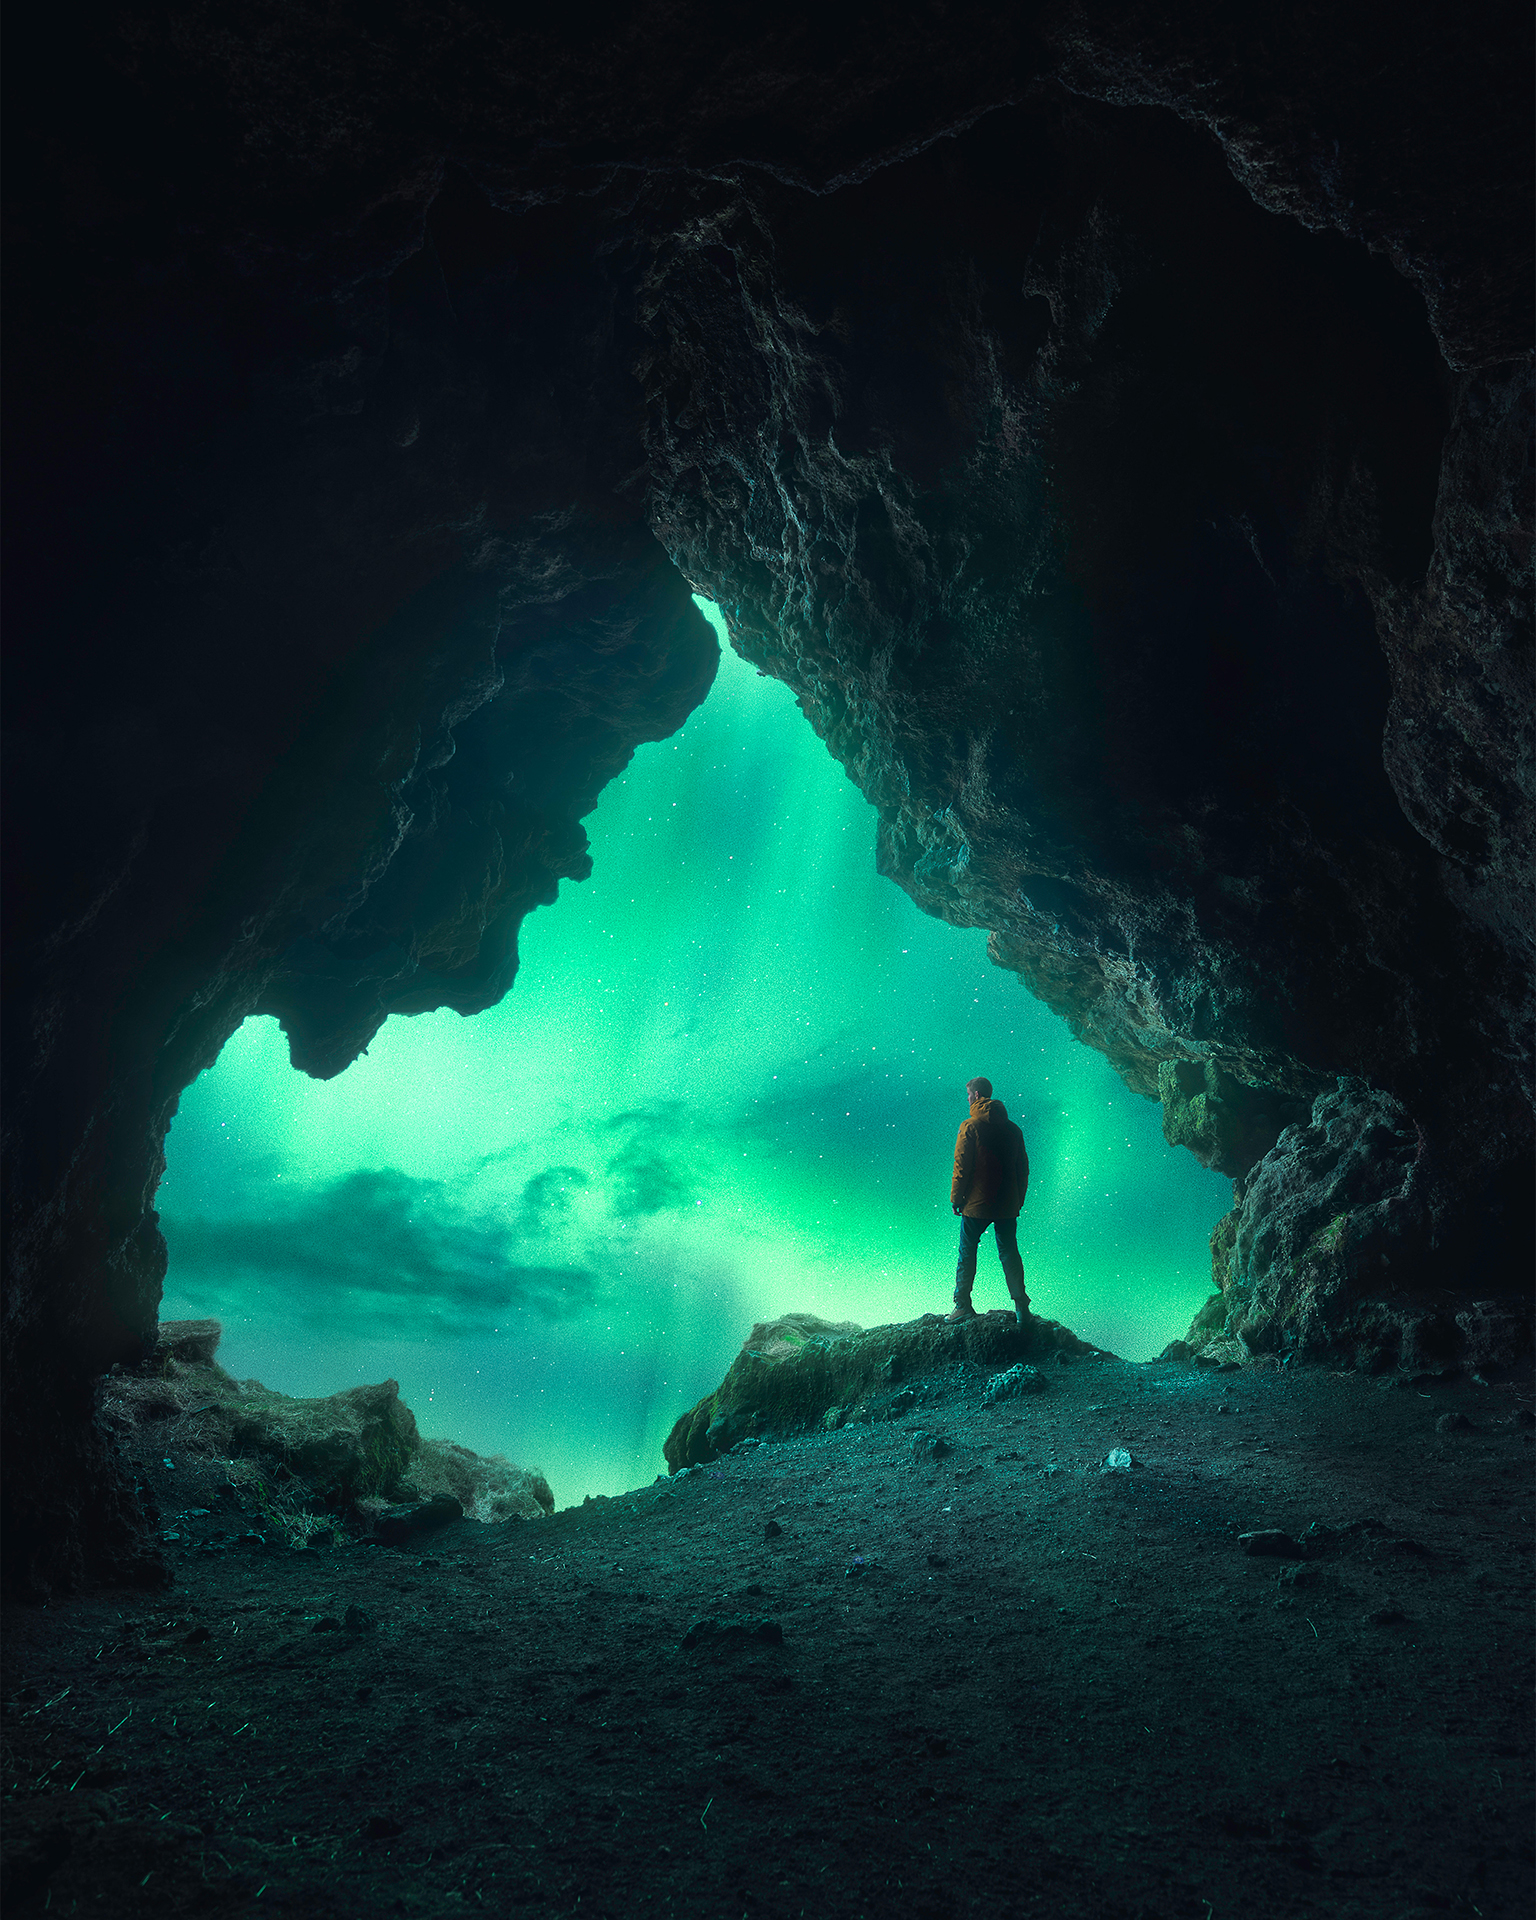
Loftsalahellir Cave, Iceland. Source: Tales of Justin
Chapter 1: Preparing for Aurora
It goes without saying that you should do the necessary research and preparations before you go out and chase Aurora. I’ll talk you through some of the metrics that can be used to predict solar and Auroral activity, why you should prepare with the right mindset, applications that prove useful for monitoring activity and other important aspects to plan for Aurora.
What is Aurora Borealis
First we take a quick look at what Aurora Borealis actually is and why it appears in the sky. That will help you understand why certain metrics are important for predicting Aurora and how they play a part in your preparation.
It all starts with the sun which is surrounded by an extremely hot atmosphere called a corona. Due to these temperatures, charged particles can sometimes escape the sun’s gravitational pull through sun spots. These particles travel at an extremely high speed and reach earth in about three days. The earth’s magnetic field deflects most of these particles. However, the magnetic field in the poles is far weaker than it is at the equator. That’s how some of these particles enter our atmosphere and through chemistry eventually display green, red and sometimes even purple and blue Aurora.
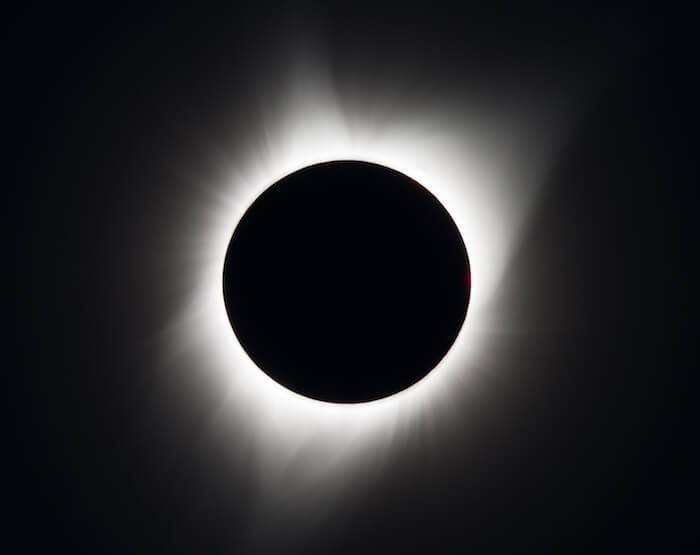
The solar corona shown in white during a solar eclipse. Source: NASA/Aubrey Gemignani
So, how does this help us predict and measure Aurora? The solar corona is constantly monitored by satellite-based telescopes. Through this data we know the current state of the solar corona and the amount of sunspots and coronal holes. The more particles are being released, the bigger the chance we can see Aurora three days from that event. More particles also mean a heavier storm. But this is not the only metric that matters when predicting Aurora. We also need to know how many particles enter our atmosphere. For this we use the data available at the NOAA Space Weather Prediction Center.
Take note of two important metrics, Bt and Bz. The Bt value indicates the total strength of the Interplanetary Magnetic Field (IMP). The Bz value indicates the orientation of the IMP. This sounds very complicated but these values are actually pretty easy to read. A high Bt value means a bigger disruption in the earth’s magnetic field which means a more intense display. A negative Bz number means that particles easier penetrate the earth’s magnetic field.
Let’s look at a graph which is available on the NOAA SWPC website to read these values and interpret them.

Bt / Bz metrics to predict Aurora. Source: NOAA Space Weather Prediction Center
Above we see the Bt value in black and the Bz value in red. If you look closely you can see a small period of consistent negative Bz (which we want) marked in purple. At the same time, the Bt values in that window are relatively high. This would be a great opportunity to see an Auroral display if we have solar activity at the same time.
Important to note is that in spring and fall the Interplanetary Magnetic Fields are best aligned. This allows for more negative Bz values and will greatly improve your odds. Here are the best months to see Aurora.
Spring: late February, March and April
Fall: late August, September and October
Preparing with the right mindset
Now that you know the basics of monitoring Aurora, you can see that the appearance of it depends on a lot of variables. In addition to predictions of a good show, you’ll need to take into account the cloud coverage, moon phases, light pollution, time of day and latitude. I’ll go more in-depth into these in the planning section, but it’s important to prepare for Aurora with the right mindset.
There will be moments where you did everything right. You monitored the Bt and Bz values, there’s plenty of sunspots, the skies were supposed to be clear and it’s New Moon. Yet when you arrive at the location you see nothing but clouds. This happens. Especially if you visit Iceland, prepare for this to happen since Iceland suffers from very frequent cloud coverage. This is why you should never visit a country just for Aurora. But with the right mindset and the willingness to chase clear skies, to skip on sleep and a little bit of luck, you’ll be rewarded with great displays.
Applications to monitor Aurora activity
The NOAA SWPC website offers lots of information, not just on predicting Aurora. Therefore it can be rather intimidating if you don’t know where to look. That’s why I prefer to use websites that focus just on predicting Aurora and give you all the valuable information in one page. The one I prefer to use is https://www.spaceweatherlive.com/. They offer real-time solar and Auroral activity, the Auroral oval, short and long term forecast, news updates on solar flares, useful information about metrics and much more.
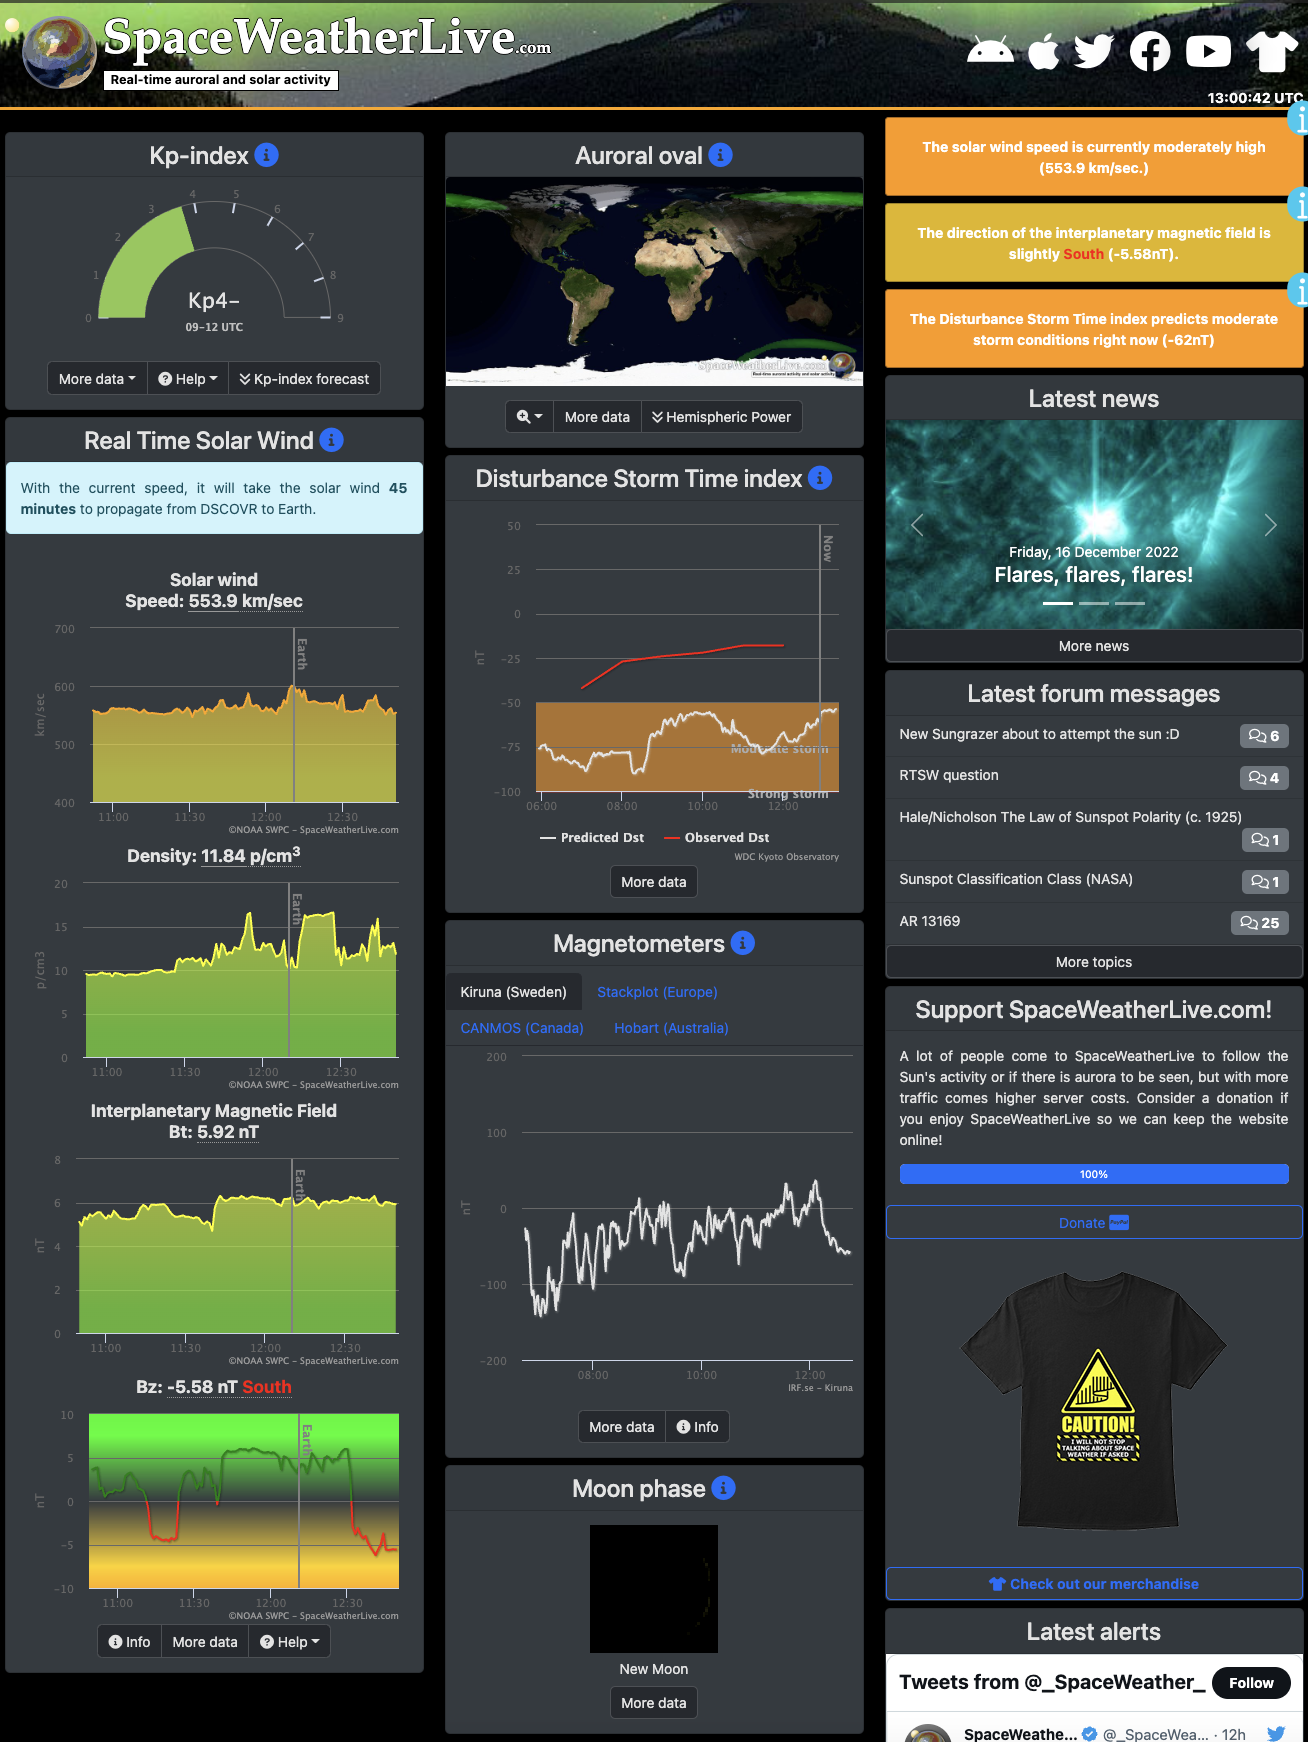
Real-time auroral and solar activity. Source: https://www.spaceweatherlive.com/
However, if you’re out in the dark chasing Aurora, you don’t want to grab your laptop and scroll through complicated graphs to check the current activity. You need a straight-forward application that shows you just what you need. For this I use the mobile application My Aurora Forecast. It offers everything you need, from Bt and Bz values to solar wind density and KP. Perfect for when you’re on the road and quickly need to check something.
My Aurora Forecast for Apple
My Aurora Forecast for Android
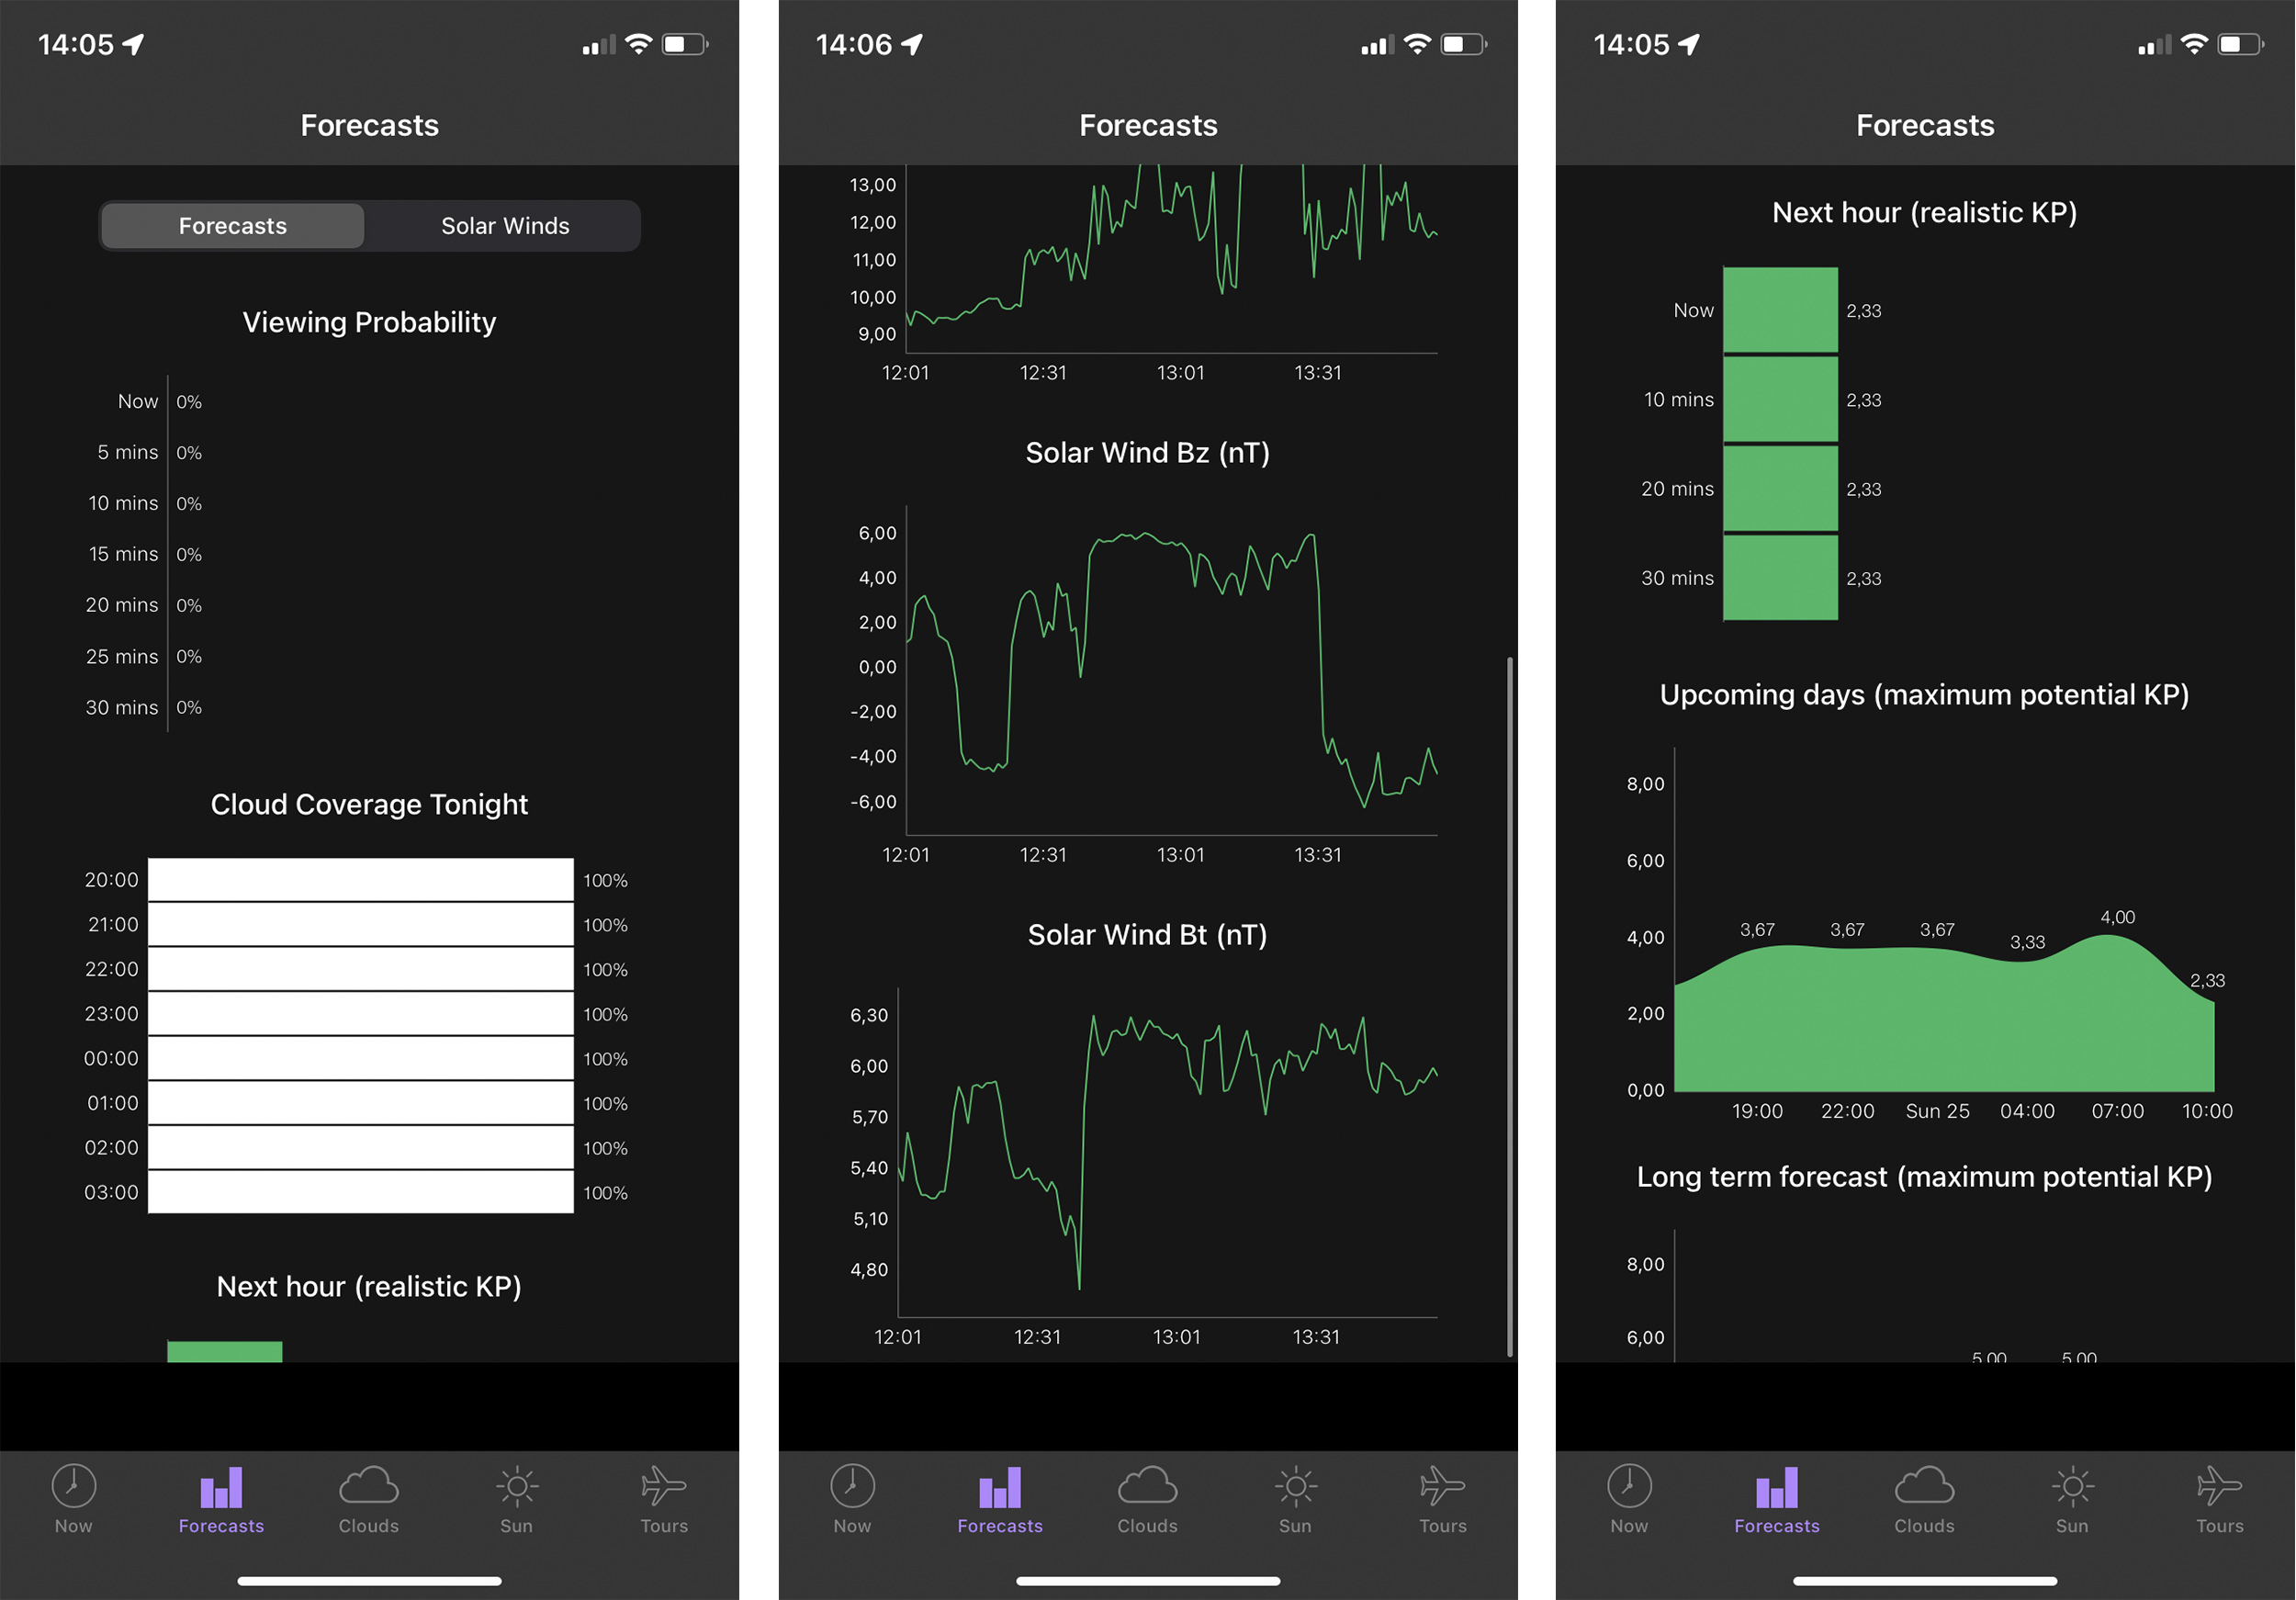 Cloud and KP forecast (left and middle) and solar wind forecast (right). Source: My Aurora Forecast
Planning for Aurora
As said earlier, the metrics for predicting Aurora don’t tell the complete story. I’ll quickly touch on various aspects that are equally as important to plan for Aurora.
Latitudes
This might sound obvious, but your location is a deciding factor in viewing Aurora. The Auroral Oval covers the latitudes between 60 and 75 degrees. This makes countries such as Norway, Iceland, Greenland and Canada popular locations to see Aurora in the Northern Hemisphere. Don’t be mistaken though, the Aurora can still be seen at lower latitudes. The strength of the display, often indicated in KP, gives us an indication as to how far it reaches. Naturally, being at a high latitude such as Iceland will make the Aurora appear above you. Lower latitudes such as the UK can still see Auroral displays from time to time, but they’ll appear far closer to the horizon.
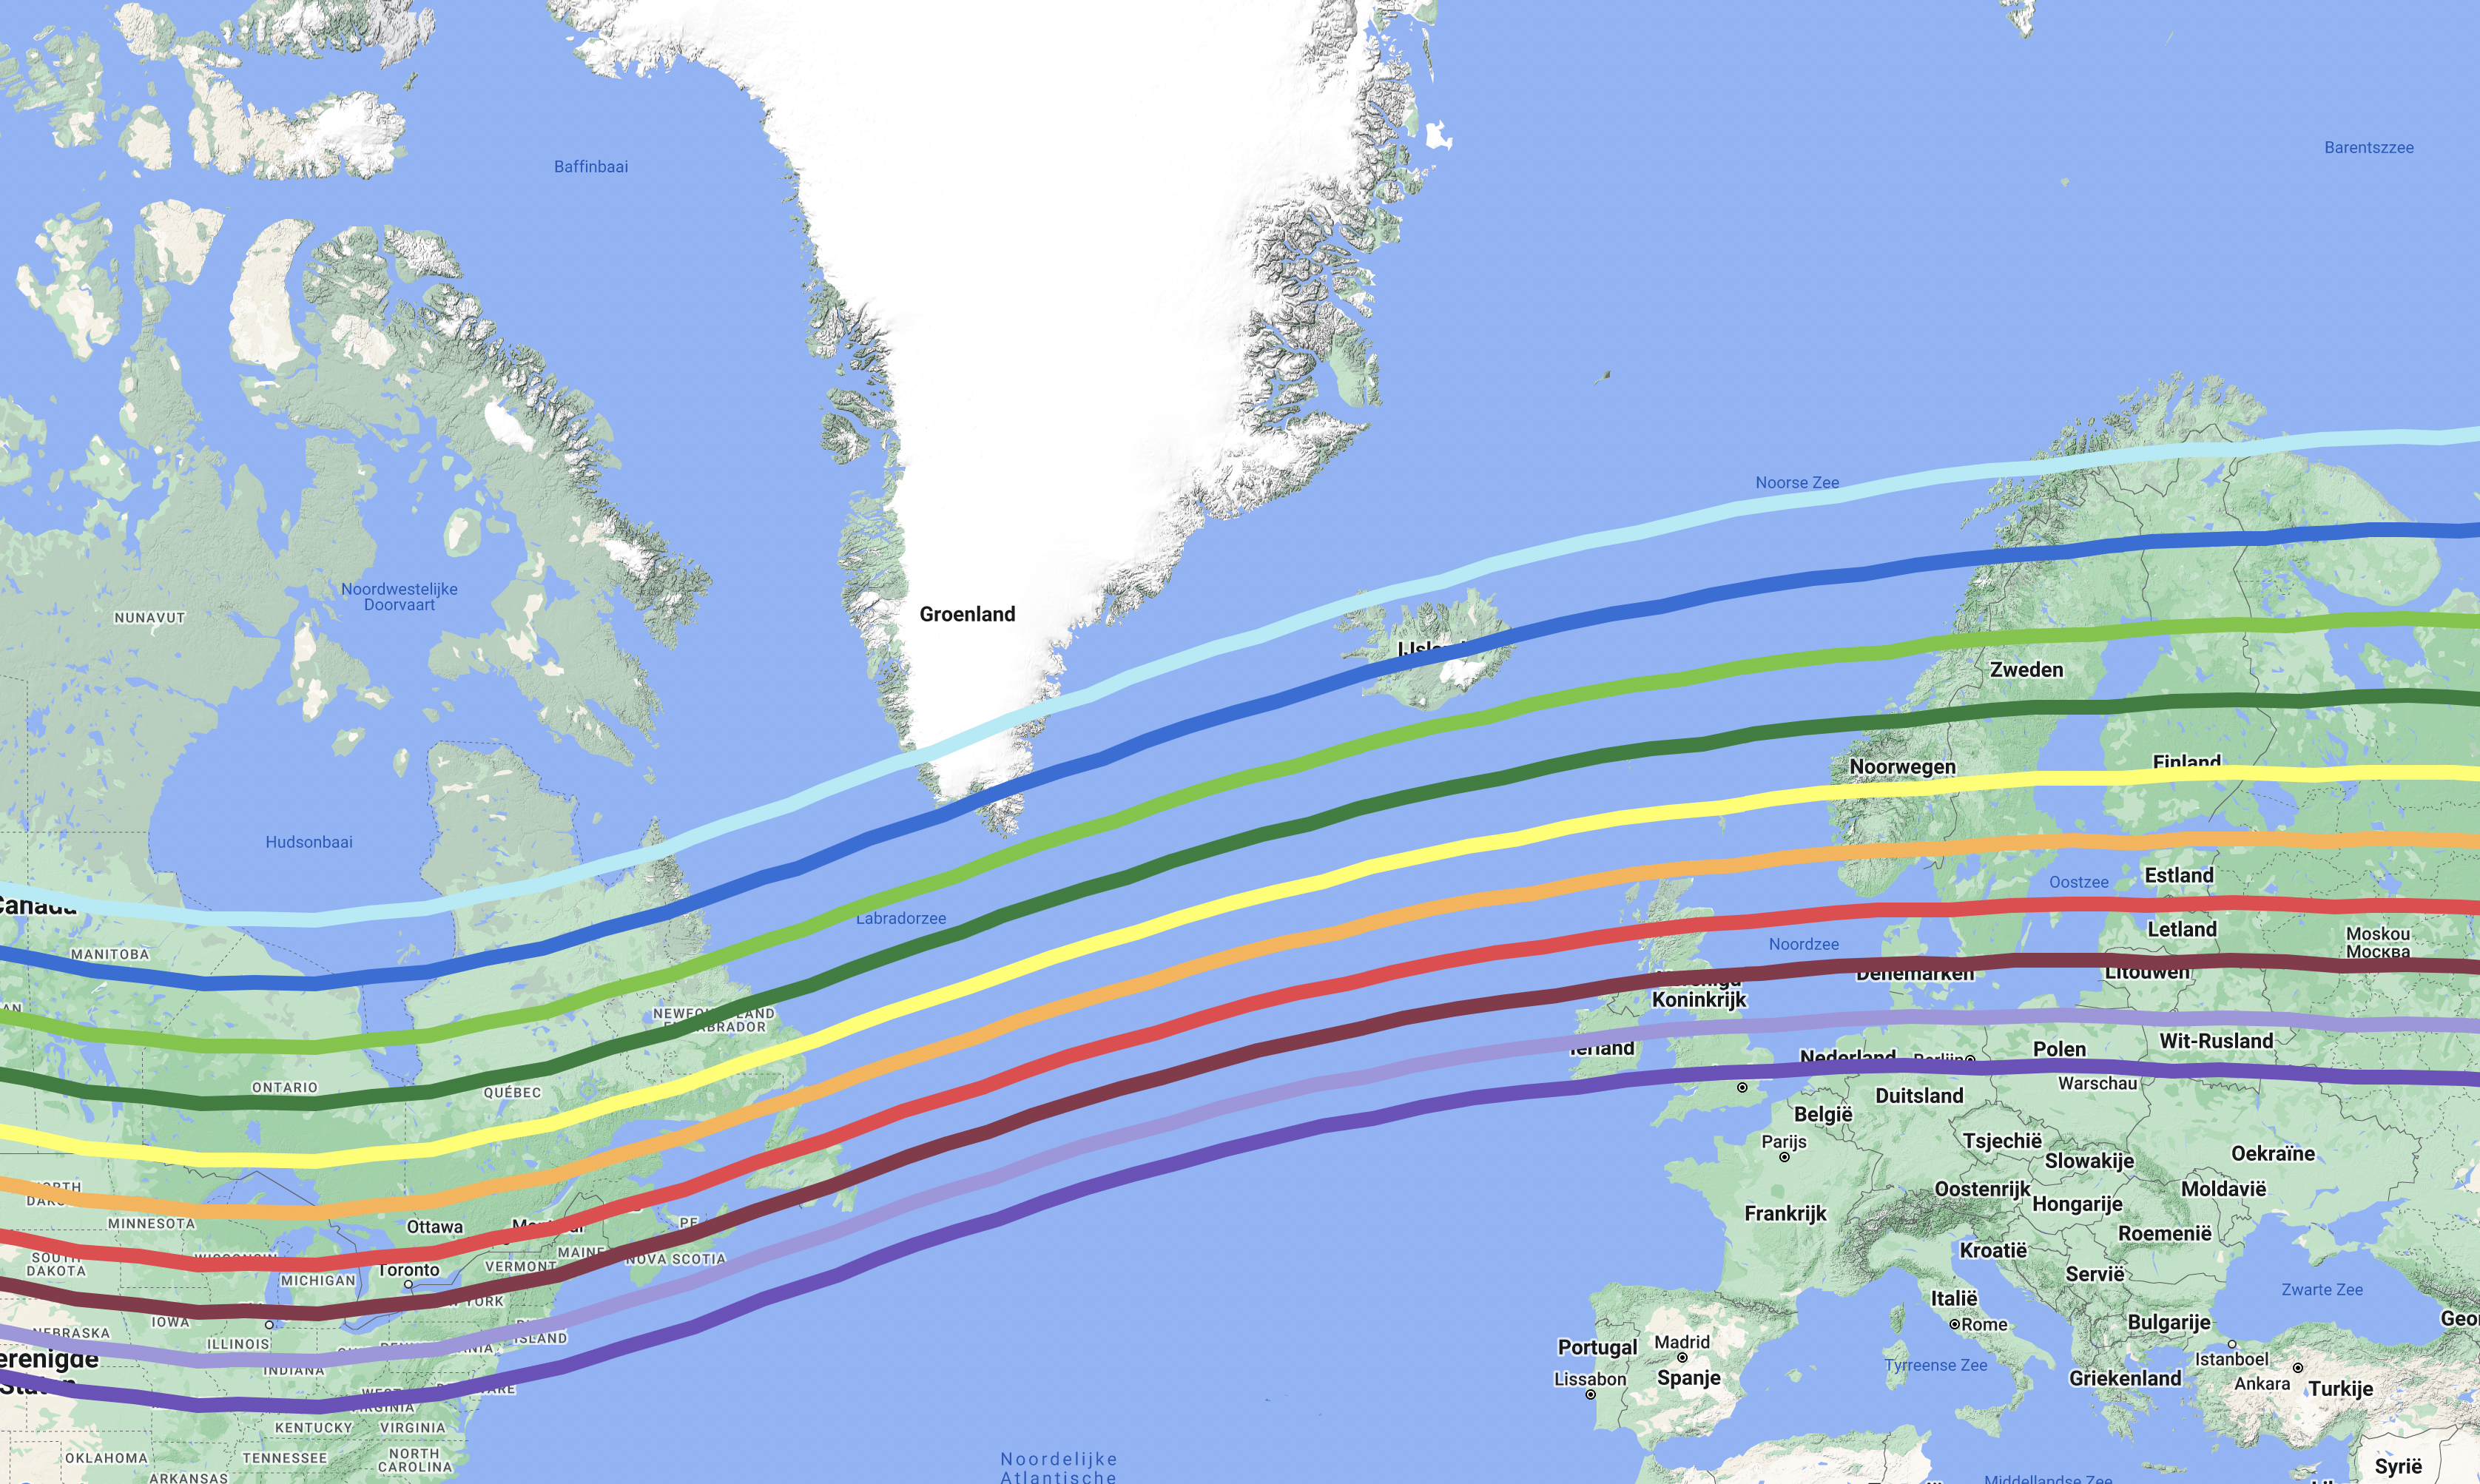
KP0 (light blue) to KP9 (dark purple) latitudes. Source: https://seetheaurora.com/
Dark skies
Dark skies play an important role in viewing Auroral displays. You might not realize this, but Aurora happens both during the day and at night. We don’t see it during the day because the skies are too bright, but it’s there. The darker the sky, the easier it is to see a show. Let’s look into some factors to keep in mind.
One of the most important factors is daylight. Or rather, the absence of daylight. That’s why the seasons play a big factor in planning for not even Aurora, but your trip to the arctic region itself. Remember we touched on what would statistically be the best season and months to see Aurora? Now keep in mind the hours of daylight your destination will have and how dark the night gets. At the arctic circle the sun doesn’t set around the summer solstice and it doesn’t rise around the winter solstice. This means that in early fall months or late spring months the skies might not get dark enough.
Another important and common factor to keep in mind is light pollution. You can use the light pollution map at https://www.lightpollutionmap.info/ to search for a prime viewing location with as little light pollution as possible.
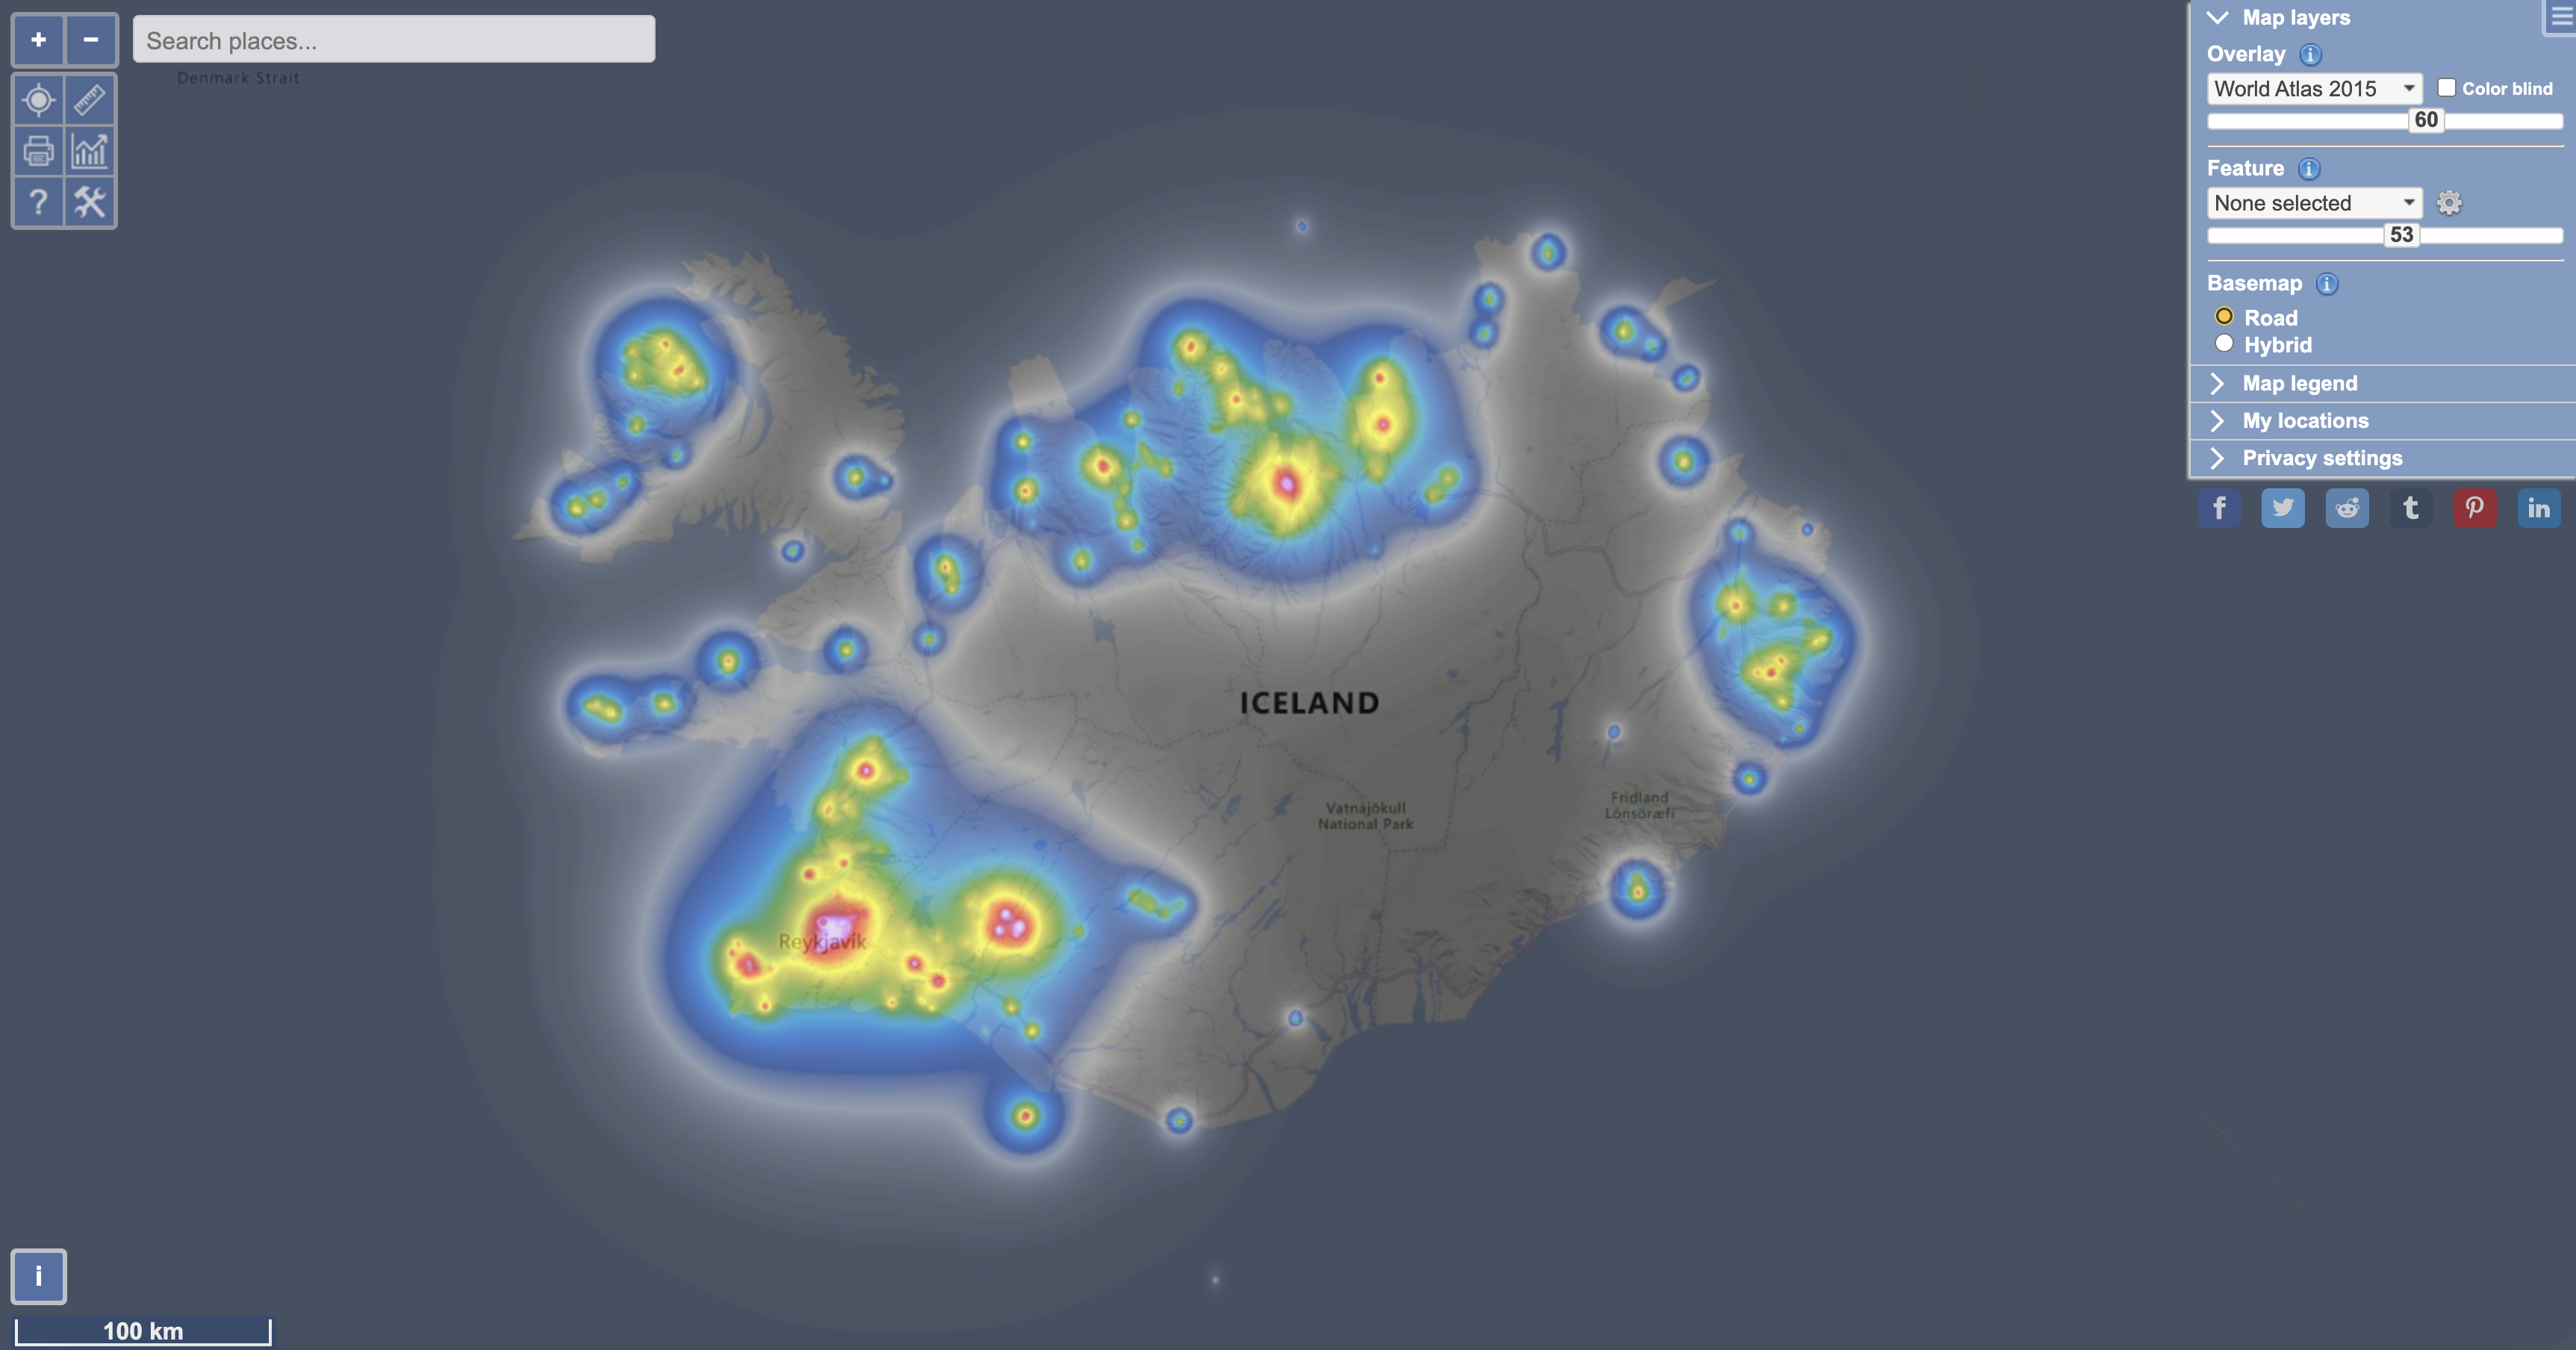
Light pollution in Iceland. Tip: increase the overlay to get a good view of the reach of pollution. Source: https://www.lightpollutionmap.info/
This doesn’t mean that you can’t see Aurora in a city such as Reykjavik. You can, but it will be less visible to the eye, the warm color temperature will show up in your image and, more importantly, these lights will likely blow out when you adjust your exposure settings to capture Aurora. So my advice is to always aim for locations with as little light pollution as possible.
While light pollution can be avoided pretty easily, you can’t avoid moonlight. Depending on the moon phase, the night can actually be pretty illuminated by the moon. This is not necessarily a bad thing. Moon light can help illuminate the landscape, making it easier to capture both the Aurora and the foreground in one image. But it will also make it harder to see the Aurora with the naked eye. Don’t let the moonphase hold you back from going out since you can capture gorgeous images at blue hour or full moon, just be mindful of what it means for your chase.
Cloud coverage
The closest the Aurora gets to earth is 80km. That’s where the green light emerges. Other colors appear at even higher altitudes of above 240km. Clouds on the other hand are much closer to earth. Low clouds appear from the earth’s surface to 2 km, middle clouds at 2-4 km and high clouds from 3-8 km. At the polar region that is, at lower latitudes and closer to the equatorial high clouds can reach up to 18 km. So I don’t have to explain why cloud coverage is one of the deciding factors in whether you see Aurora or not.
The weather in the Arctic changes very quickly. Weather forecasts are usually given three days in advance, but anything beyond that is just pure speculation. This makes it almost impossible to plan for clear skies which means you’re at the mercy of the weather. Even so, take into account the weather forecast for the upcoming three days and make sure you’re ready to go when the weather changes. More on that later.
Chapter 2: Gear
It’s important to pack the right gear when you’re going out to see Aurora. Remember that conditions change quickly and before you know it, you’re out all night in the cold. Here are some quick tips to make the wait as comfortable as possible.
Clothing
You’re in the Arctic so it’s cold. With a little bit of luck the skies will be clear, making it even colder. So I’d highly recommend putting on multiple layers of clothing. For the base layer I usually go with a merino thermal. This keeps me exceptionally warm and helps regulate the body temperature for when I’m inside the car. Your middle layer can be a thicker wool or fleece. Sometimes I also pack a ski pulley to put on between my base and middle layer if I really need the extra warmth. Your outer layer is very important and should preferably be both windproof and waterproof. It’s likely you’re going to be experiencing a lot of wind which makes it feel far colder than it already is. For the trousers I usually go with thermal hiking trousers that are wind- and waterproof. I always pack merino wool tights as well just in case I need them. Last are your shoes. Again, make sure they’re waterproof. There’s nothing worse than getting your feet soaked with cold water. Trust me, they don’t dry easily and will make you very uncomfortable. Speaking from experience here.
Accessories
Make sure you put on a warm hat, gloves and (merino) woolen hiking socks. These will make your cold nights far more comfortable. Also consider bringing a balaclava to block the cold wind from hitting your face. If you know you’re going to be standing on a beach or near a waterfront I’d recommend bringing wellies and an extra pair of socks. In case you do get wet you’ll at least have a fresh pair in the car. Do you feel cold easily? Then bring a couple of heating packs as well. They’ll help you get warm quickly when you really need it.
Light
If you did your planning right, you’ll be exploring in the darkest of night. I always bring my headlight when I’m out and sometimes a flashlight if I really need the additional light, or if I need to focus my camera or want to light paint. Bear in mind though that you might not be alone. There could be other photographers trying to capture Aurora. And if there’s one thing that will ruin their night, it’s light. So try to be aware of your surroundings. Don’t put your headlight brighter than it needs to be, point it down as much as you can, and consider switching it off when there’s moonlight. If you want to see the Aurora with the naked eye, your eyes will need to adjust to the dark anyway. So stay safe and use a headlight if necessary, but switch it off whenever you can.
Battery
Chasing Aurora is lots of fun and before you know it, you’ve been monitoring Aurora activity and cloud coverage on your phone for hours and hours. Bring a powerbank to charge your phone when you need to and put a DC charger in the car for charging devices on the road. You’ll likely be remote from any civilization and you don’t want to get stuck somewhere with an empty phone.
Food and drinks
Your body will burn calories during your night out. So bring some snacks for the night and if you have an insulated bottle, fill it with a hot drink such as tea. This won’t only make your night more enjoyable and comfortable, but your body will also thank you for it.
Chapter 3: Chasing clear skies
You’ve done all your research, planned your visit to the arctic region in the right period, brought the gear you’re going to need and are ready to chase Aurora. Or rather, chase clear skies.
Be ready at all times
My first advice is to be ready at all times. Like we discussed, the weather around the arctic changes unpredictably fast. You can plan for light pollution, moon phases, KP index and so much more. But it’s almost impossible to accurately predict cloud coverage. You’ll find yourself monitoring the weather forecast even more than monitoring Aurora activity. Therefore it’s important to be prepared for when the skies clear up. Even at lower KP and Bt values you can see Aurora as long as there are little to no clouds. So I’d suggest heading out as soon as the cloud forecast looks good, even if there’s only a moderate chance at Aurora.
Unfortunately this means that there’s no way to know in advance when you’ll be heading out. That’s why you need to be ready to head out at all times. If you want to be really thorough, set midnight alarms. By checking the forecast hourly you can monitor if the skies suddenly open up in the middle of the night.
Packing your car
This may sound like an obvious one but it’s also something that’s easily missed in the chaos of chasing Aurora. Pack your car strategically. You’re likely going to be jumping in and out of the car regularly. So if you’re in the car with multiple people, gear will get thrown all over the place if you’re not careful.
My backpack is the most important piece of gear I need to reach for when I head out. So I pack all my crucial items such as my light, a couple of snacks, something to drink, camera gear and layers of clothing and put it in the trunk so I can easily reach it. Then I place some snacks and drinks in the car (e.g. center console) for when we’re on the road and maybe a vest where I’m sitting so I can put that on if I get cold in the car. This way I can leave my backpack in the trunk and know I have everything I need in there when we head out.
I’m not saying you should pack your car the same way I do, but be somewhat mindful of how you pack your gear. You don’t want to arrive at a location only to realize you left your fleece in the car because you took it out of your backpack.
The chase
This part is fun and satisfying, but can also be very frustrating if you don’t have the right tools. Remember that I said we’d get back to monitoring the clouds? That’s what you’ll be doing most of the time when you’re chasing Aurora.
Constant monitoring of cloud coverage is crucial. You can use any application that shows a real-time cloud coverage, but I prefer to use Windy. It comes with a really nice feature that visually shows how many kilometers of visibility you can expect at a location. Using this in addition to My Aurora Forecast will make it easier and more enjoyable to chase Aurora on the road.

Windy cloud forecast (left) and visibility forecast (left). Source: www.windy.com
Don’t be afraid to drive a longer distance if the predictions are good. At one time the Aurora predictions were so great that we decided to drive over three hours, just because there was supposed to be a clear patch at that location at the given time. That night ended up being the most spectacular show of the trip. Having patience and dedication can pay off. But on the contrary, the weather could’ve changed in the blink of an eye and our plan would’ve gone to waste.
When you’re out on the road and you’re driving in a clear patch of sky, keep your eyes open and look out of the window regularly. Aurora can sometimes look like a slowly moving cloud, especially if it’s not as strong. So it’s hard to recognize it when seeing it for the first time. When in doubt, take a quick photo with your camera. Its sensors pick up the green quicker than our eyes do so it’s always a good idea to double-check.
Behaviour of Aurora
If you’ve spotted green, congratulations! This means your hard work has paid off. But before you get all excited, let’s take a quick look at how Aurora behaves.
Aurora typically occurs in short bursts. If you see a slight fade of green, sometimes in the form of an arc, that’s your sign that the Aurora is building up. It doesn’t take long for the Aurora to build and to start dancing. This is the best part and lasts about 15 to 30 minutes. When you see the Aurora becoming fainter and less active, you know it’s cooling down.
Usually, when you see the first hints of green I’d advise you to stop the car as soon as possible and shoot at the location you’re at. Don’t keep driving to a specific location you had in mind unless it’s under a couple of minutes out. Otherwise, you risk missing the show.
As soon as you see the Aurora cooling down and becoming faint, start moving. This is your window to drive to a new location. While doing so it’s important to keep monitoring cloud coverage and to regularly look at the sky to spot green.
Stay safe
Seeing Aurora for the first time is very exciting. So exciting that people sometimes forget about their surroundings. Please remain vigilant while you’re out in the dark. Don’t park your car in dangerous places or stand on the road to take a photo. Remember, it’s most likely pitch black and fellow road users might be distracted by the Aurora themselves.
Chapter 4: Enjoy!
Enjoy the mystical appearance of Aurora. It’s truly a magical sight and a memory you’ll hold dear for the rest of your life. Therefore don’t forget to sometimes pause, put your camera away and take it all in. Some people get too hung up on capturing the lights and end up mostly fiddling with their camera settings in the field. Be well prepared by following the tips given in this article and you’ll be fine.
Make sure to keep an eye out for our upcoming articles which will cover how to capture Aurora when you’re out in the field and how to process them back home! Everything you need to know from camera settings to gear recommendations, grading your shots and of course denoising them for the perfect result.
If you’re reading this article in preparation for a trip to the arctic, I couldn’t be more excited for you, wish you the best of luck and really hope you end up seeing the Aurora!
Author: Justin Nederkoorn
Justin is a freelance travel photographer from Apeldoorn, NL. Justin always aims to evoke a feeling of awe and inspire his audience to go out and explore and experience valuable moments in nature where everything comes together. Justin also has been teaching others on the subject of photo and video capturing and has received a number of awards for his outstanding work.