Clip resizing and render speed

Filming in 4K, 6K, or even in 8K, but exporting in a lower resolution and waiting a looooong time for the render to complete? The good news is you can dramatically decrease render times if the final resolution needs to be lower than the original one.
Many modern cameras are capable of recording video in high resolutions, such as 4K and higher. However, you do not always need to produce the final video in the same high resolution. For example, large frame formats are not often used in online video platforms. When you upload a high-resolution content to such a platform, the video typically gets heavily transformed by the platform’s video codecs and sometimes gets downsized. So it may be sufficient to upload a lower-resolution version.
In some cases, you need to downsize a clip in the edit, for example, when you want to bring a larger clip to a smaller-resolution project or when you need to crop a part of the larger frame.
There may be many other reasons why you might want or have to bring the frame size down. Whatever the reason is, the size reduction itself can help to speed up the render process because applying Neat Video to smaller frames is always faster than to larger frames. So if you can make sure that Neat Video is applied after the frame size is reduced, then you can achieve higher render speed.
Most video editing applications offer some control over the size of the frames they work within their render pipeline and therefore over the size of the frames they send to video effects like Neat Video. When you can control that, you can change things in your favour.
You can also check the size of the frames actually provided by the host application to Neat Video using the frame size indicator displayed at the bottom of the Neat Video window.
We have run a few quick tests in several popular video editing applications to check the times they take to export a test clip when rendering it in different resolutions. Specifically, we have tested the case of rendering in the native 4K resolution vs rendering in the FullHD resolution (the resolution is reduced from 4K to FullHD during rendering and then effects are applied to FullHD frames instead of 4K frames). The results confirm that a little bit of hustle may be worth it when you want the final result to be in a lower resolution anyway.
| 4K Input, 4K Render, FullHD Output | 4K Input, FullHD Render, FullHD Output | Speed Improvement | |
| Premiere Pro | 58 sec | 26 sec | 2.2 times |
| DaVinci Resolve | 49 sec | 17 sec | 2.9 times |
| Final Cut | 96 sec | 31 sec | 3.1 times |
| After Effects | 55 sec | 29 sec | 1.9 times |
We have also prepared a little cheat sheet describing the ways you can downsize a video and speed up the render in different applications. It considers the case of going from 4K to FullHD as an example, but you can easily generalize that for other frame sizes.
Resizing cheat sheet
We assume that we have a 4K clip and our project is based on FullHD frame size. We want to use that 4K clip in the FullHD project. Let's see how can we change the size of the 4K frames down to FullHD in different applications:
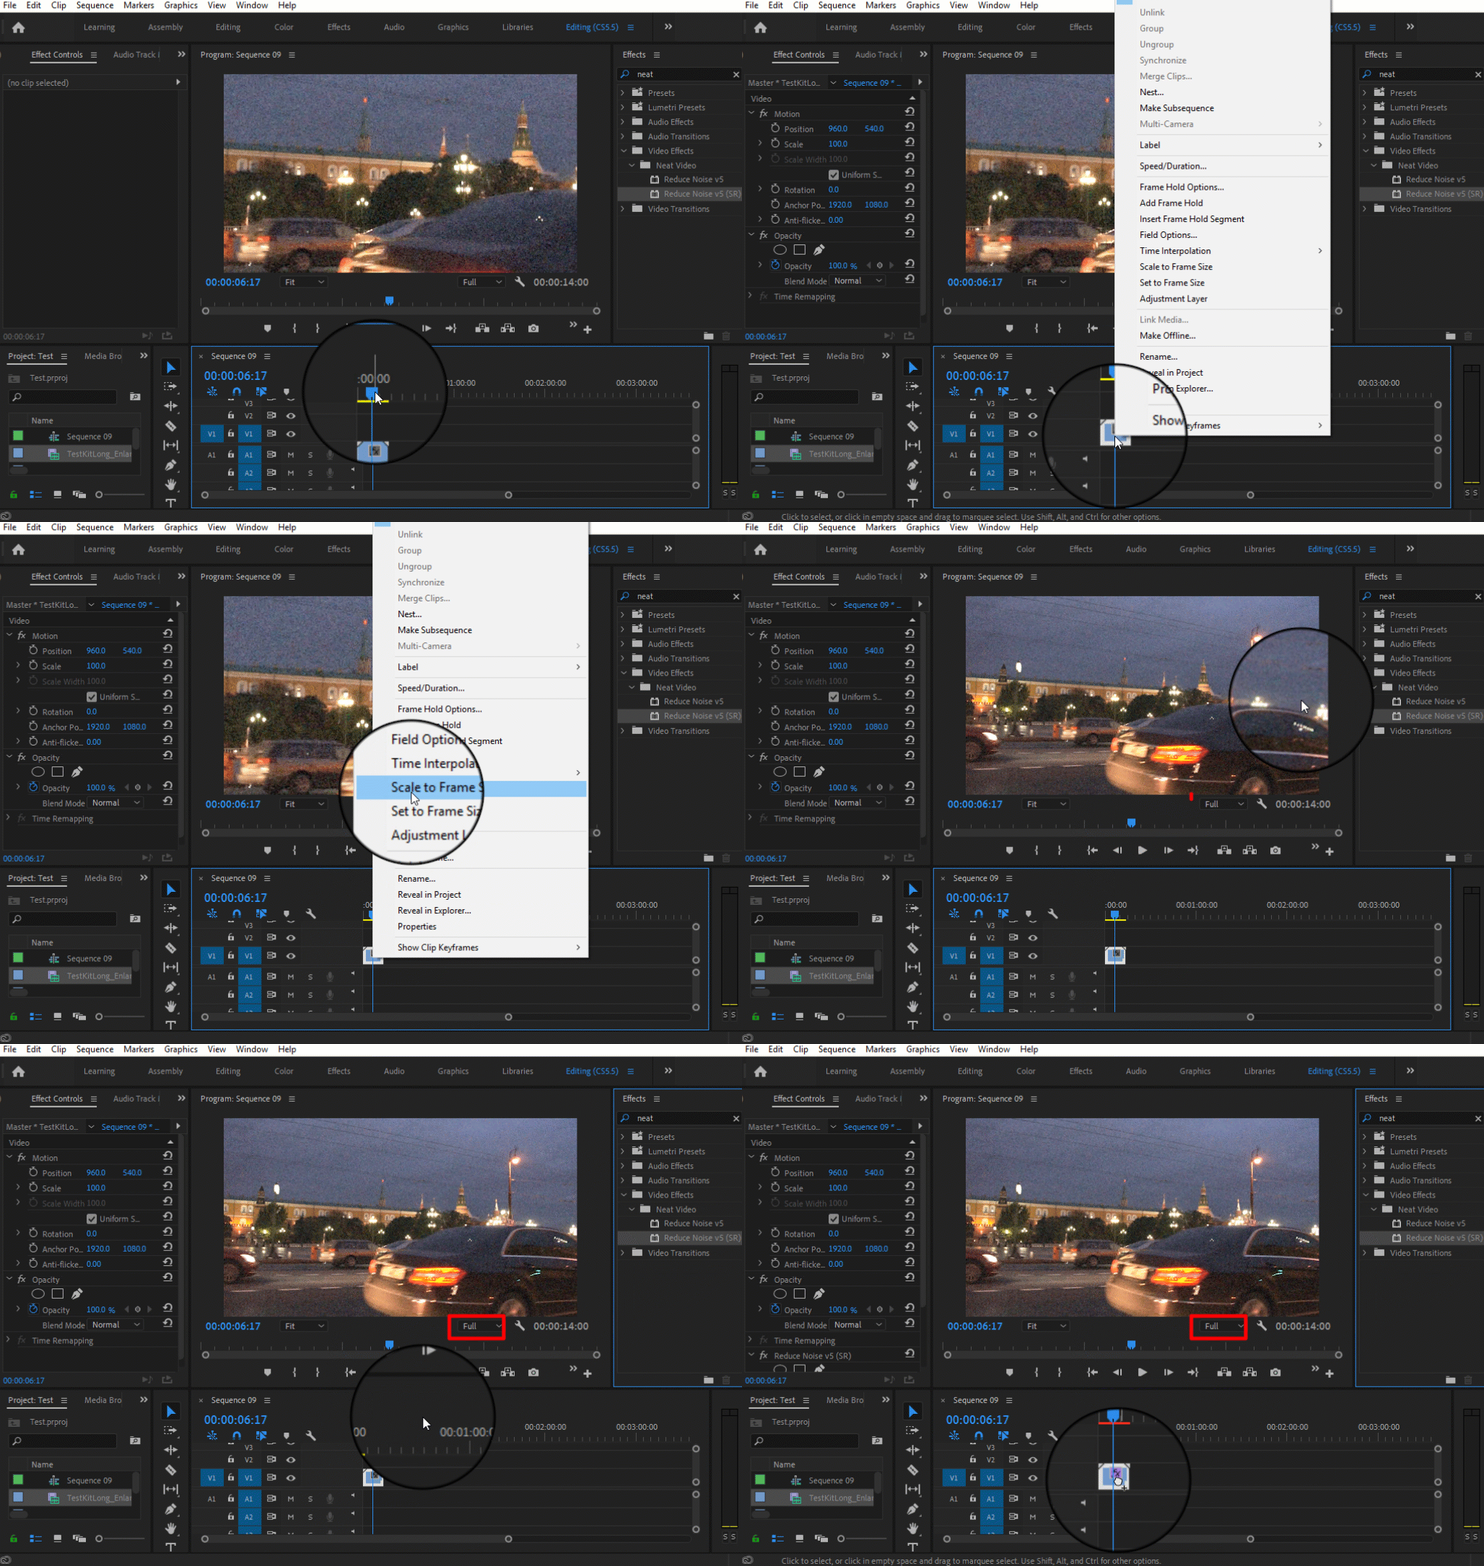
Premiere Pro
- Put a 4K clip into a FullHD sequence.
- Right-click the clip ’s preview in Premiere and select “Scale to Frame Size” in the popup menu. (When you do this, Premiere truly down-sizes the input frames to the size of the sequence (FullHD) before supplying those FullHD frames to effects for further processing).
- Make sure Premiere's preview resolution is set to Full.
- Apply Neat Video to the clip.

If you choose “Set to Frame Size” instead, Premiere Pro will only change the scale, but the actual pixel size of the frame will stay the same and there will be no difference in render time during export. The actual render and Neat Video processing will still be done in 4K resolution, so it will be slower. Still, there may be situations when you may need to use this option, for example, if you want to animate zoom settings in that clip.
When you want to use only a part of a large frame and crop everything else, “Scale to Frame Size ” won’t work, but we can suggest another trick for bringing the render time down. There are actually two options here:
- Crop the video to the desired size, adjust the scale (if needed),
create an Adjustment Layer and apply Neat Video to that
layer.
Or - Crop the video and adjust the scale (if needed), right-click the cropped video, select Nest… and then apply Neat Video denoiser and other effects of your choice to that nested sequence.
Both of these options will allow the denoiser, as well as other effects, applied this way, to receive smaller frames to work with, thus making processing faster.
If you decide to work in a 3K Sequence or larger and resize to FullHD or something similar during export, then enable "Use Maximum Render Quality" in Export Settings. Otherwise, the quality of the final video will suffer.
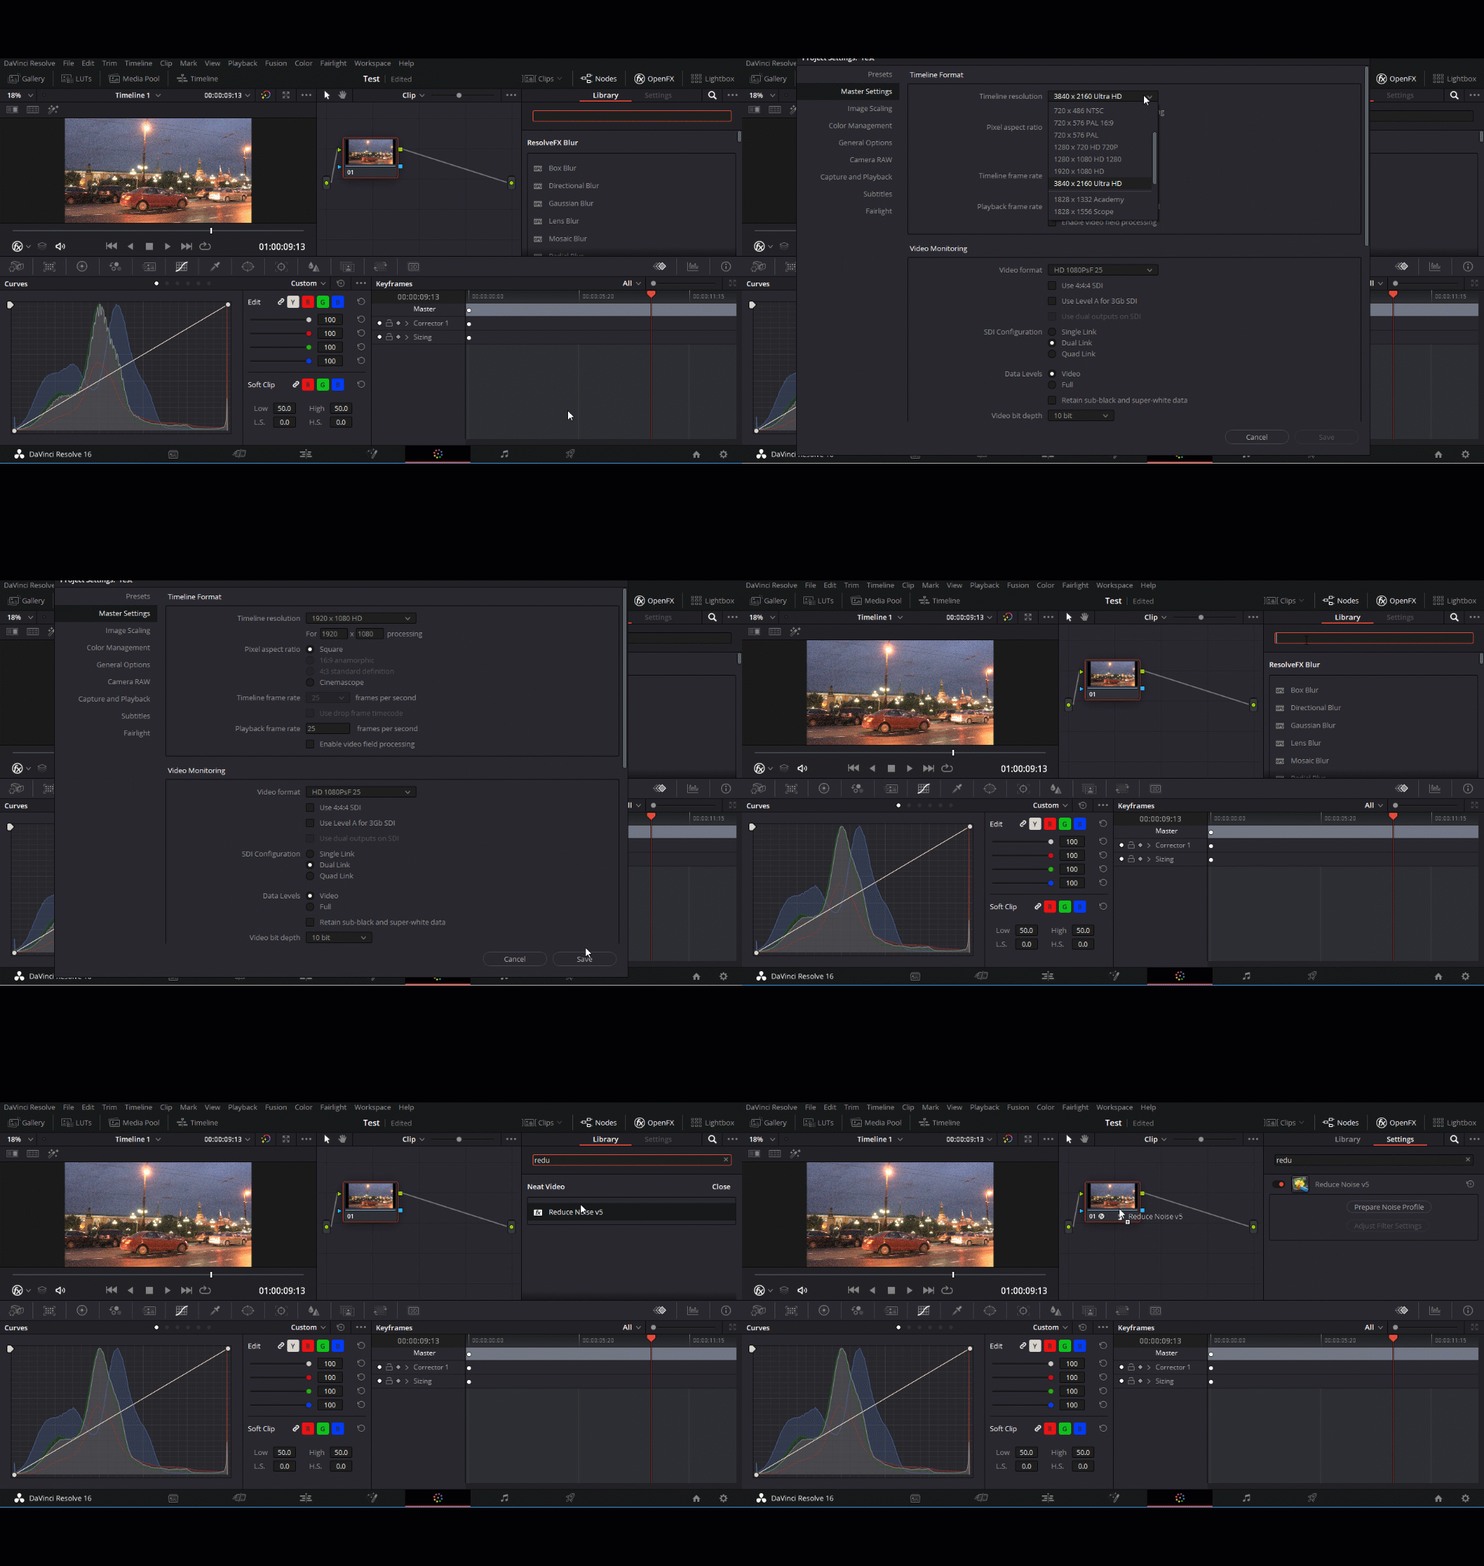
DaVinci Resolve
In DaVinci Resolve, downsizing in pretty straightforward and mostly automatic. You just need to double-check a couple of things:
- Click the Project Settings icon in the bottom right corner and make sure the Timeline resolution is set to 1920x1080.
- Apply Neat Video to the clip.
- Export the final video with the same resolution as that specified in the Timeline settings.

Depending on the codec of the input clip, the speed of reading that clip by Resolve and therefore the speed of the whole render process may very. If you work with especially slow codecs, you can try resizing your clip in a separate project first and saving the output with a faster intermediate codec. Then bring the downsized video into the main project for editing and noise reduction.
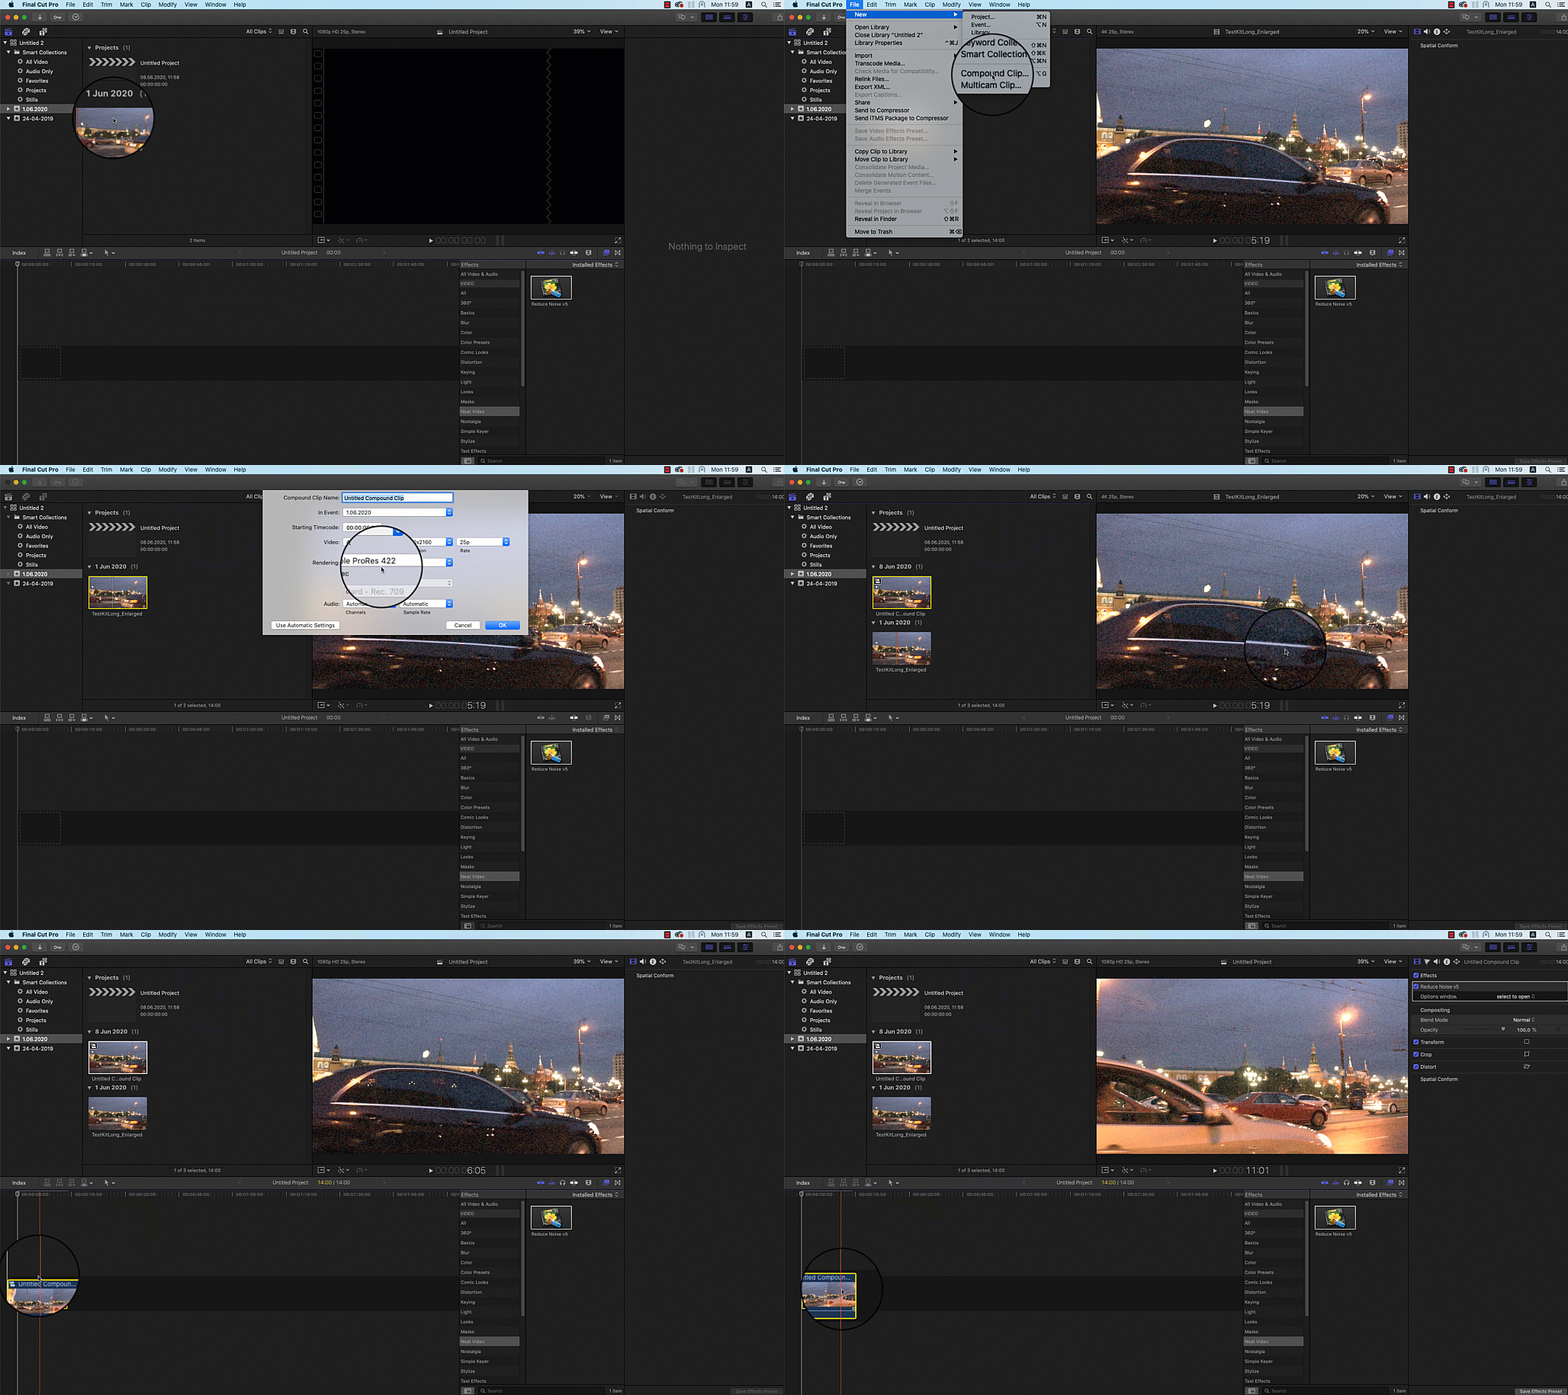
Final Cut
This video editing software allows us to control the size of the frames through compound clips. Here is how you can do that:
- Open/create a FullHD project.
- Select the original 4K clip and create a compound clip from it:
use the menu File > New > Compound Clip ( or keys “Option + G”). - In the pop-up settings window, select Custom in Video Properties and choose 1080p HD Format and 1920 x1080 resolution (or different settings depending on your needs ).
- Put the compound clip into the timeline of the FullHD project. Apply Neat Video to the compound clip in the timeline. Then Neat Video will receive FullHD frames for profiling and rendering.

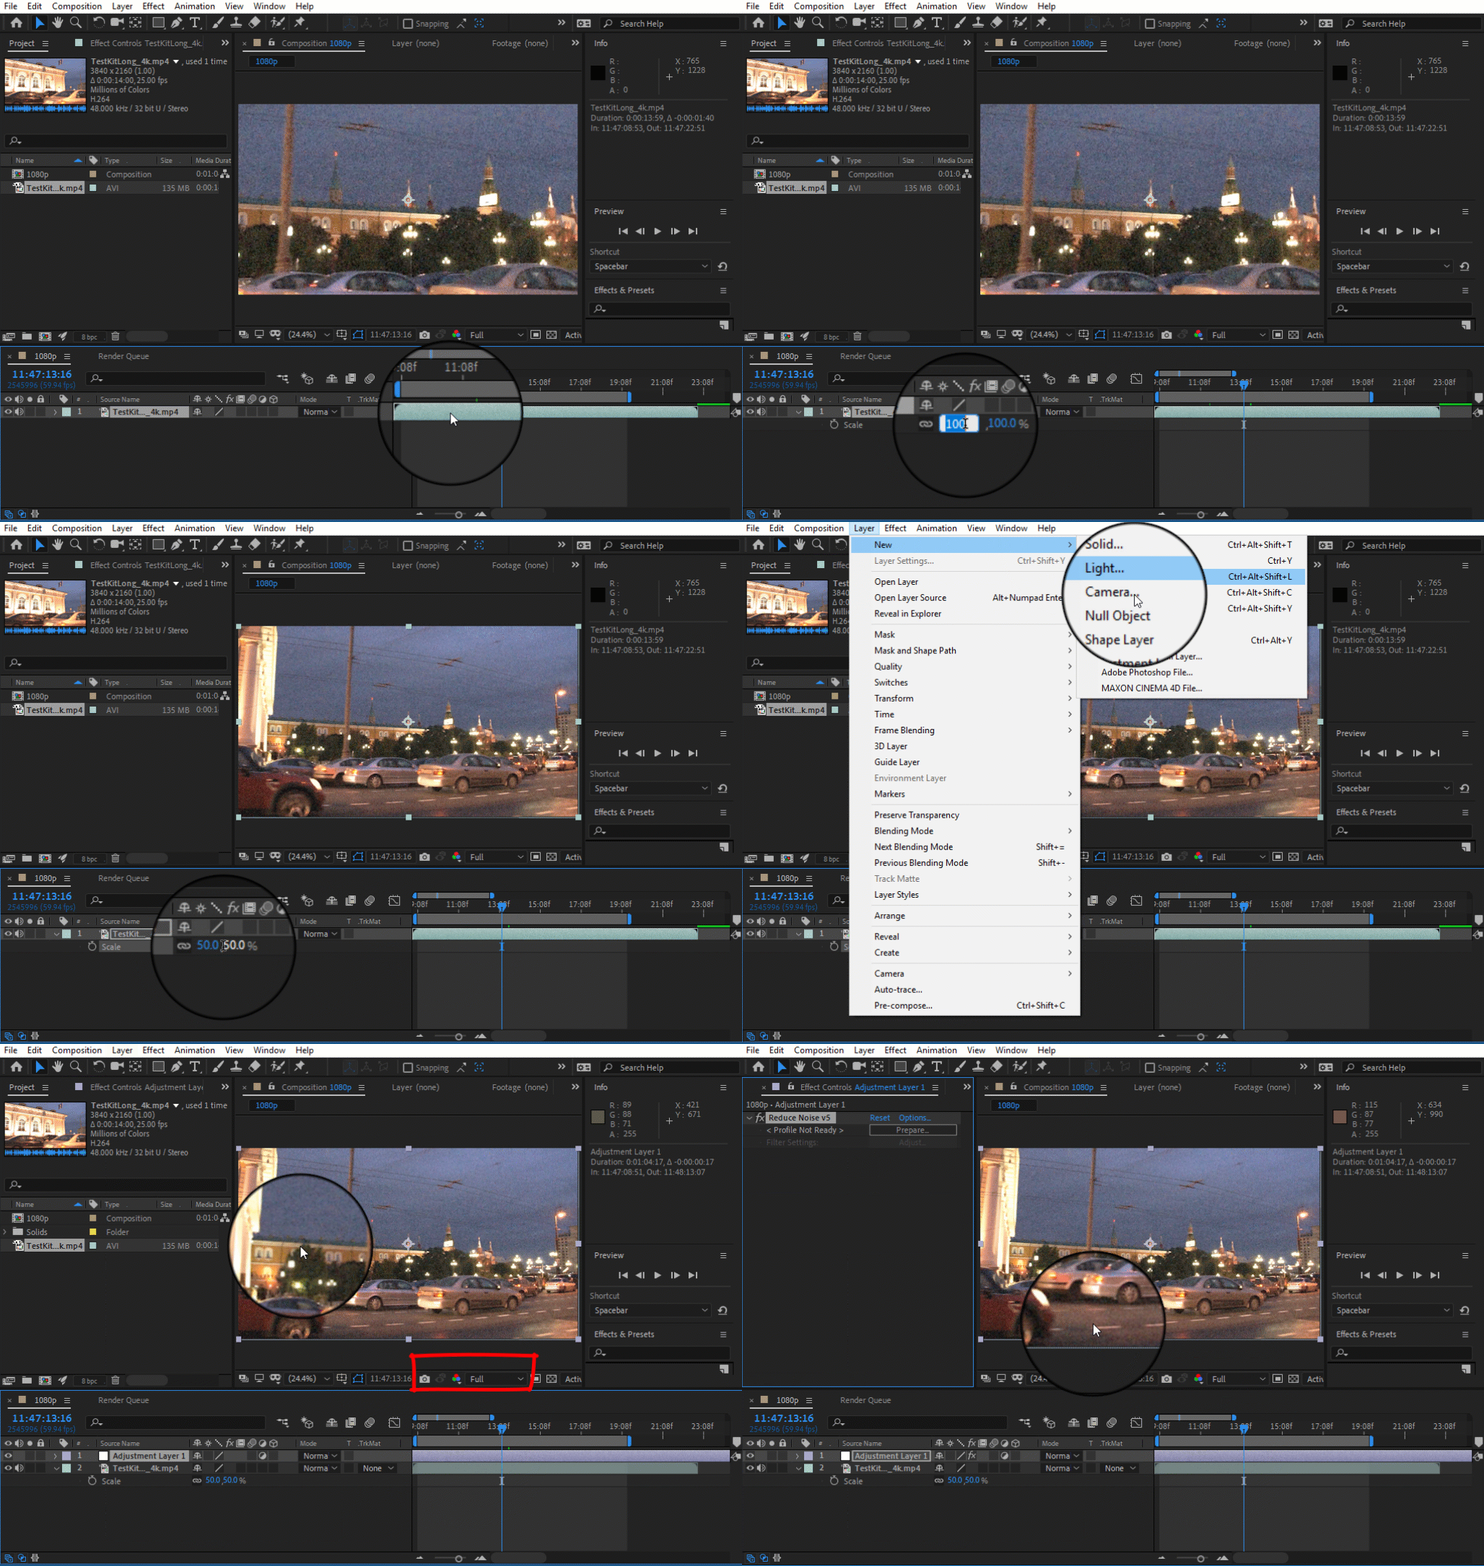
After Effects
After Effects can decrease the resolution of frames (supplied to Neat Video for profiling and rendering) with the assistance of Adjustment Layers. Follow these steps to change the resolution from 4K to FullHD and save render time:
- Create a FullHD composition and place a 4K clip into that composition.
- Adjust the scale (50% if you want to use the entire frame).
- Click Layer > New > Adjustment Layer.
Mac: Option + Command + Y
PC: Alt + Control + Y - Make sure After Effects’ preview resolution is set to Full.
- Apply Neat Video to the Adjustment Layer.

Make things even faster
Neat Video has a special performance optimizer tool that allows to find the best combination of available hardware resources (CPUs and GPUs) to process a specific clip and filter settings. When you switch from one frame size to another or change the temporal radius in Neat Video, make sure you run that tool: go to menu Tools > Preferences > Performance > Optimize Settings > Start. When the test has completed, please click Accept Best Combination. This will let Neat Video itself work faster and that will reduce the overall render time.