Drone tricks: sunrise above the clouds
Guest article by Dr. Christoph Oberschneider
1983 born and raised in Salzburg, Austria, my original plan was to become a medical doctor. Everything looked to go according to this plan until I got my first camera in 2012.
By the time I finished studying and received my medical degree, I was already too deep into photography.
Coming from a strong skiing background, my vision has since then been to capture the soul of the sport, to infect the world around me with my absolute passion for skiing.
But it’s not just about skiing: Every sport has its special, unique feeling to it, and I love to make this feeling visible with my images.
Playing with light and shadows, finding new angles, different perspectives - that’s what photography is all about, and where drones come into play! A flying camera that can be positioned nearly anywhere opens up a whole new dimension of creative possibilities.
Choose the best possible time and the right place to get the shot
In November 2021, I got an offer from DJI to test the Mavic 3 in return for receiving stills and videos they could use for advertising the drone, I didn’t hesitate and accepted the offer. The fall was nearly over here in the Alps around Salzburg. Most days were dominated by grey colors, fog and low clouds, not the conditions you’d wish for. However, sometimes you have to make it right. No matter what.
So, November in the Alps. It’s cloudy, grey, foggy and cold. On the other hand, however, low clouds can be ideal if you manage to find a mountain that rises just above them and maybe even get there right in time for sunrise.
Sounds easy in theory, right? There should be more than enough mountain peaks to choose from when you’re living in the Alps. The challenge is to predict how far the fog or low clouds will reach up, so it’s basically a matter of trial and error (and luck) to be in the right place at the right time.
Find the spot
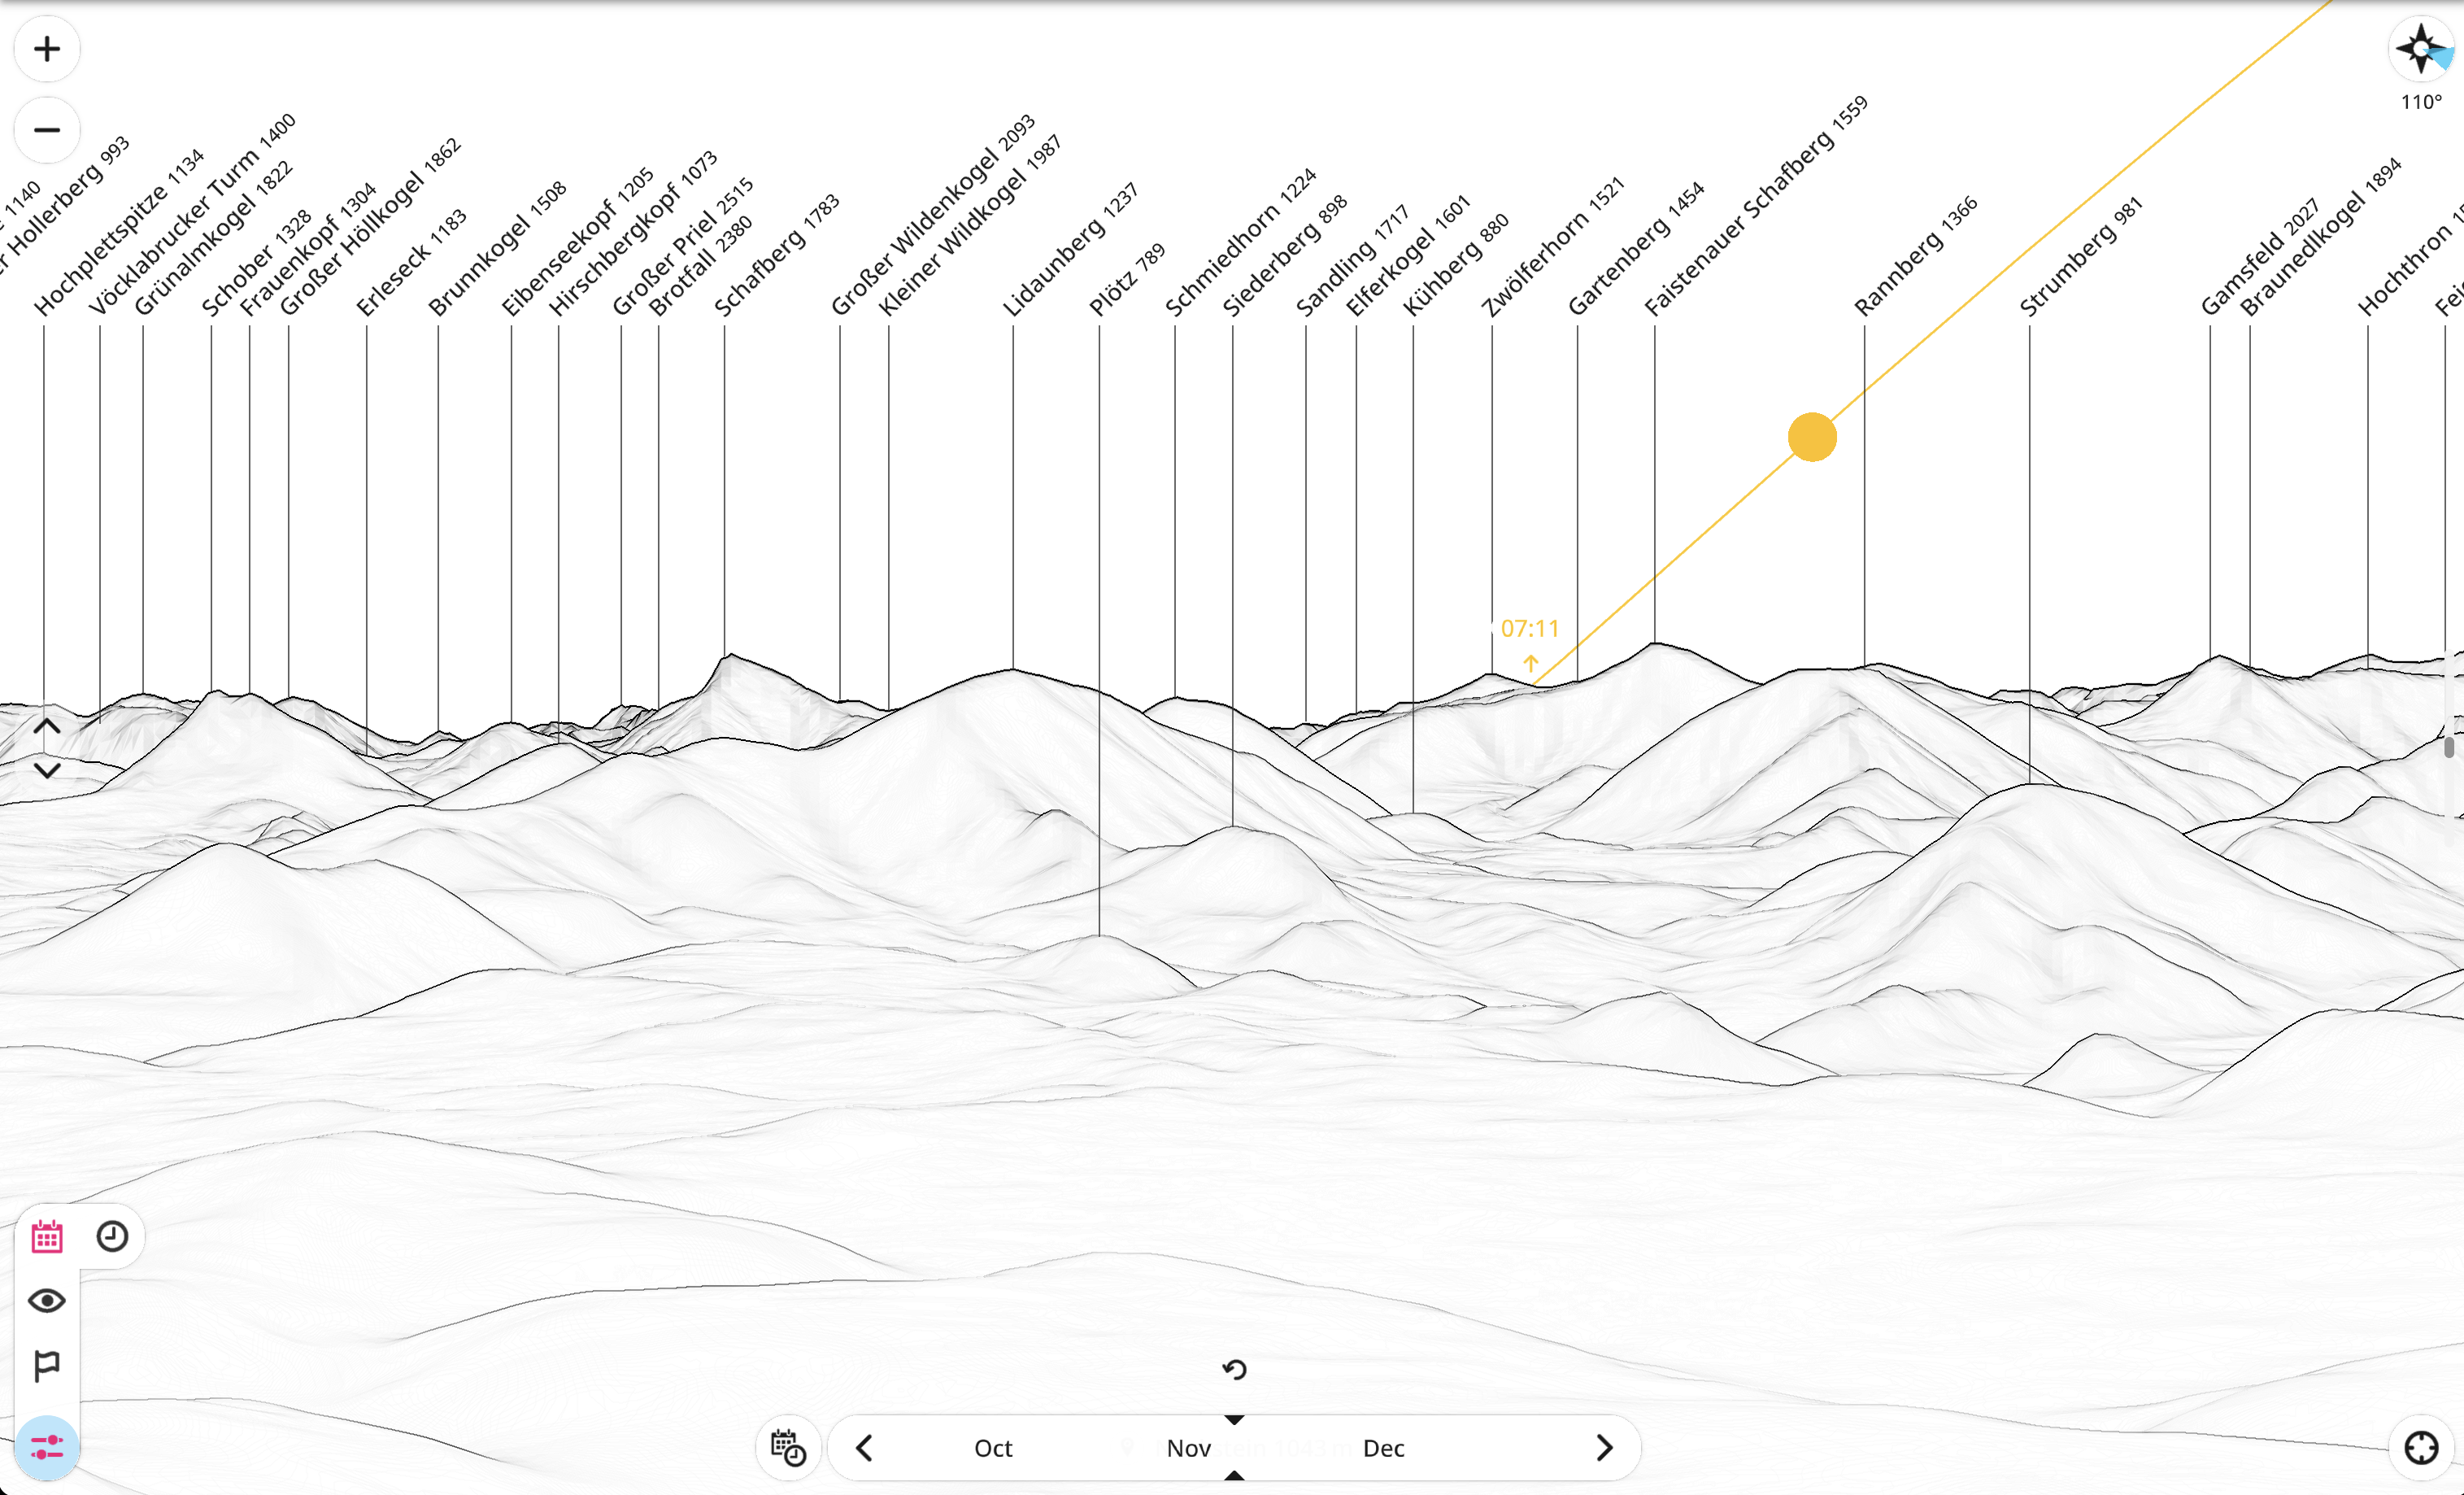
Thanks to Google Earth, the ‘finding the right place’ part is now easier than ever, especially since it’s possible to show the trajectory of the sun directly in the 3D landscape. (There’s also an option to show which parts of the landscape are actually visible from a given viewpoint. That can be really useful as well, but was not necessary for this project.)
PeakFinder also works well for this purpose:
Do your timing calculations
It’s needless to say that it can get quite cold in mid-November, especially when you’re waiting for sunrise on top of a mountain, so it’s vital to calculate the time you would need to get to the peak right from your doorstep to avoid having to wait in freezing temperatures. Flying a drone with cold fingers makes getting those beautiful smooth shots nearly impossible.
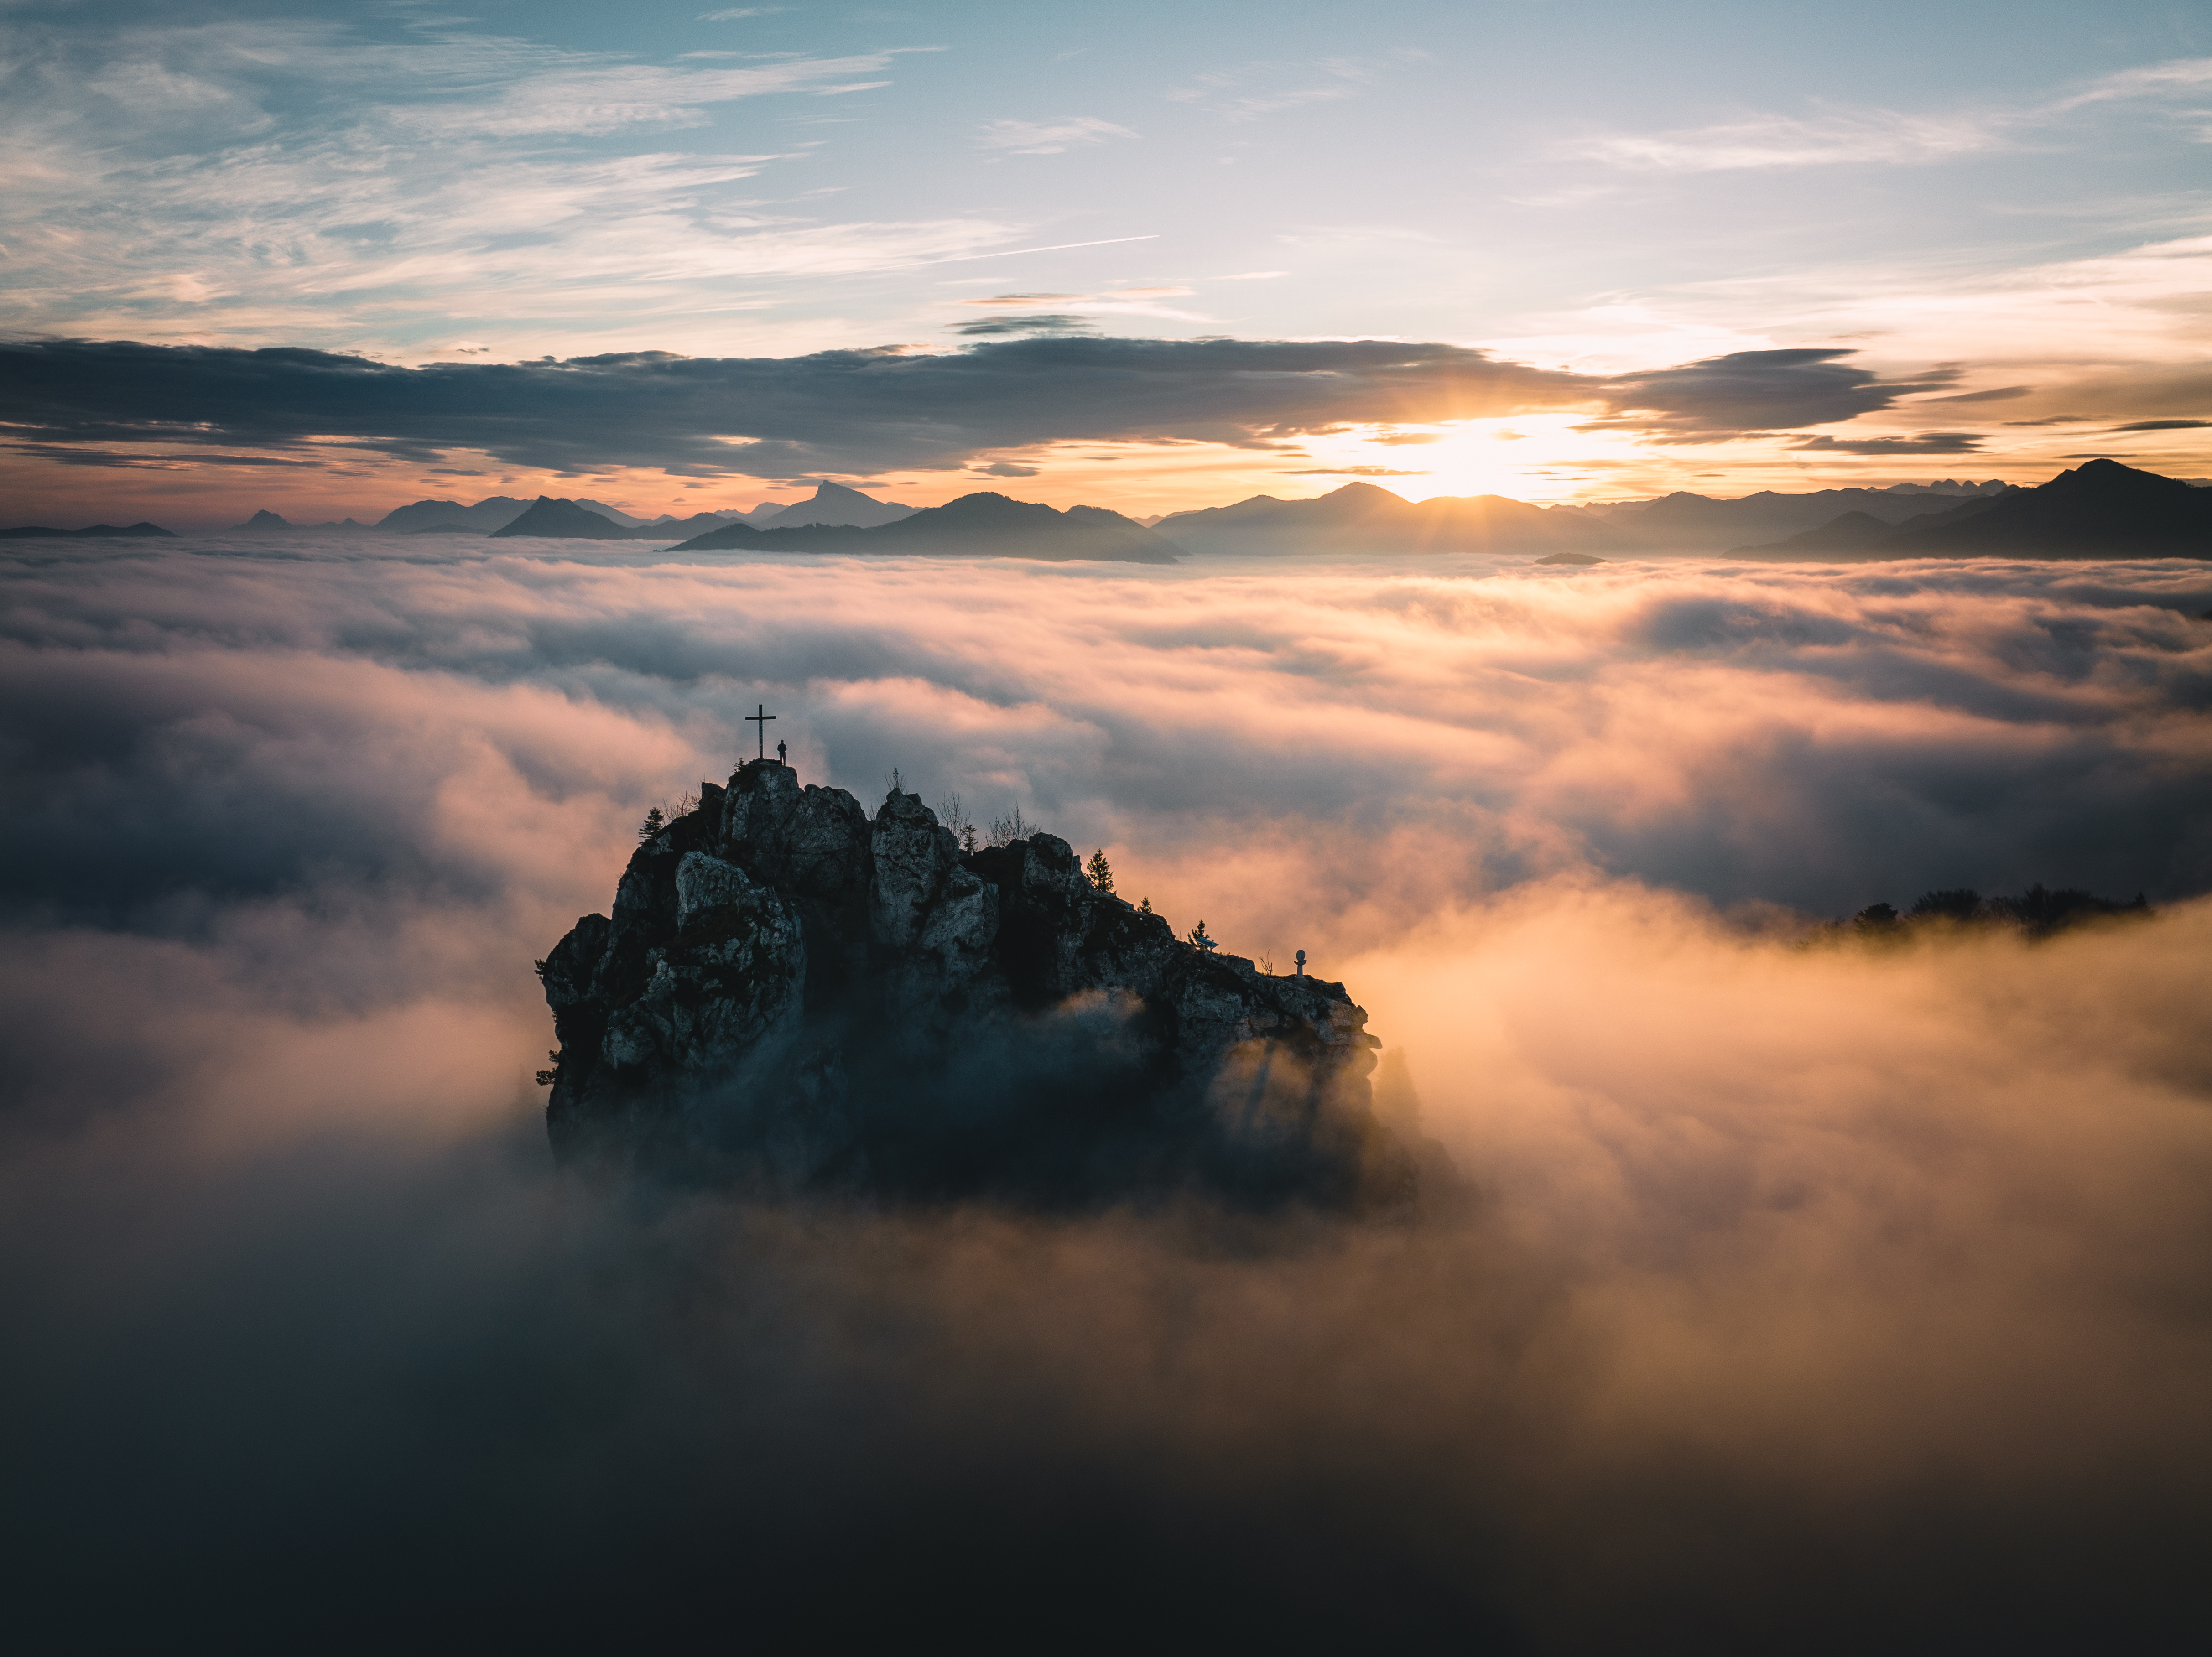
After 2 unsuccessful attempts to capture the sunrise above the fog from my chosen viewpoint, where either the clouds were too high or too low, I was finally lucky, though it didn’t seem that way at first. Arriving at the peak 10 minutes before sunrise, the clouds were just a bit too high, maybe by 30 meters, which was incredibly frustrating. To my surprise the clouds were coming down lower the closer it was to sunrise, and soon I was above the sea of clouds and launched the Mavic just in time.
DJI Mavic 3 settings to capture sunrise above the clouds
It’s difficult to stress enough the importance of selecting the right settings for your shot. I decided to film in 5.1K at 30 frames and chose 10 bit DLOG (in H.265), which basically records the footage in a very flat and desaturated format to give maximum flexibility in post-production. DLOG footage can either be graded all manually or with the help of a LUT that brings back contrast and colors and is a good starting point for final grading.
The Mavic 3 can also record DLOG using the H.264 codec which may be easier to edit, but the image quality of the more modern H.265 codec should show fewer compression artifacts. The same logic applies to choosing the ideal frame rate: While the Mavic 3 can record in 5.1K at up to 50 fps, using the 30 fps mode can result in slightly better image quality. Recording fewer frames per second means that each frame gets to use more of the limited data rate available.
For those thinking about using the normal color mode to avoid the grading process, be aware that this mode records only in 8 bit on the regular Mavic 3 (though it’s 10 bit on the Mavic 3 Cine in ProRes). 10 bit video has far more room for grading compared to 8 bit.
Recording in DLOG also means having to deal with the only 2 available ISO settings in this mode, 400 and 800. I went for ISO 400 to minimize image noise. To get some nice motion blur, it’s ideal to set the shutter speed at roughly 1/60s (when filming at 30 fps). Using an aperture of f/5.6 which is about the sweet spot for this lens regarding sharpness, I had to use an ND16 filter to get a correctly exposed image. White balance was set to 5600, and using manual focus ruled out any situation where the camera would have to hunt for something to focus on.
Capturing the bright sun rising above a dark landscape means having to find a balance between exposing the highlights and not crushing the shadows. Make sure to use zebras or the histogram to get the exposure right, don’t just trust what you see on the display of your phone or remote controller.
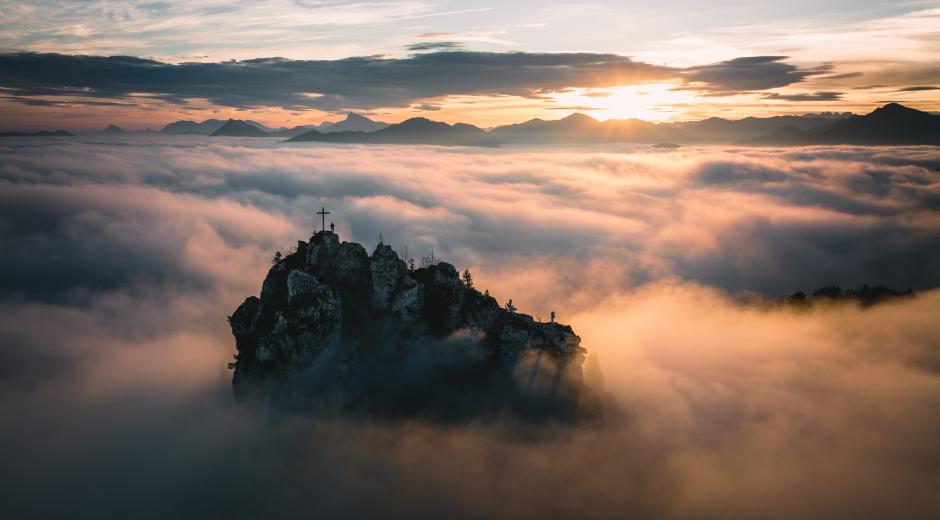
The scenery was incredible. Standing on the rocky peak of the mountain, right above a layer of moving clouds, the sun was illuminating the whole scene with golden light. It was even better than I imagined.
The way from SDR & DLOG to HLG / HDR
To get some life back into the flat-looking DLOG footage with the help of a LUT, there are various options to choose from. DJI provides a free LUT for the Mavic 3 on their website, but that did not get the results I was looking for (DJI has recently released another version of the Mavic 3 LUT on their website which works a lot better than the original). I purchased a LUT from The Film Poets, which added some nice warm tones in addition to adding contrast and saturation.
After finding the right soundtrack for the video on Artlist and some polishing with Neat Video, the project was completed.
.…until I found out that DJI had released a firmware update that unlocked the HLG HDR mode on the Mavic 3. After trying this mode I was so impressed by the vivid colors and the brightness of the footage, that I started to look for a way to convert the 10 bit DLOG footage from my ‘Above the Clouds’ project to HLG. And I’m happy to say that there is indeed a way to make it work!
These are the basic settings in FCPX:
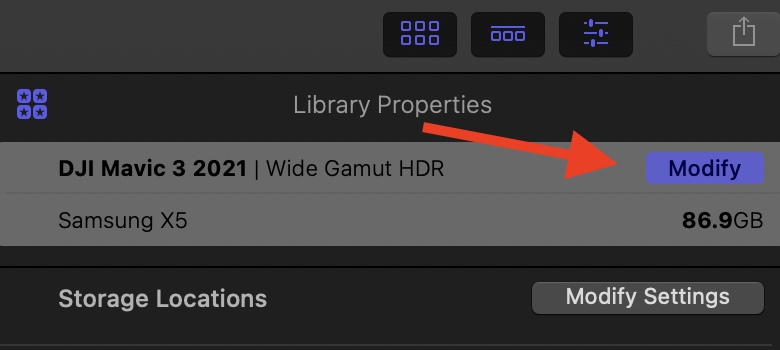
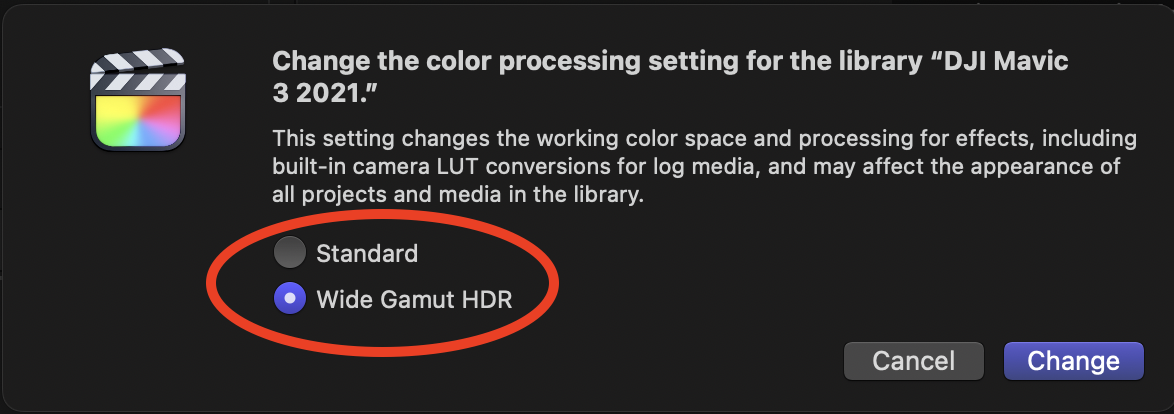
Set the working color space in the media library properties to Wide Gamut HDR:
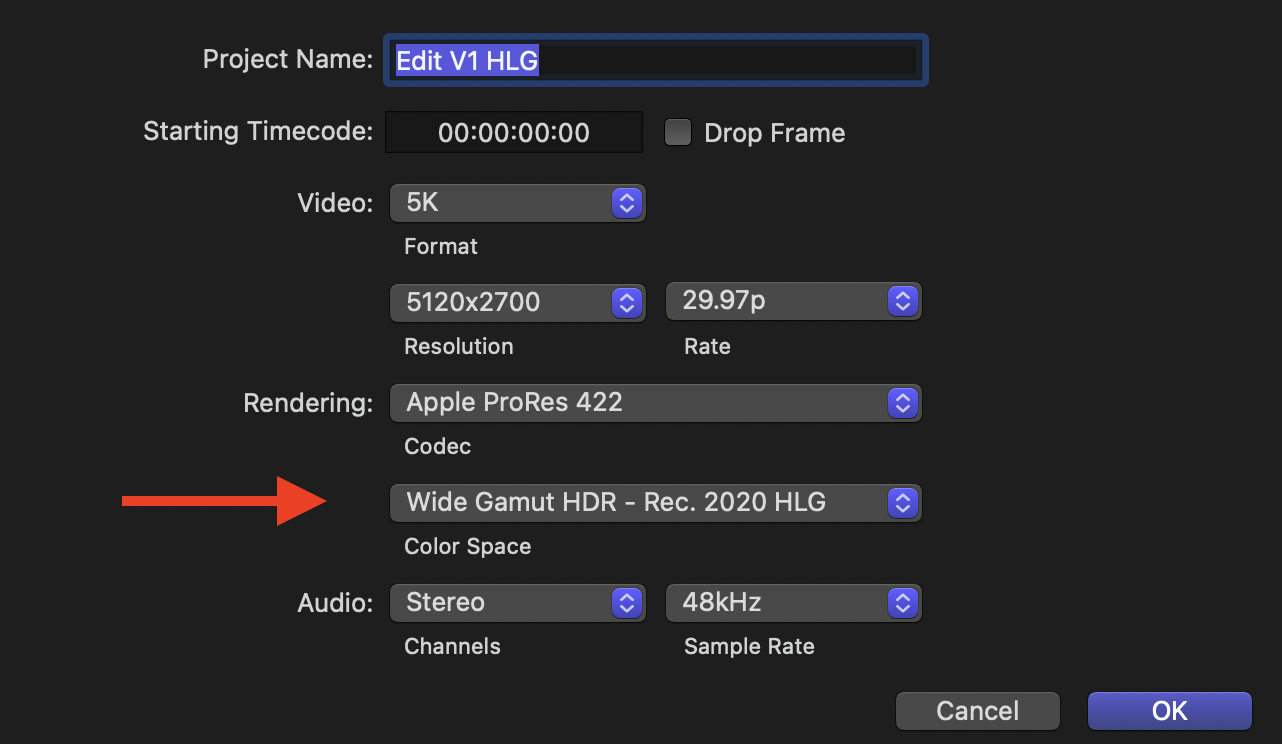
Make sure the project settings are set to ‘Wide Gamut HDR - Rec. 2020 HLG’ color space:
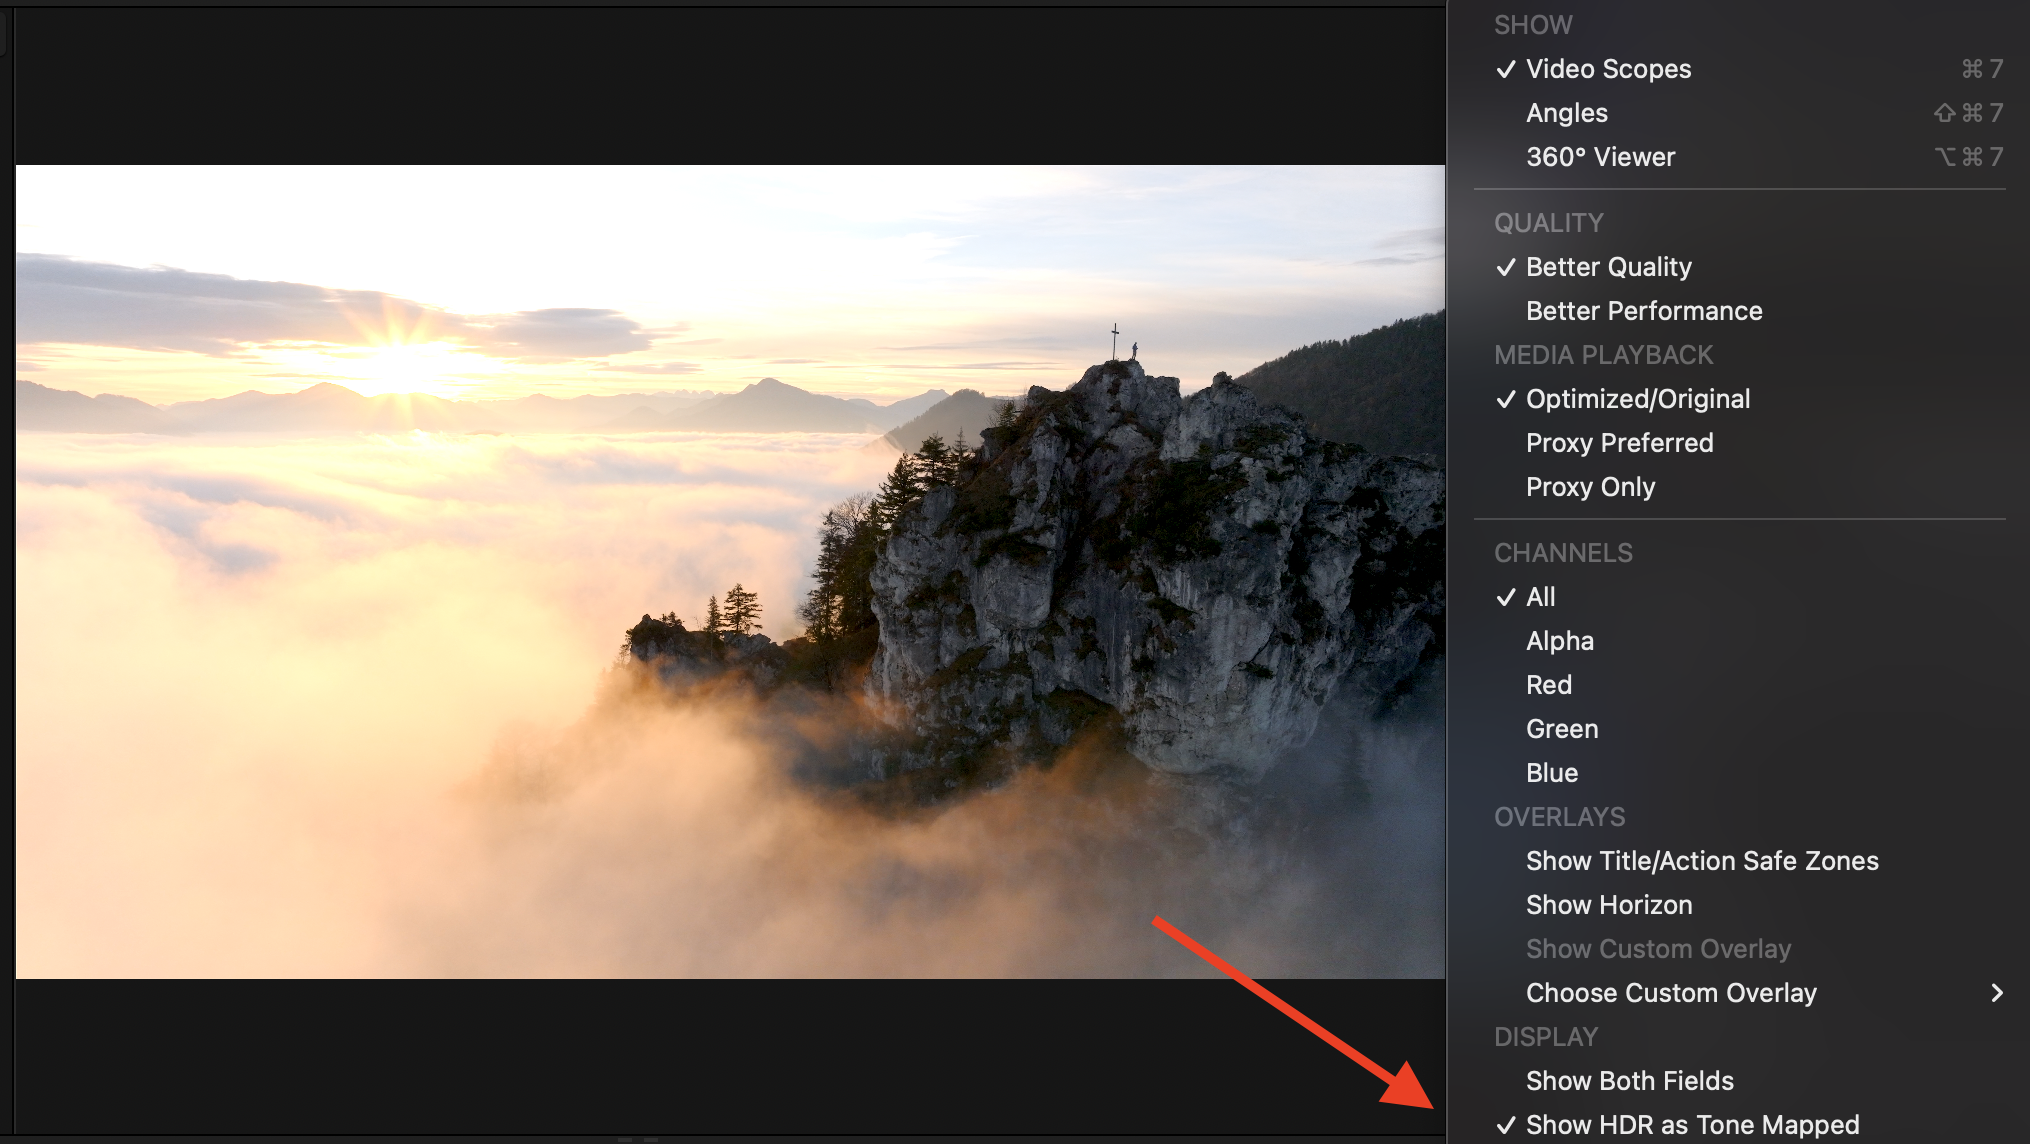
In case you’re not working on an HDR-capable monitor, adding a 10 bit DLOG clip to the timeline will give you a blown-out image. Make sure to enable ‘Show HDR as tone-mapped’ in the ‘View’ pop-up menu in the upper right corner of the viewer.
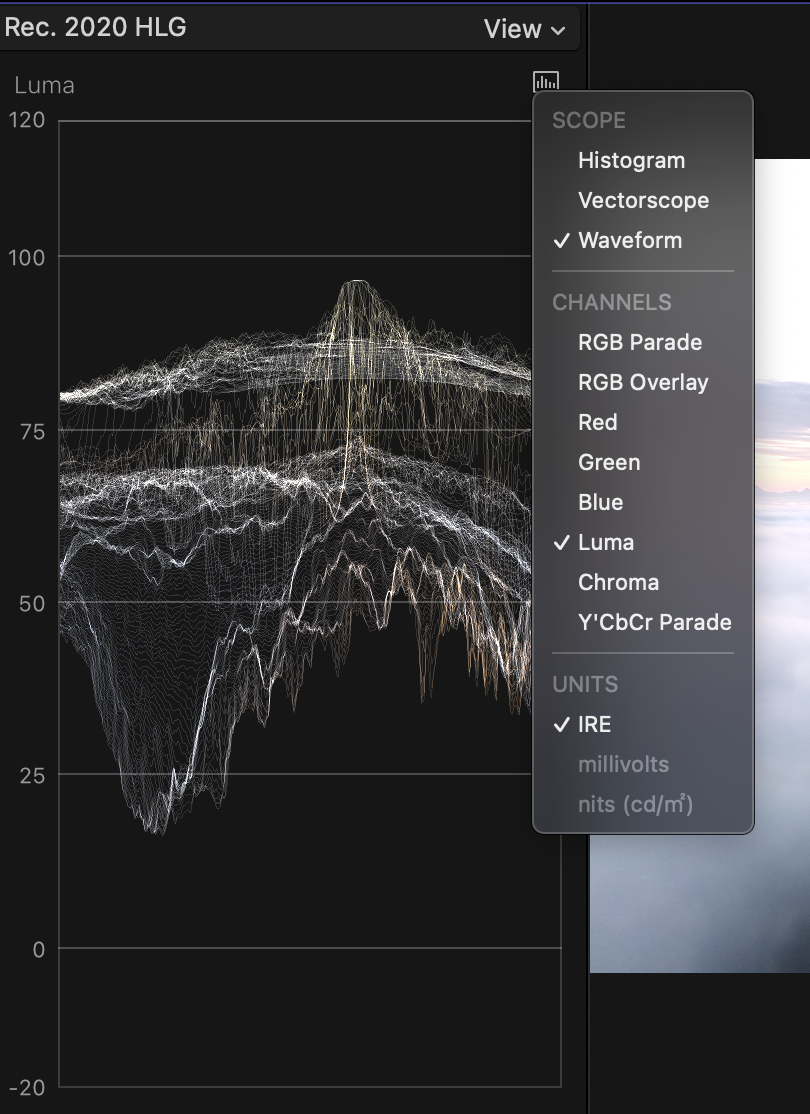
Video scopes are essential tools for grading.
This waveform scope is used to display the luma values, making it easy to avoid blown-out highlights (values above 100) or crushed shadows (below 0).
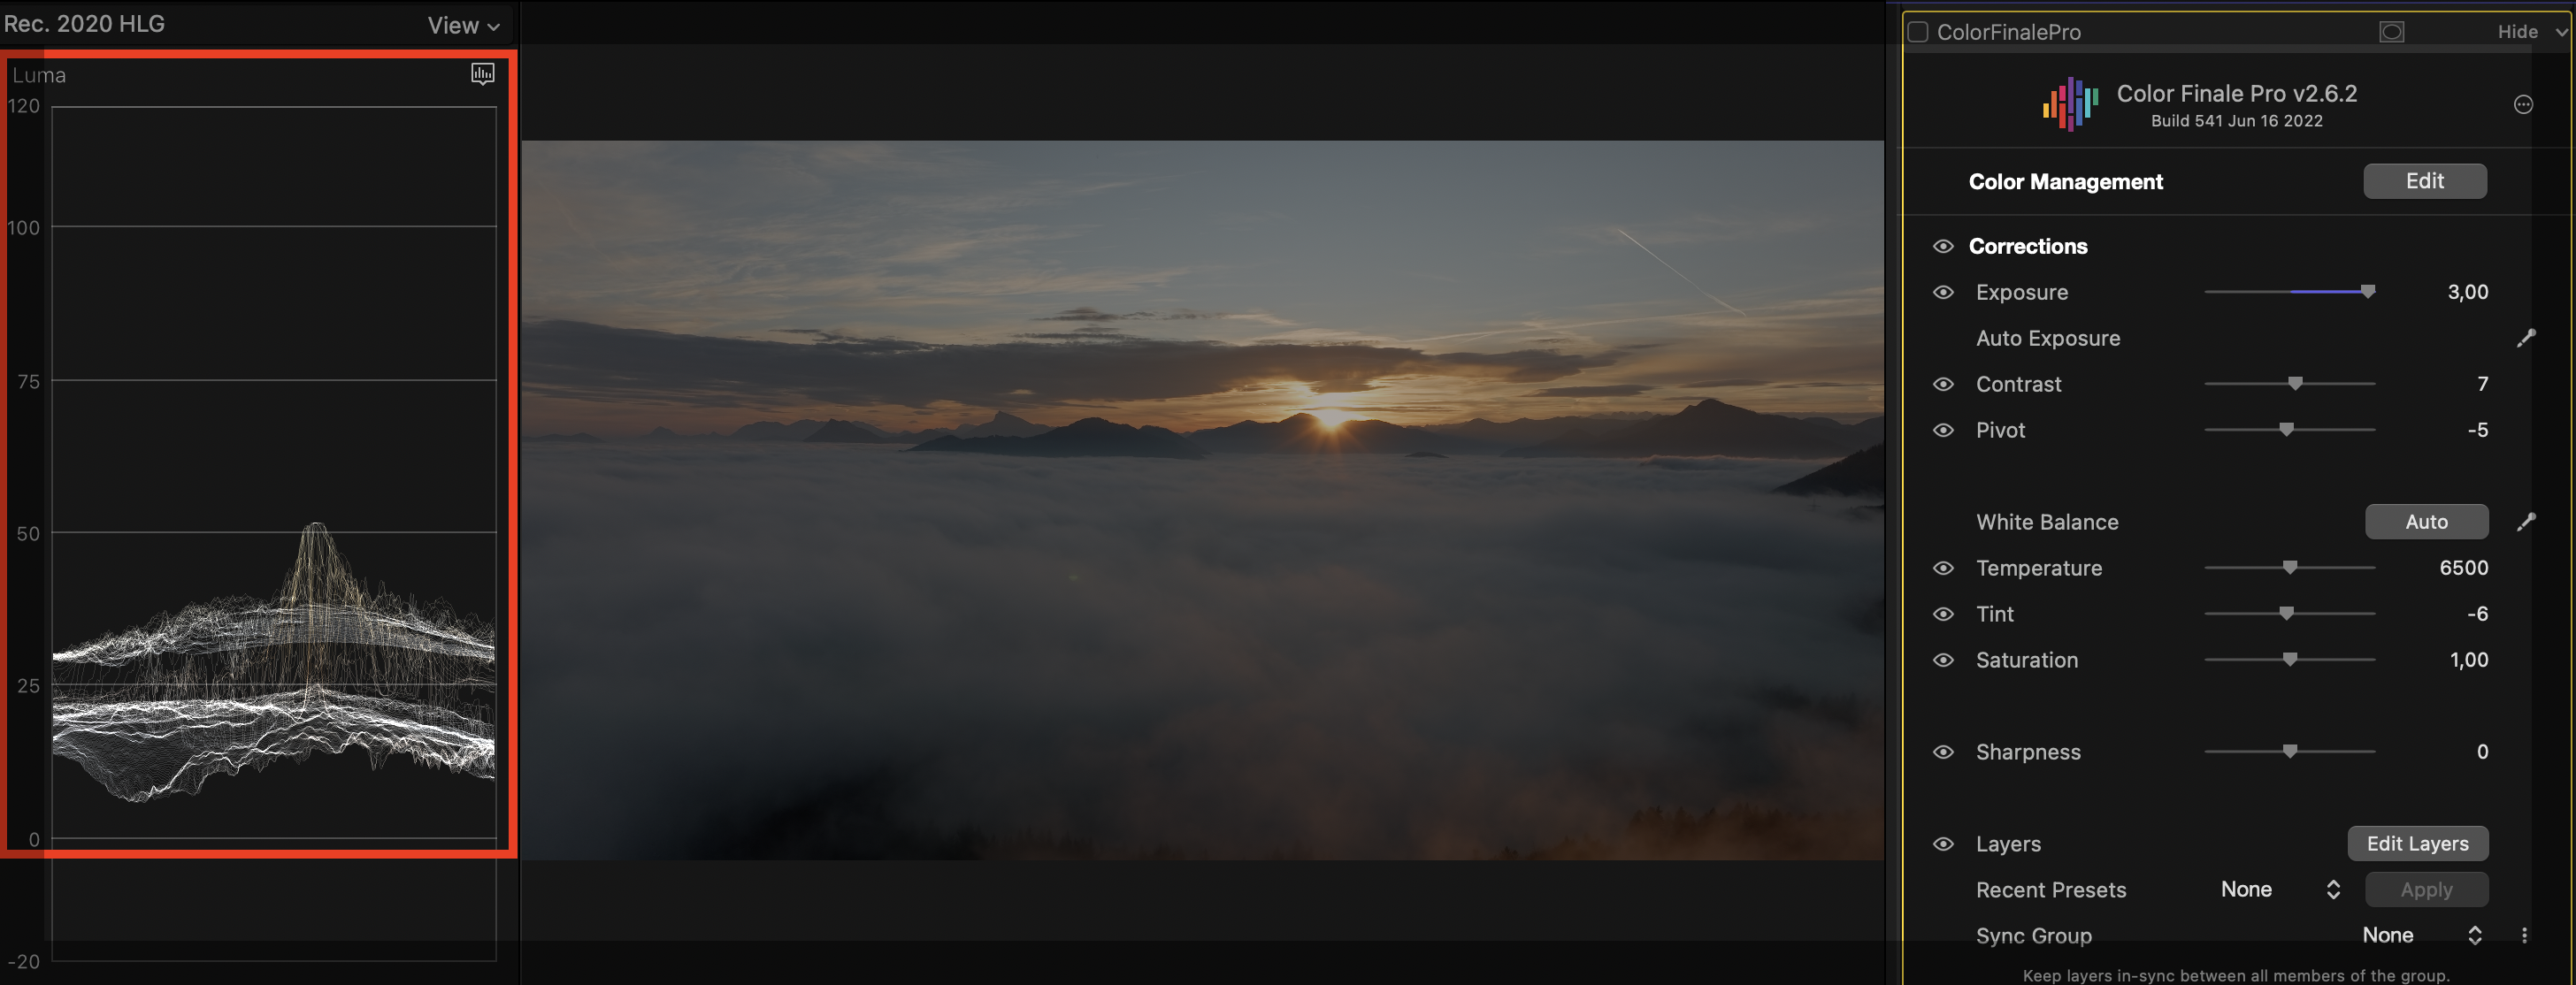
The uncorrected, non-HDR clip in your HDR timeline will not automatically make use of the increased available dynamic range of the Rec. 2020 HLG color space, so it needs manual adjustments. Color Finale 2 is a fantastic tool for this task, but the standard tools of FCPX work fine as well. Here’s the uncorrected image (notice the luma values):
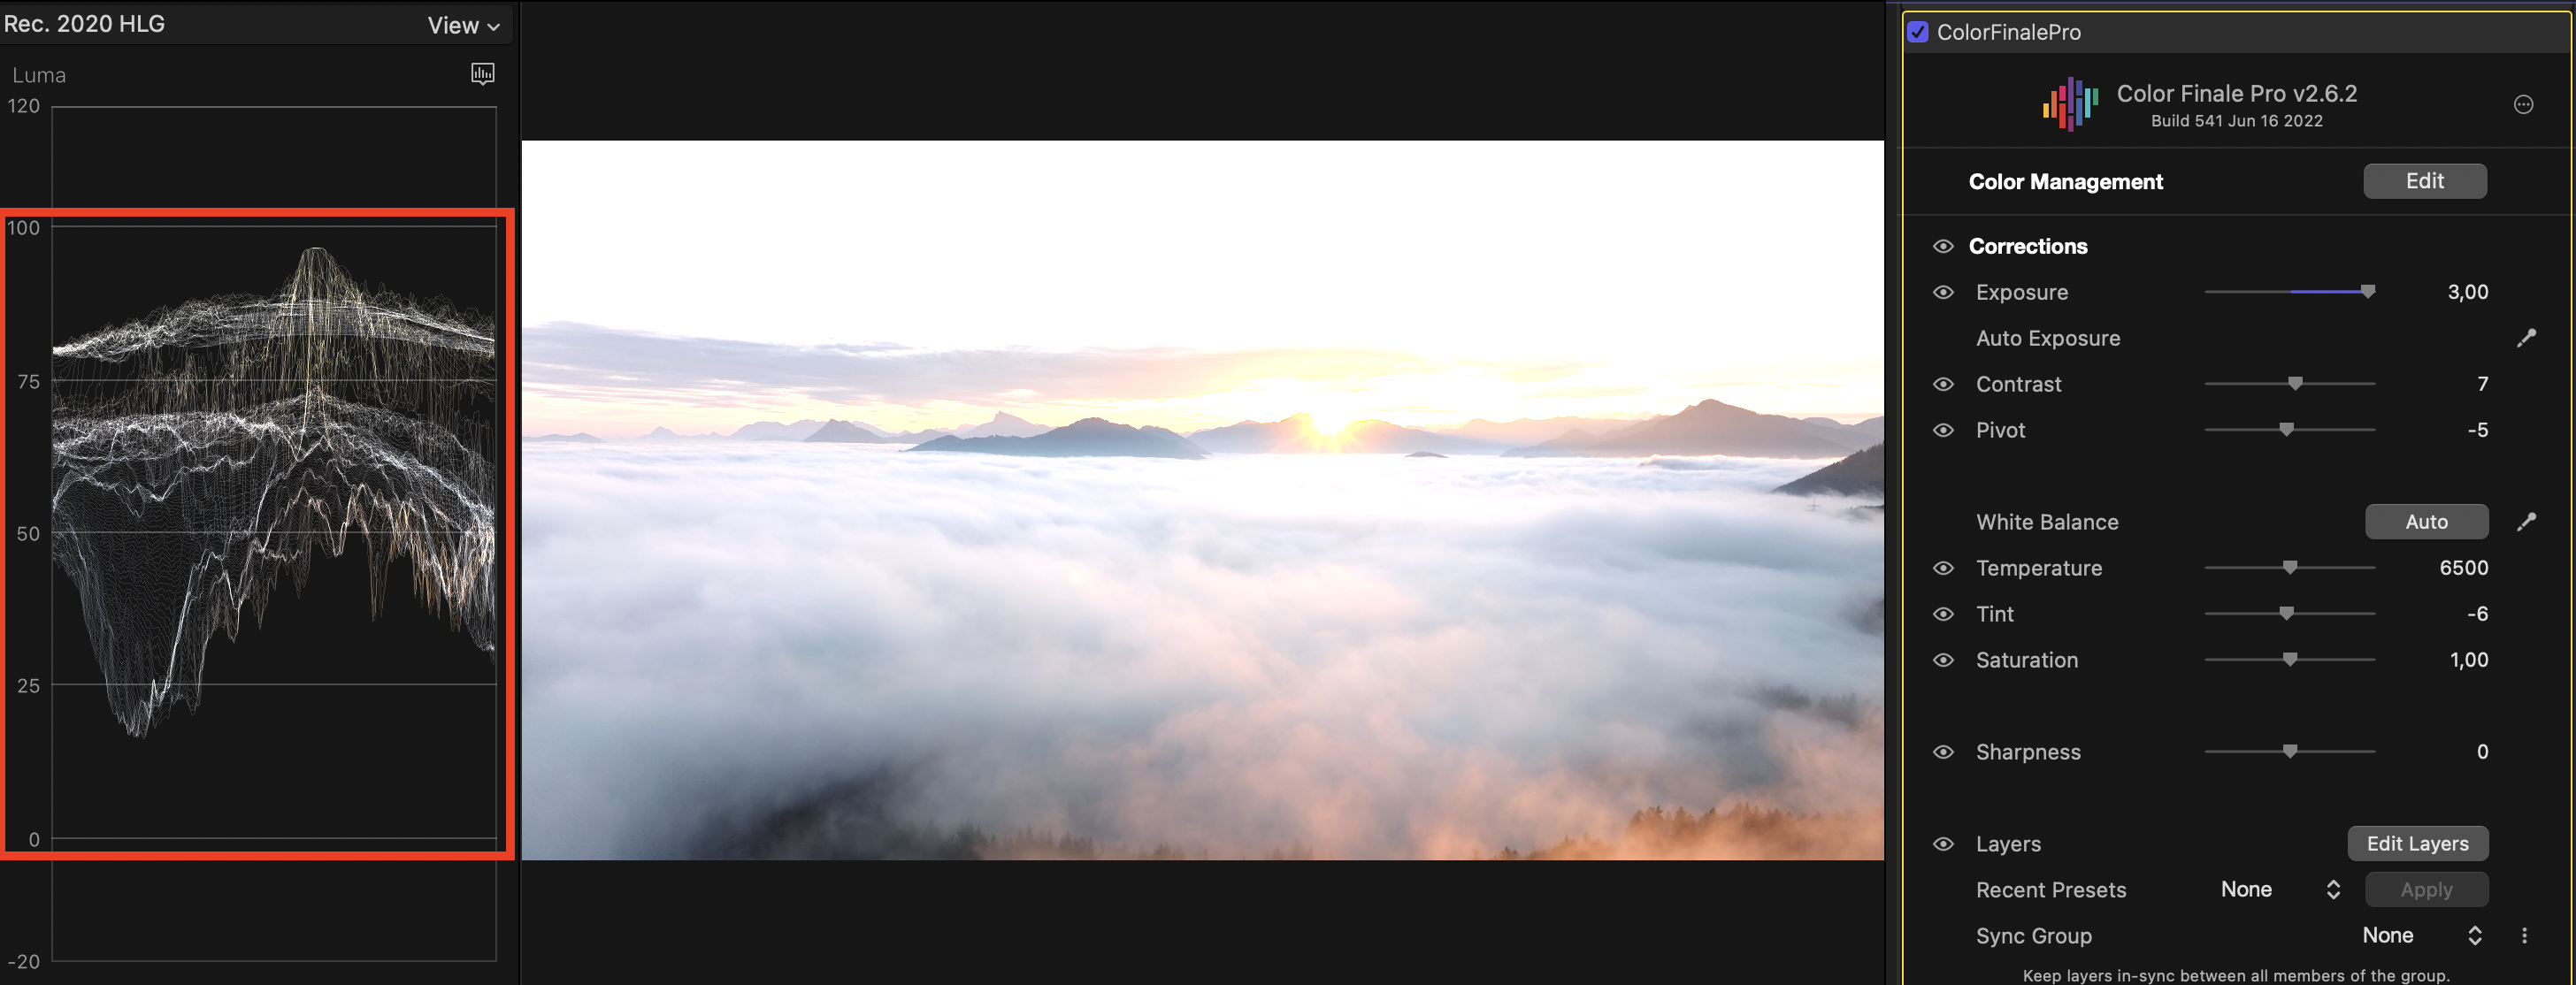
After exposure correction, using the full range of the HLG color space:
Final step: noise reduction & sharpening with Neat Video.
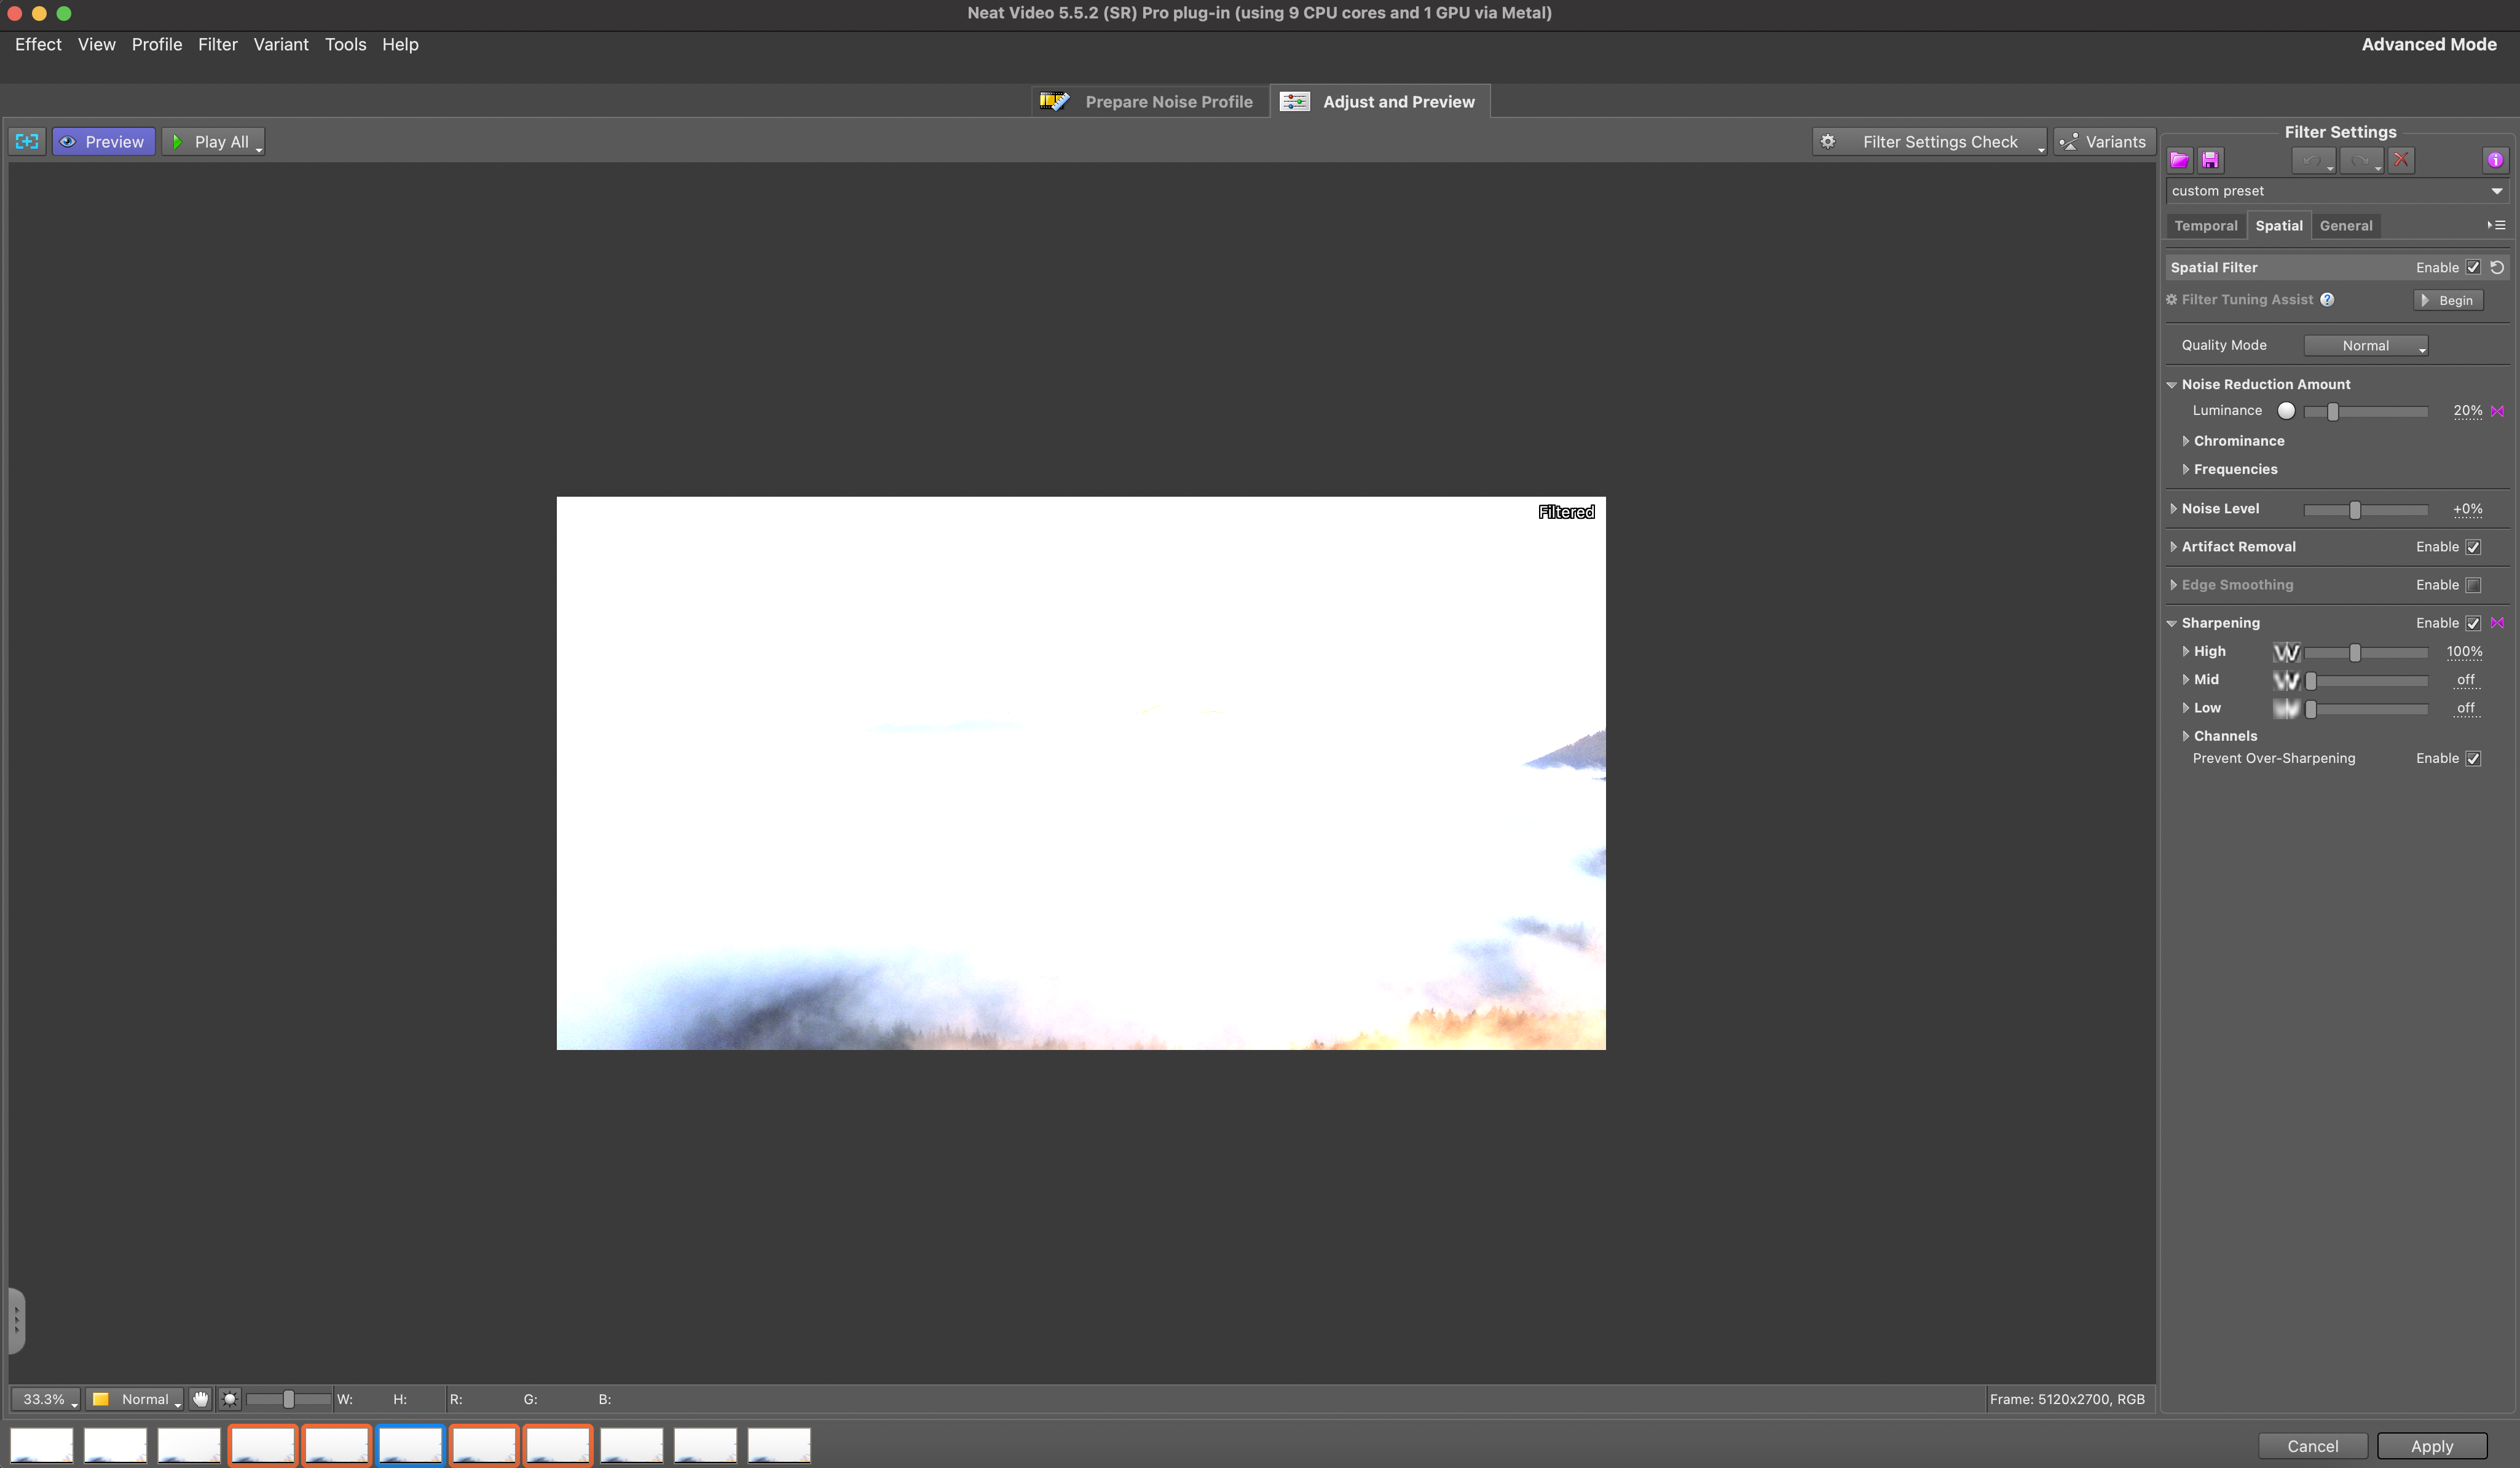
Adding Neat Video as the last effect after having corrected the exposure of your clip results in a blown-out image in the NV options window:
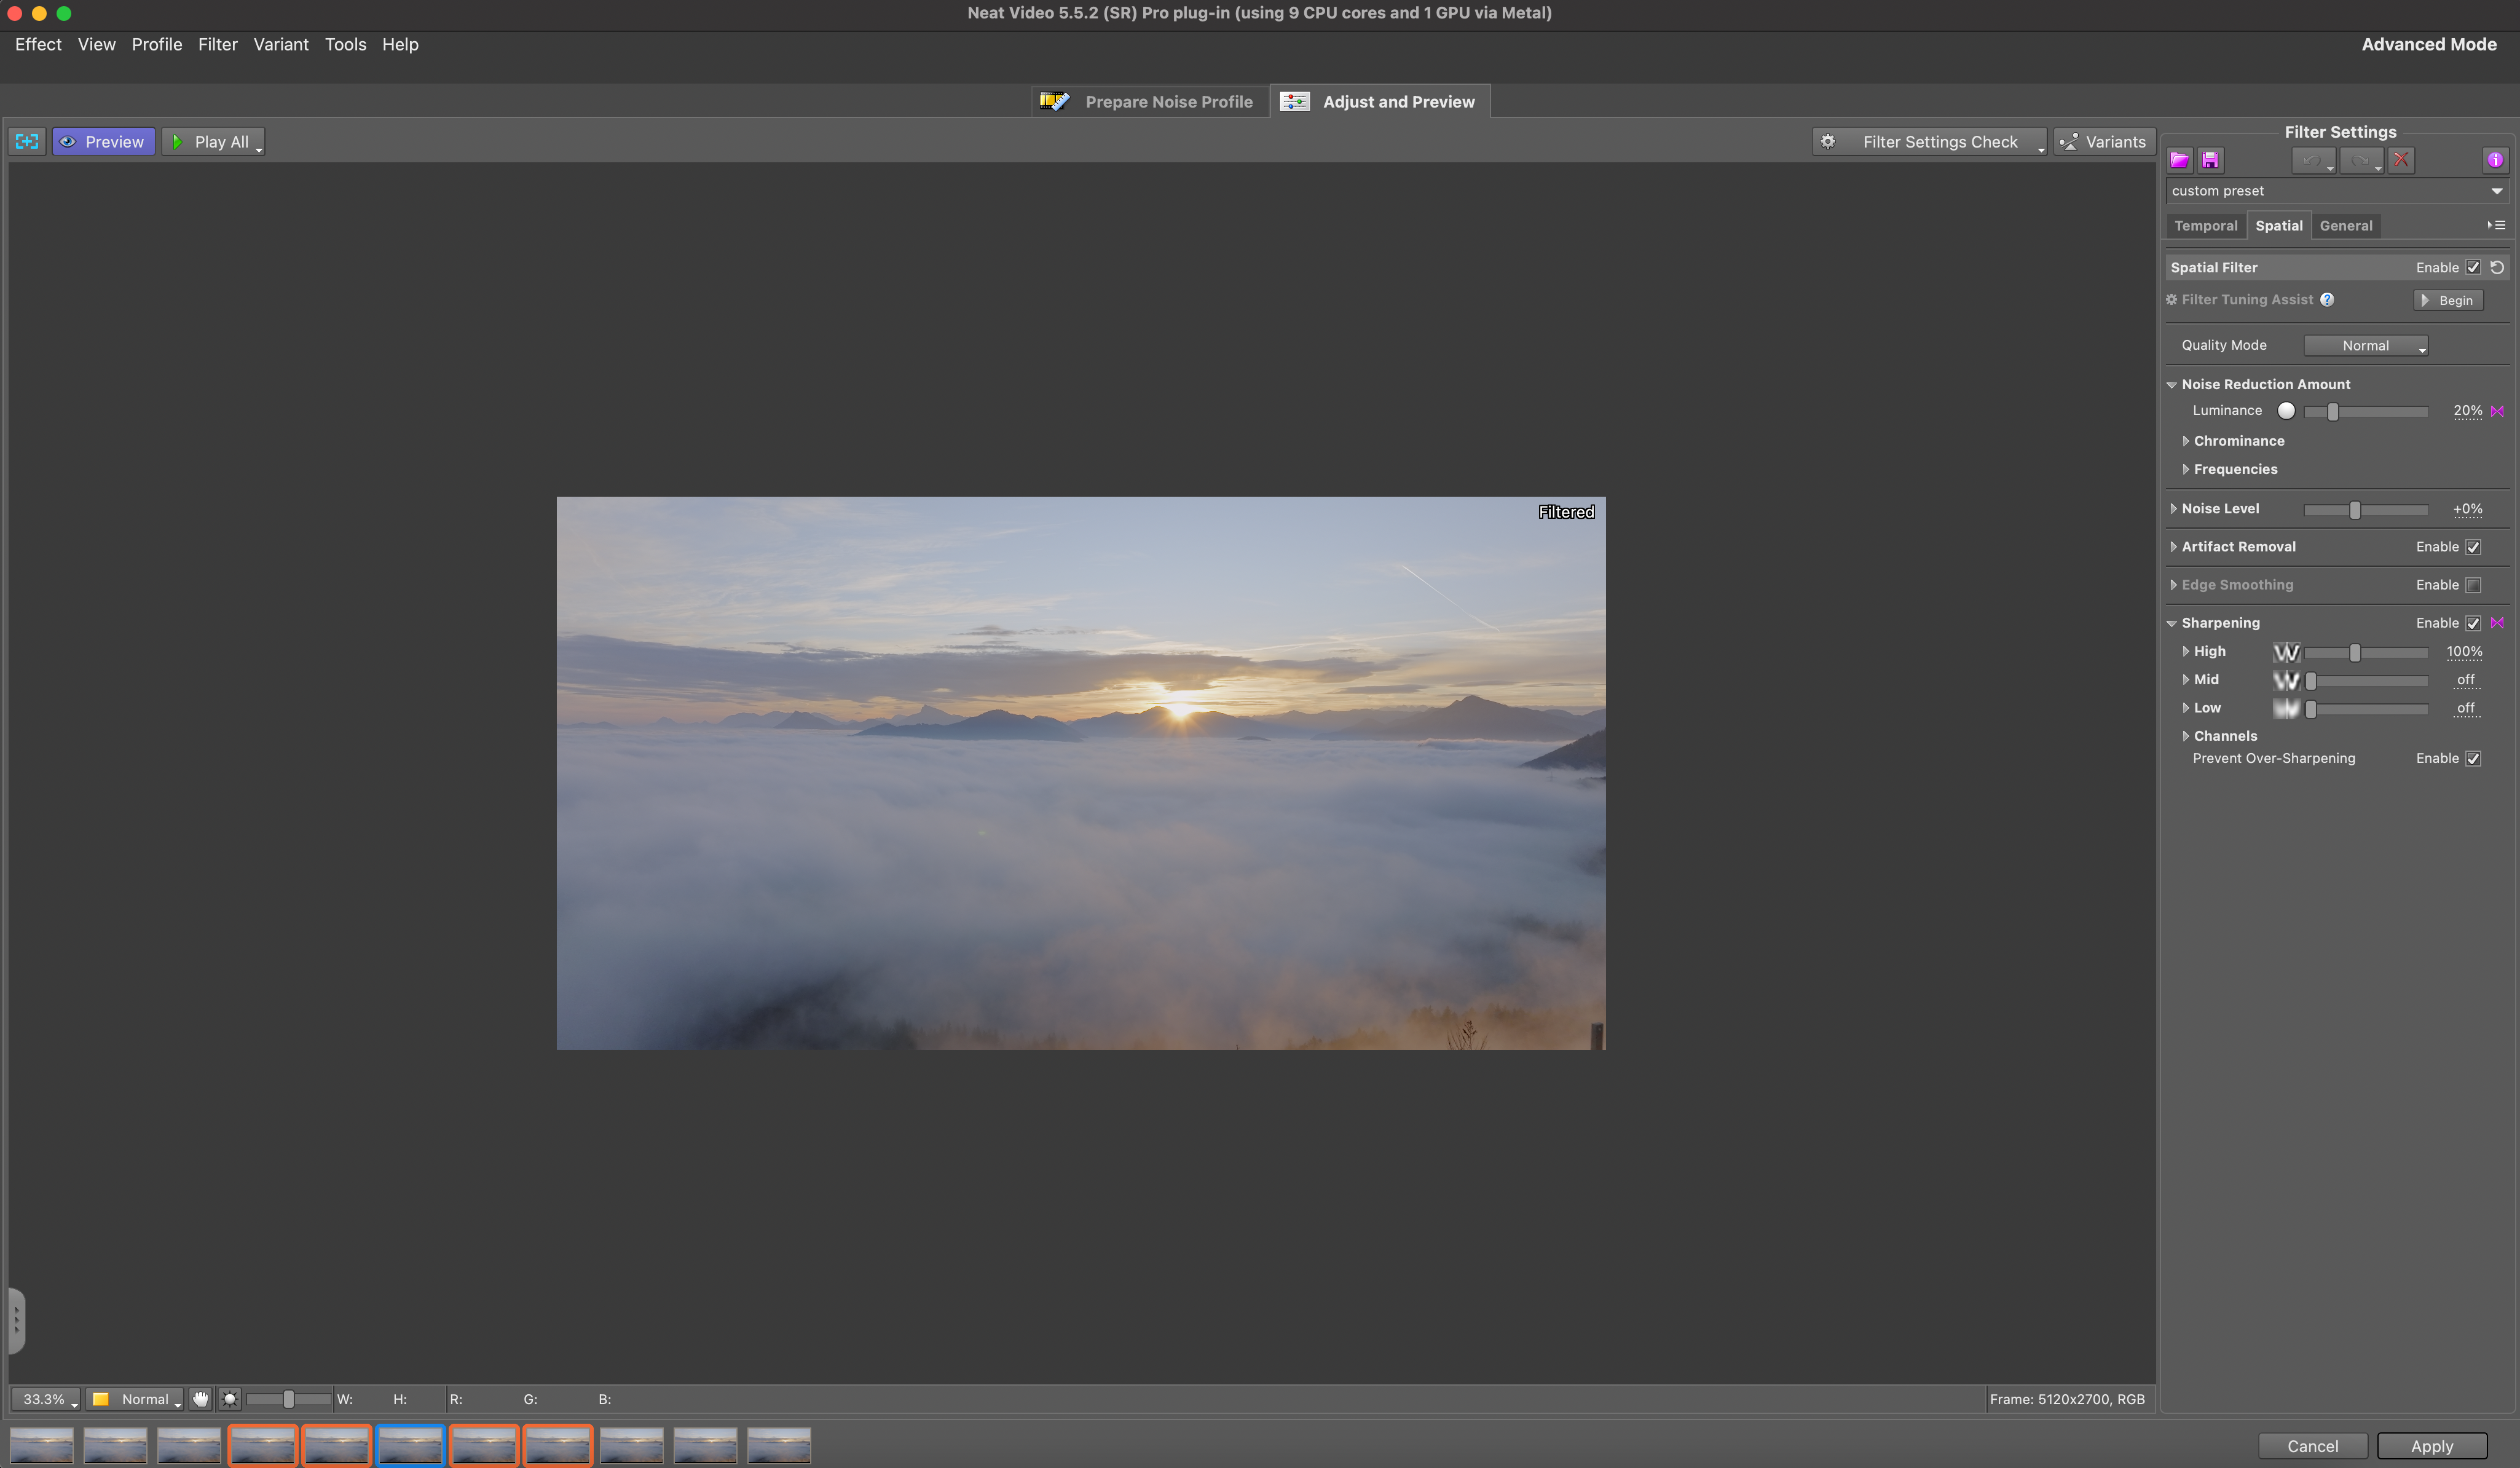
A workaround for this issue is to add the ‘HDR Tools’ effect a step above the NV effect, and choose the ‘HLG to PQ (Rec. 2020)’ option in the drop-down menu and set Peak Brightness to 100 nit. This results in an adjusted version of the HLG image that can be worked with in Neat Video:
Once Neat Video has been applied and adjusted you’ll need to convert the video back to HLG color space. To do that add another ‘HDR Tools’ effect following Neat Video and select ‘PQ to HLG (Rec. 2020)’ option in the drop-down menu.
Conversions performed this way (HLG -> PQ -> HLG) won’t change the frames and retain all the image data.
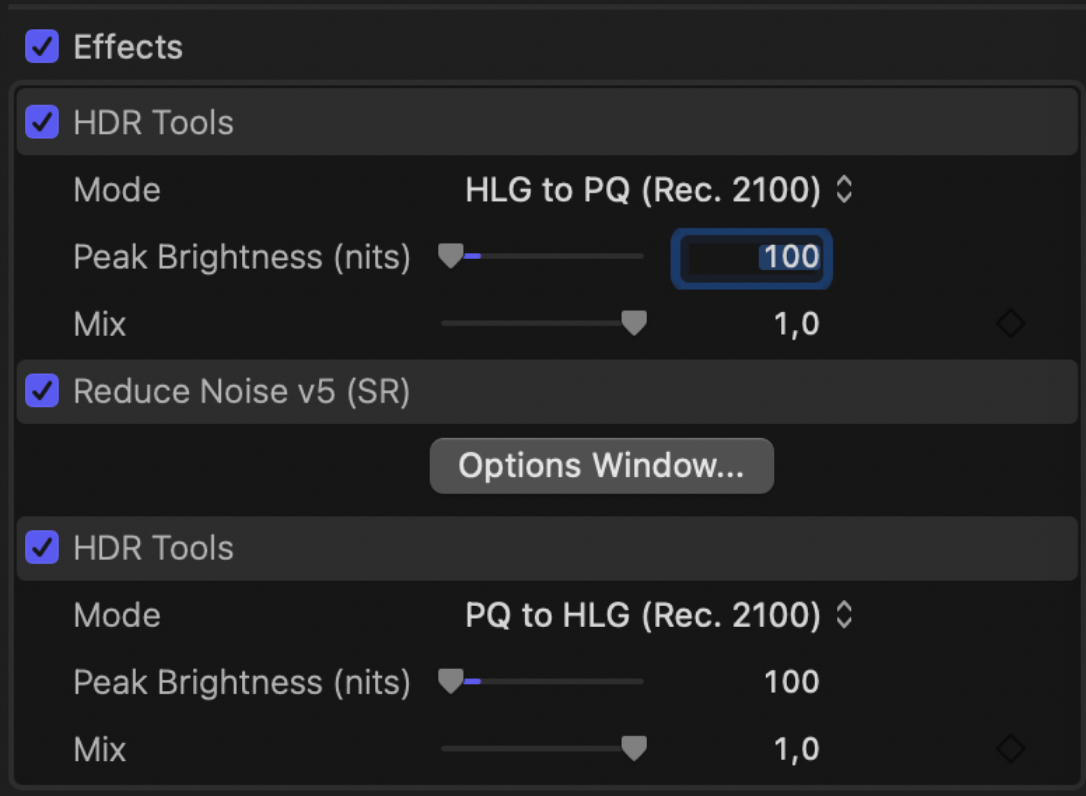
All the conversions should be done without changing the Color Space of the project. It should be set to Rec 2020 HLG.
If you apply NV as the first effect (before grading), you won’t get the blown-out image in the NV options window and can avoid using the HDR Tools effect mentioned above. The advantage of using NV after color grading is that it takes care of any additional noise that was introduced by grading the footage.
Also, if you’re working with a native HLG video clip (remember that for this article we’re using a Rec. 709 clip and converting it to HLG), using the HDR Tool is necessary, whether using NV as the first or last effect.
To find the optimum noise reduction settings, NV needs to build a noise profile using a featureless area of the clip. Manually selecting ‘Build Profile (Most Noisy Frame)’ in the dropdown menu makes sure NV selects the frame suited best for noise reduction:
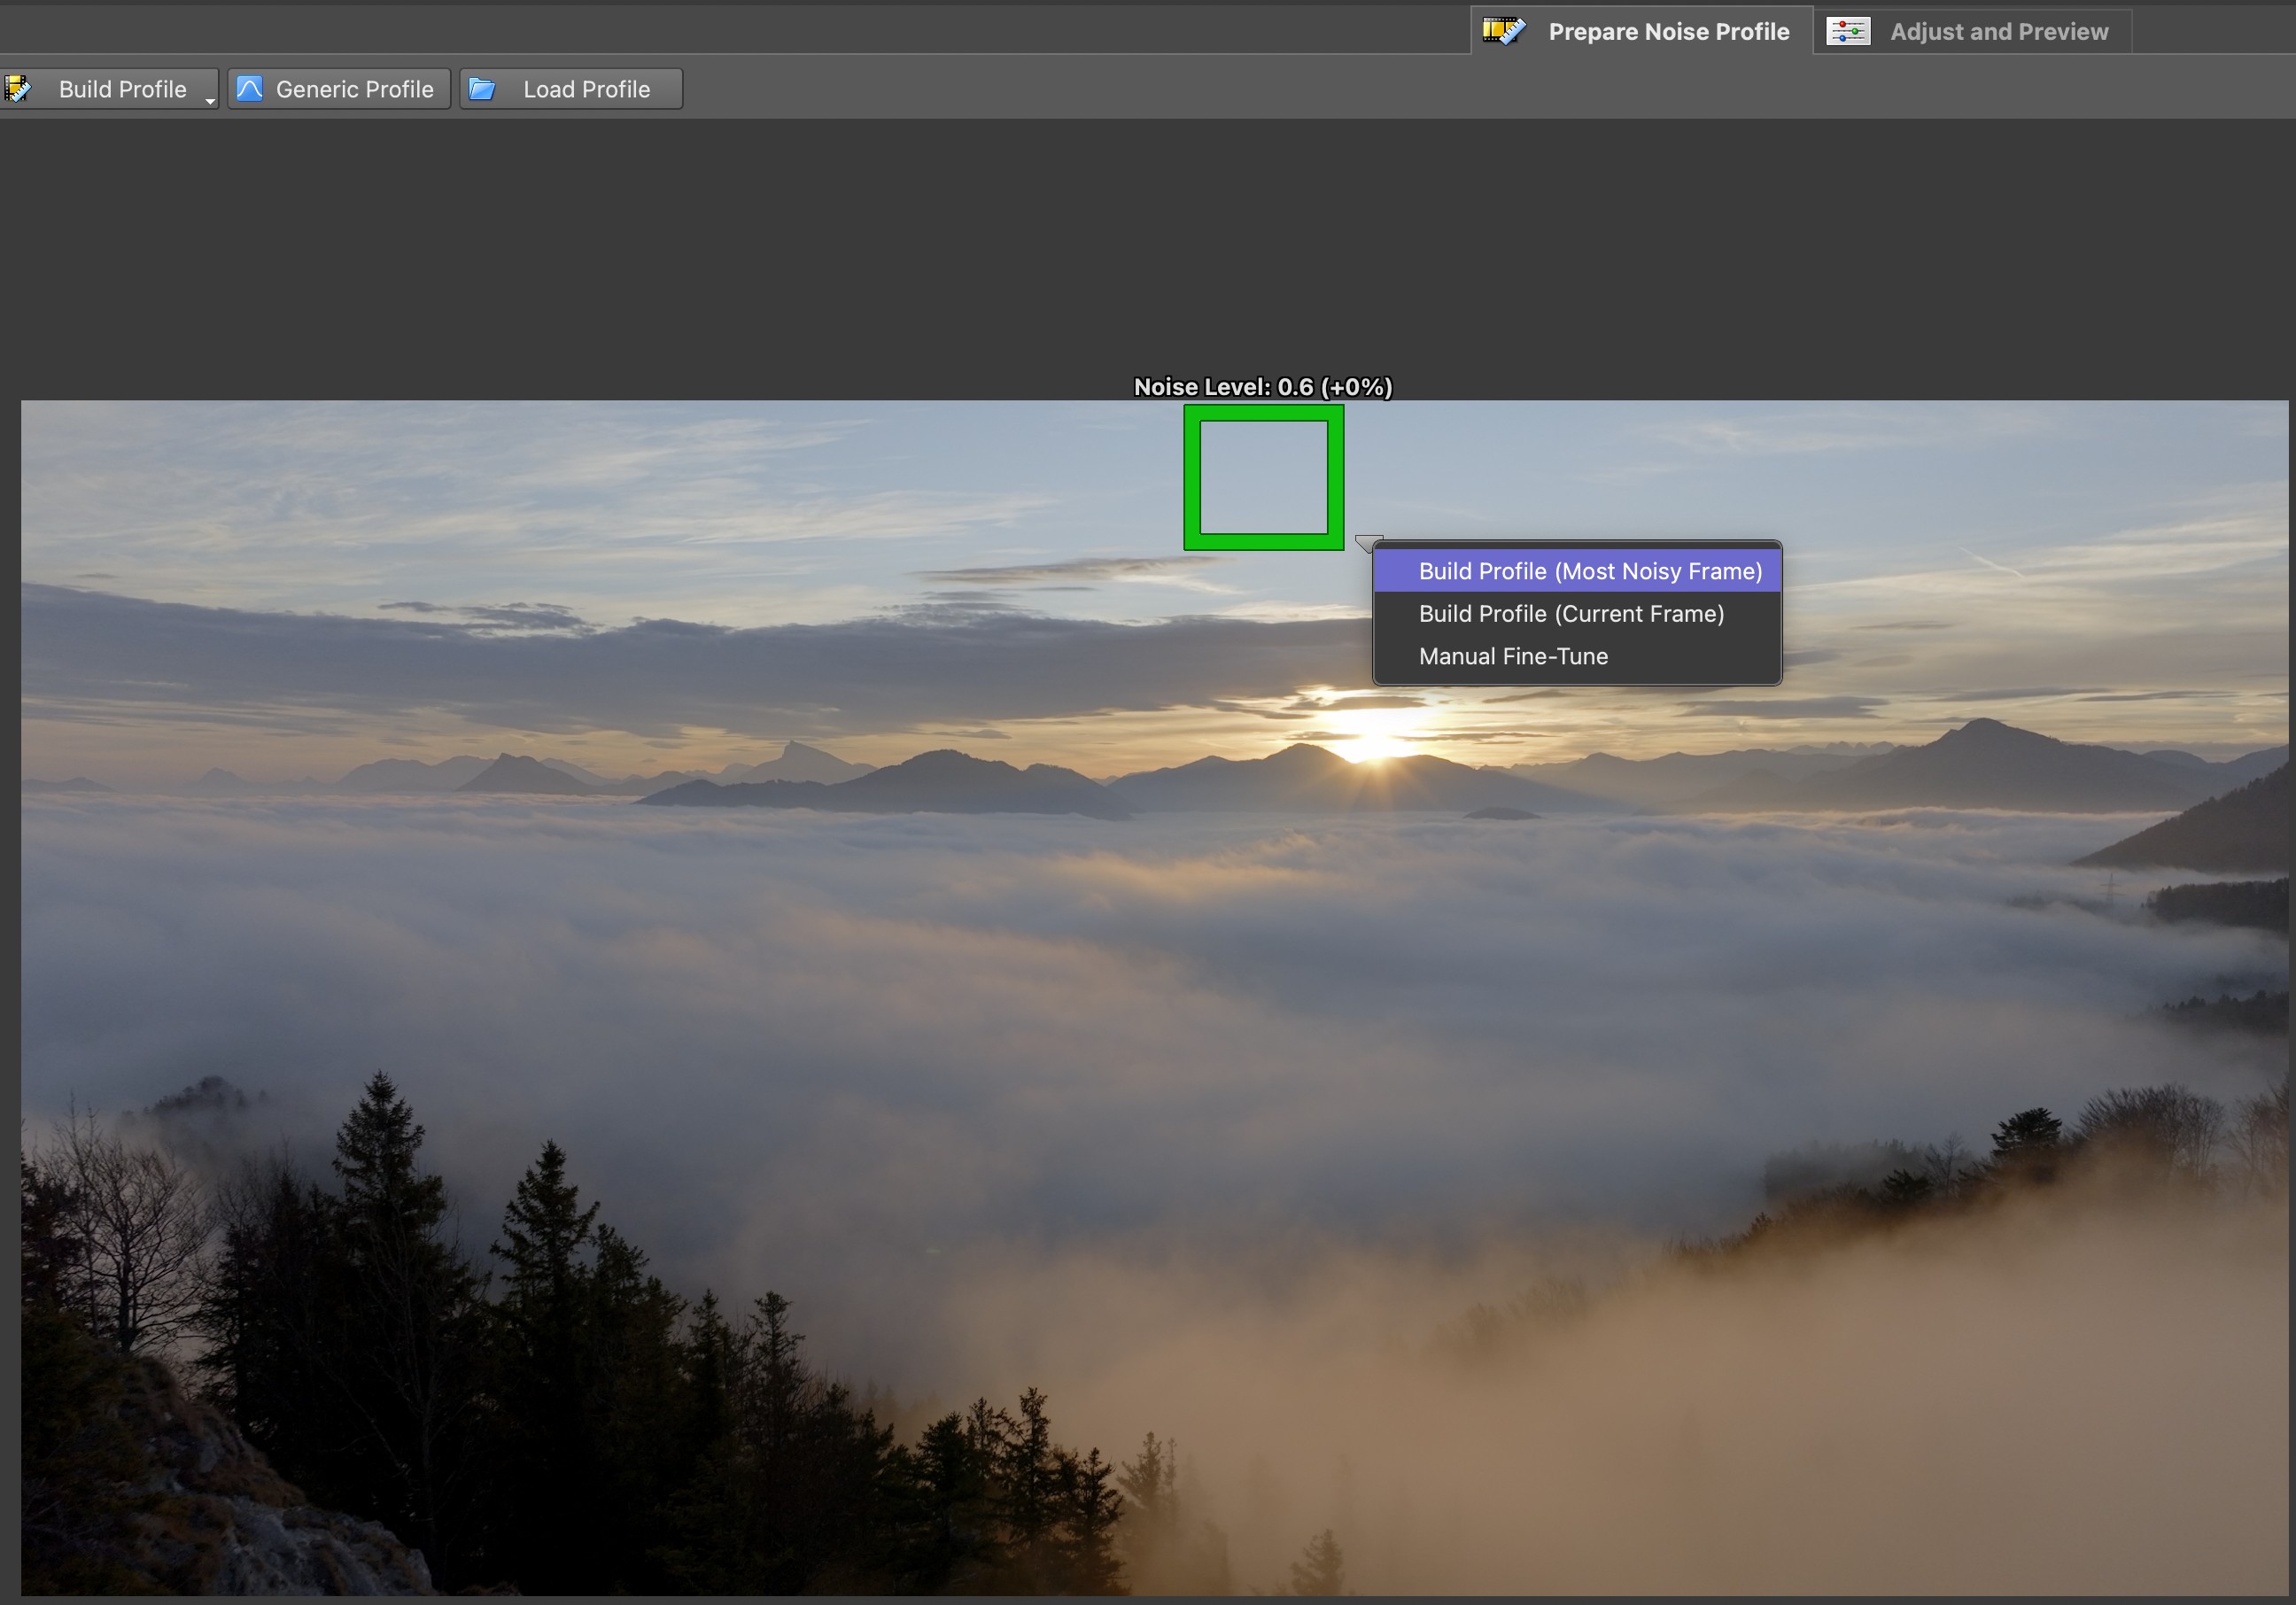
After building the noise profile and using the ‘apply noise reduction and sharpen’ preset, the settings can be fine-tuned controlling the impact of each changed value in the viewer.
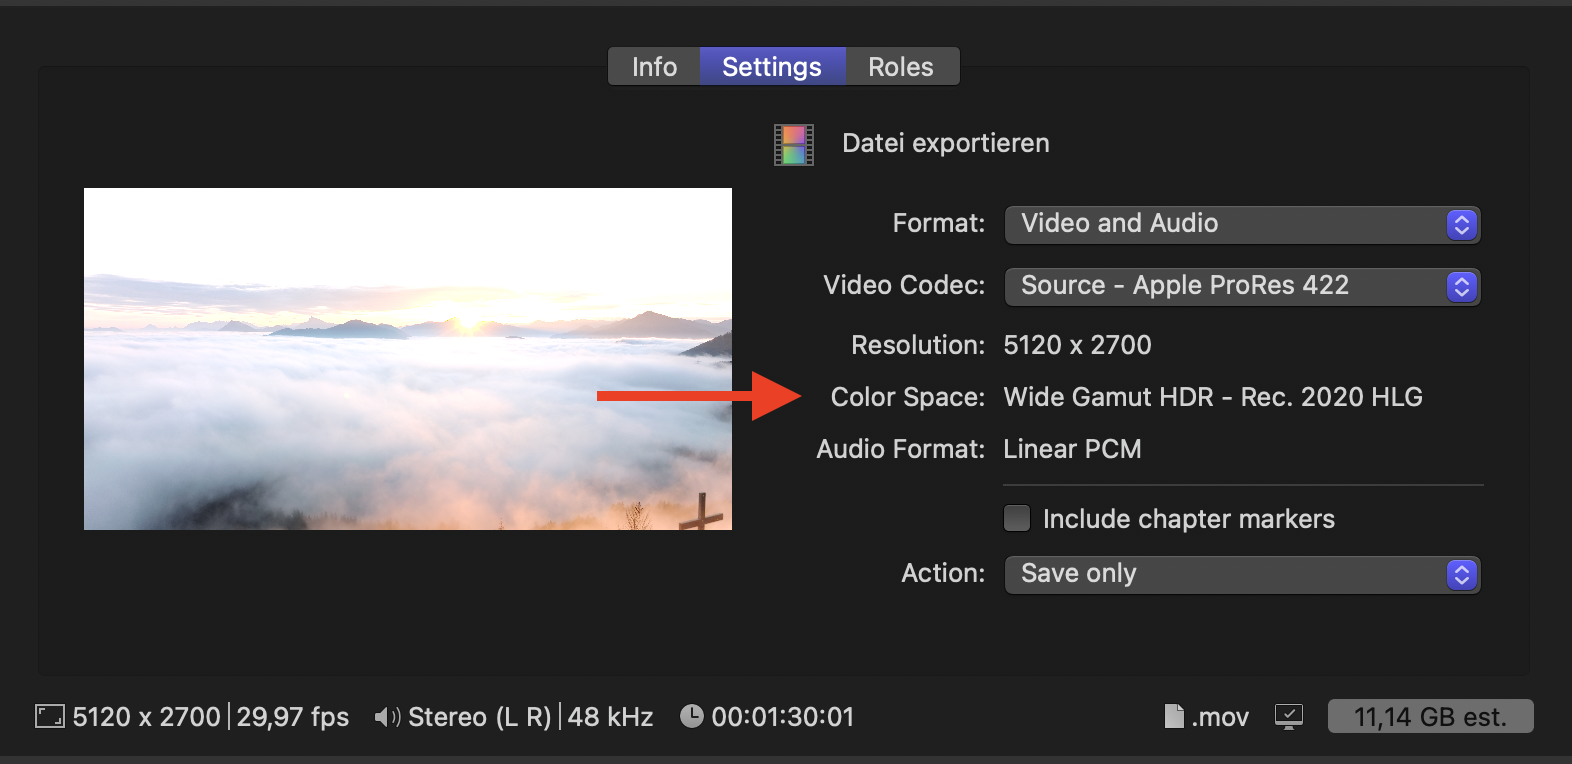
These export settings make sure that the HLG color space is interpreted correctly
when uploading to YouTube:
And here’s the final outcome - an HLG HDR video created from 10 bit DLOG footage!
Comparing this to the original SDR video, the improved brightness and intense colors of the HLG version are easily noticeable: