Filming Aurora Borealis in the field
Guest post by Justin Nederkoorn,
travel photographer and videographer
Now that you know all the details about predicting and chasing Aurora, it’s time to learn how to capture the phenomenon on film. If you haven’t yet, read our article on how to predict and chase Aurora so you know all about how to prepare for, chase and monitor Aurora.
Chapter 1: Gear
Filming in the midst of the night is not a task that can be handed to all cameras. You’ll want to optimize your gear to let in as much light as possible while also being able to stretch your ISO far beyond their comfortable levels. We’ll talk you through what to keep in mind when picking gear for filming Aurora.
Camera body
Technically speaking any camera body that has video capabilities can be used to film the Aurora and there’s absolutely no reason why you shouldn’t pull out yours to try and capture the lights as best as you can. Having said that though, some are superior to others. One of the best cameras out there to film at nighttime with, and my personal pick, is the Sony A7SIII. This isn’t to say that you need to bring an A7SIII. However, diving into why this is my top pick will help you understand what to look for in a body.
Color depth
The Sony A7SIII can record up to 10-bit 4:2:2 internally. The higher the bit-depth, the more colors it’s able to capture, which means smoother gradients and more room for post-processing. A smooth gradient is especially important when filming Aurora since the lights range from opaque colors to almost transparent, consisting almost entirely of gradients of colors.
ProRes RAW
The Sony A7SIII truly excels when partnered with the Atomos Ninja V. External recordings allow you to capture 4.2K 16-bit Linear footage downsampled to a 4K 12-bit ProRes RAW format at up to 59.94 frames per second. What this practically means is that your footage will benefit from the ProRes RAW codec, giving much more versatility in post-production, while also boosting your color depth to 12-bit. This puts the A7SIII on par with some of the best cinema cameras out there.
This is my choice whenever I know that I need the best possible quality I can get, and this is what I choose when I film Aurora Borealis.
Dual Native ISO
The term Dual Native ISO might sound familiar to you as it’s frequently talked about in the film industry. The base ISO is the ISO level which your camera performs the best at. This can vary depending on the brand and model, but usually it’s around 640 or 800 when filming in LOG. Dual Native ISO means that the camera doesn’t have one, but two, base ISOs. If we look at the Sony A7SIII, it has a base ISO at 640 and at 12,800, meaning that it produces similar levels of noise at those two ISOs. This is very important when you’re out filming in the middle of the night as you’ll be able to bump up your ISO much more easily. The difference between the ISO 640 and 102,400 is 7 ⅓ stops. Compared to the second base ISO at 12,800, this difference is only 3 stops, resulting in less digital noise.
Autofocus
Sony has always been known for its fast and accurate autofocus systems and the A7SIII is no exception. It is surprisingly accurate even in extreme low light situations. While I would still pick manual focus over autofocus when filming landscapes and skies, the autofocus comes in handy when you want to film a subject. Using a fast lens like an f/1.4 makes it almost impossible to nail focus if there’s any movement in the frame.
Lenses
To limit digital noise we want as much light as possible hitting our camera’s sensor, and we can win a lot of territory here by choosing the right lens. While many people find the versatility of a f/2.8 zoom lens attractive, there will be a noticeable difference in quality as you’ll have to bump up your ISO to make up for the loss of light. If you have the option, I’d highly recommend bringing primes. An f/1.8 lens is good, but having an f/1.4 or f/1.2 is best. Not only does this gain you an extra stop in light, their glass is generally of better quality.
Your focal lengths depend a lot on your artistic choice, but Aurora can be quite a large spectacle. Therefore it’s a good idea to at least pack a wide angle lens such as a 24mm or even wider at 20mm or 14mm. This helps you to frame both the Aurora and landscape in a single shot.
Accessories
While not required, it can be a welcome addition to bring a tripod, especially if you’re traveling alone. Having a tripod will allow you to film a timelapse, film yourself while you walk in the frame or to continue filming the Aurora while you grab a second camera to take some photos.
Make sure to bring plenty of SSDs as codecs such as ProRes RAW easily eat up your storage. For reference, one of my one minute clips takes up 11.7GB. Audio makes the watching experience much more immersive and adds emotion to your shots. If you can, bring a microphone to capture the ambient sounds or people getting excited seeing the Aurora. Gaffer tape is indispensable at nighttime to cover up any annoying lights on your camera or monitor. Make it a custom to always have a small roll on you.
Chapter 2: Capturing Aurora Borealis
Capturing the Aurora on camera is not easy. You’ll be pushing your camera a lot here and it’s important that you find a balance that works for you. Although some settings are going to differ for each setup, I’ll share why I use certain settings so you can apply the same techniques.
Get to know your camera
Before we dive in I want to say that every camera and lens is unique. Therefore it’s important that you get to know the ins and outs of your own setup. Don’t apply everything you read directly, but understand why we come to these settings and decide if they would work for you.
Go out at night and film a variety of clips using different settings. Then import everything in your video editor and discover how these settings impact your footage. This is the only way for you to learn how far you can push your camera.
Camera settings
Shutter speed
Due to the 180 degree shutter rule, we always want to pick the shutter speeds that’s double our framerate. So if we’re filming at 24 frames per second, we pick 1/50 as our shutter speed. Since we can’t go lower than 24fps, 1/50 is basically as far as we can go to optimize our light coming in.
However, we can make a small exception. While doubling our frame rate is always preferable for the smoothest and most realistic motion blur, we could choose to match our shutter speed to our framerate, using a 360 degree shutter. This is something that I often do when I’m filming at night because I could really use that extra stop of light. But bear in mind that we also increase the motion blur past a realistic sense. Therefore this is a trick that you should only apply when you know your shot is going to have minimal movement. For Aurora luckily, this works fine.
Aperture
This is an area where you can really win stops of light if you’ve invested in a good lens. While for photography I would usually stop down a little, for video I’m going as open as I can. If I’m using a 24mm f/1.4, I’ll be shooting at f/1.4. But again, get to know your gear and know how severely shooting wide open impacts (corner) sharpness, vignetting, chromatic aberration.
ISO
How far you can push your ISO really depends on the body you’re shooting with. For the A7SIII though, I easily push it beyond levels of 25,600 and sometimes film even at 102,400. If I’m shooting a moonlit scene though I can usually keep it down to 12,800. So again, this really depends on the available light. But don’t be afraid to push your camera’s ISO.
A common dilemma in the field is if you prioritize a low ISO over a proper exposure. While for photography this is usually something you do, lifting the exposure in post-processing, for film I always prioritize getting a proper exposure. If you’re shooting in ProRes RAW, you are able to control the ISO in post-processing which gives you a lot more flexibility and puts less stress on getting it perfectly right in the field.
Pushing your ISO to extreme levels will introduce lots of noise. Don’t let that scare you off though since you can get rid of a lot of the noise if you’re using a denoiser like Neat Video. Getting back with severely underexposed footage will yield far worse results.
White balance
Always put your white balance on the manual. If you don’t, your camera will continuously re-evaluate your white balance and make adjustments during your recordings. This results in a color shift that’s practically impossible to correct in post-processing and will most likely ruin your shots.
The general rule of thumb is that at night the color temperature is usually in the range of 3,200K - 4,800K. I personally like my shots to be a little cooler and gravitate towards 3,000 Kelvin. Don’t worry too much, you can always adjust the temperature in post-processing, but it’s better to get it right in camera. Go with a value that feels right to you and that fits your creative look.
Frames per second
I always film in 24p to get a cinematic feel to my shots. If you need the room to slow down footage you can shoot at 60p, but bear in mind that increasing your frame rate also means you have to increase the shutter speed. Therefore I’d advise to always shoot at 24p unless you really need slow motion, which you’ll rarely ever need when filming Aurora.
Focussing at night
If you need to manually focus your lens at night, look at the sky and try to find a bright star. Magnify your liveview and slowly turn your focus ring until the star appears to be sharp. If you’ll be filming a lot of landscape shots and you don’t need to adjust focus, consider taping your focus ring so you don’t accidentally spin it.
Codec
Filming Aurora means extremely dark scenes, faint colors and lots of gradients whilst you’re maximally pushing your camera. Therefore you don’t want to compromise on quality and aim for the maximum bitrate and color depth possible. I would recommend shooting with an external monitor to achieve 10-bit ProRes 422, preferably 12-bit ProRes RAW. If you don’t have an external monitor then go for XAVC S-I 4K internal on the A7SIII.
Make sure you’re familiar with your camera’s codecs and how they differ in quality. Go for the best and make sure to bring plenty of storage.
LOG
I always film in LOG to benefit from extra dynamic range and color rendition. Every brand has their own profiles so it’s important to figure out what profile works best for your camera. For example, Sony has S-Log 2 and S-Log 3, but S-Log 3 gives me an extended dynamic range over S-Log 2. The introduced noise can be easily pushed back into the blacks and remaining noise is removed using Neat Video.
Monitoring exposure
Using an external monitor will make it much easier to monitor your exposure. Use the parades function to see the exposure for the red, green and blue channels. Take extra note of the green channel to make sure your greens aren’t clipping. Using only a luminance channel could make your exposure appear correct while your greens are actually blowing out.
Composition
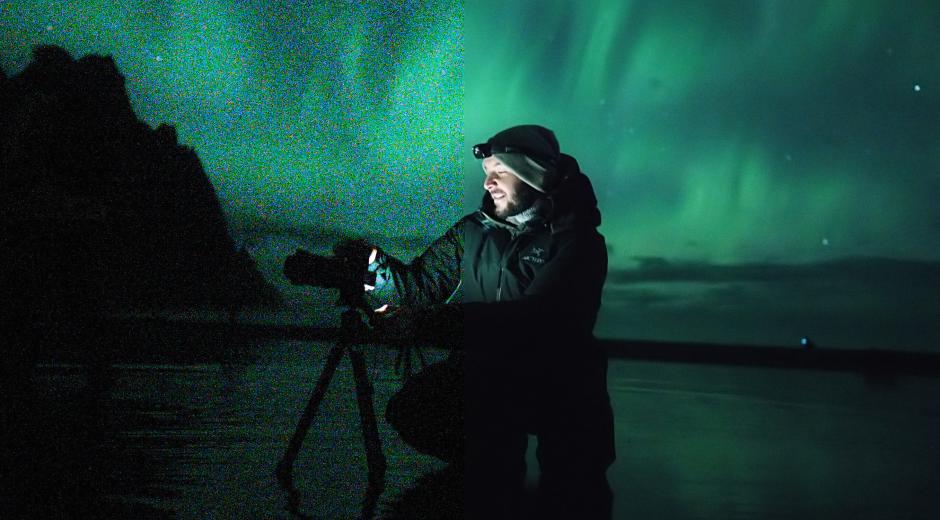
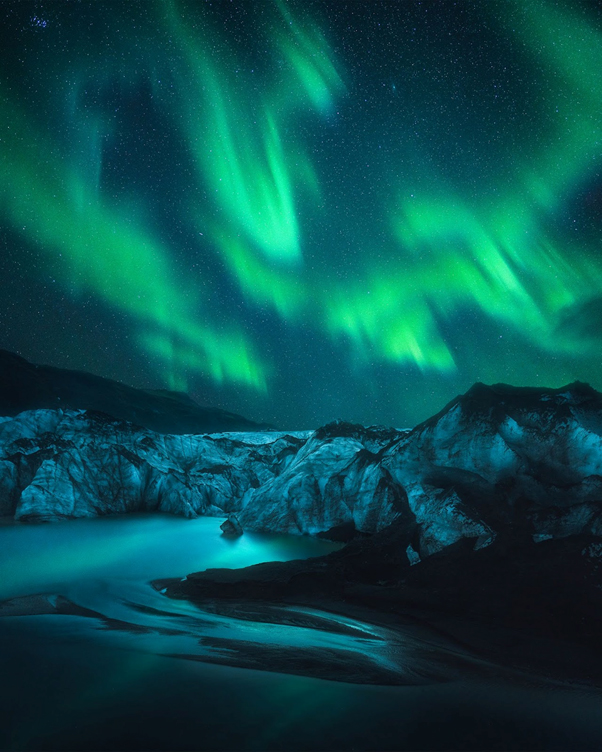
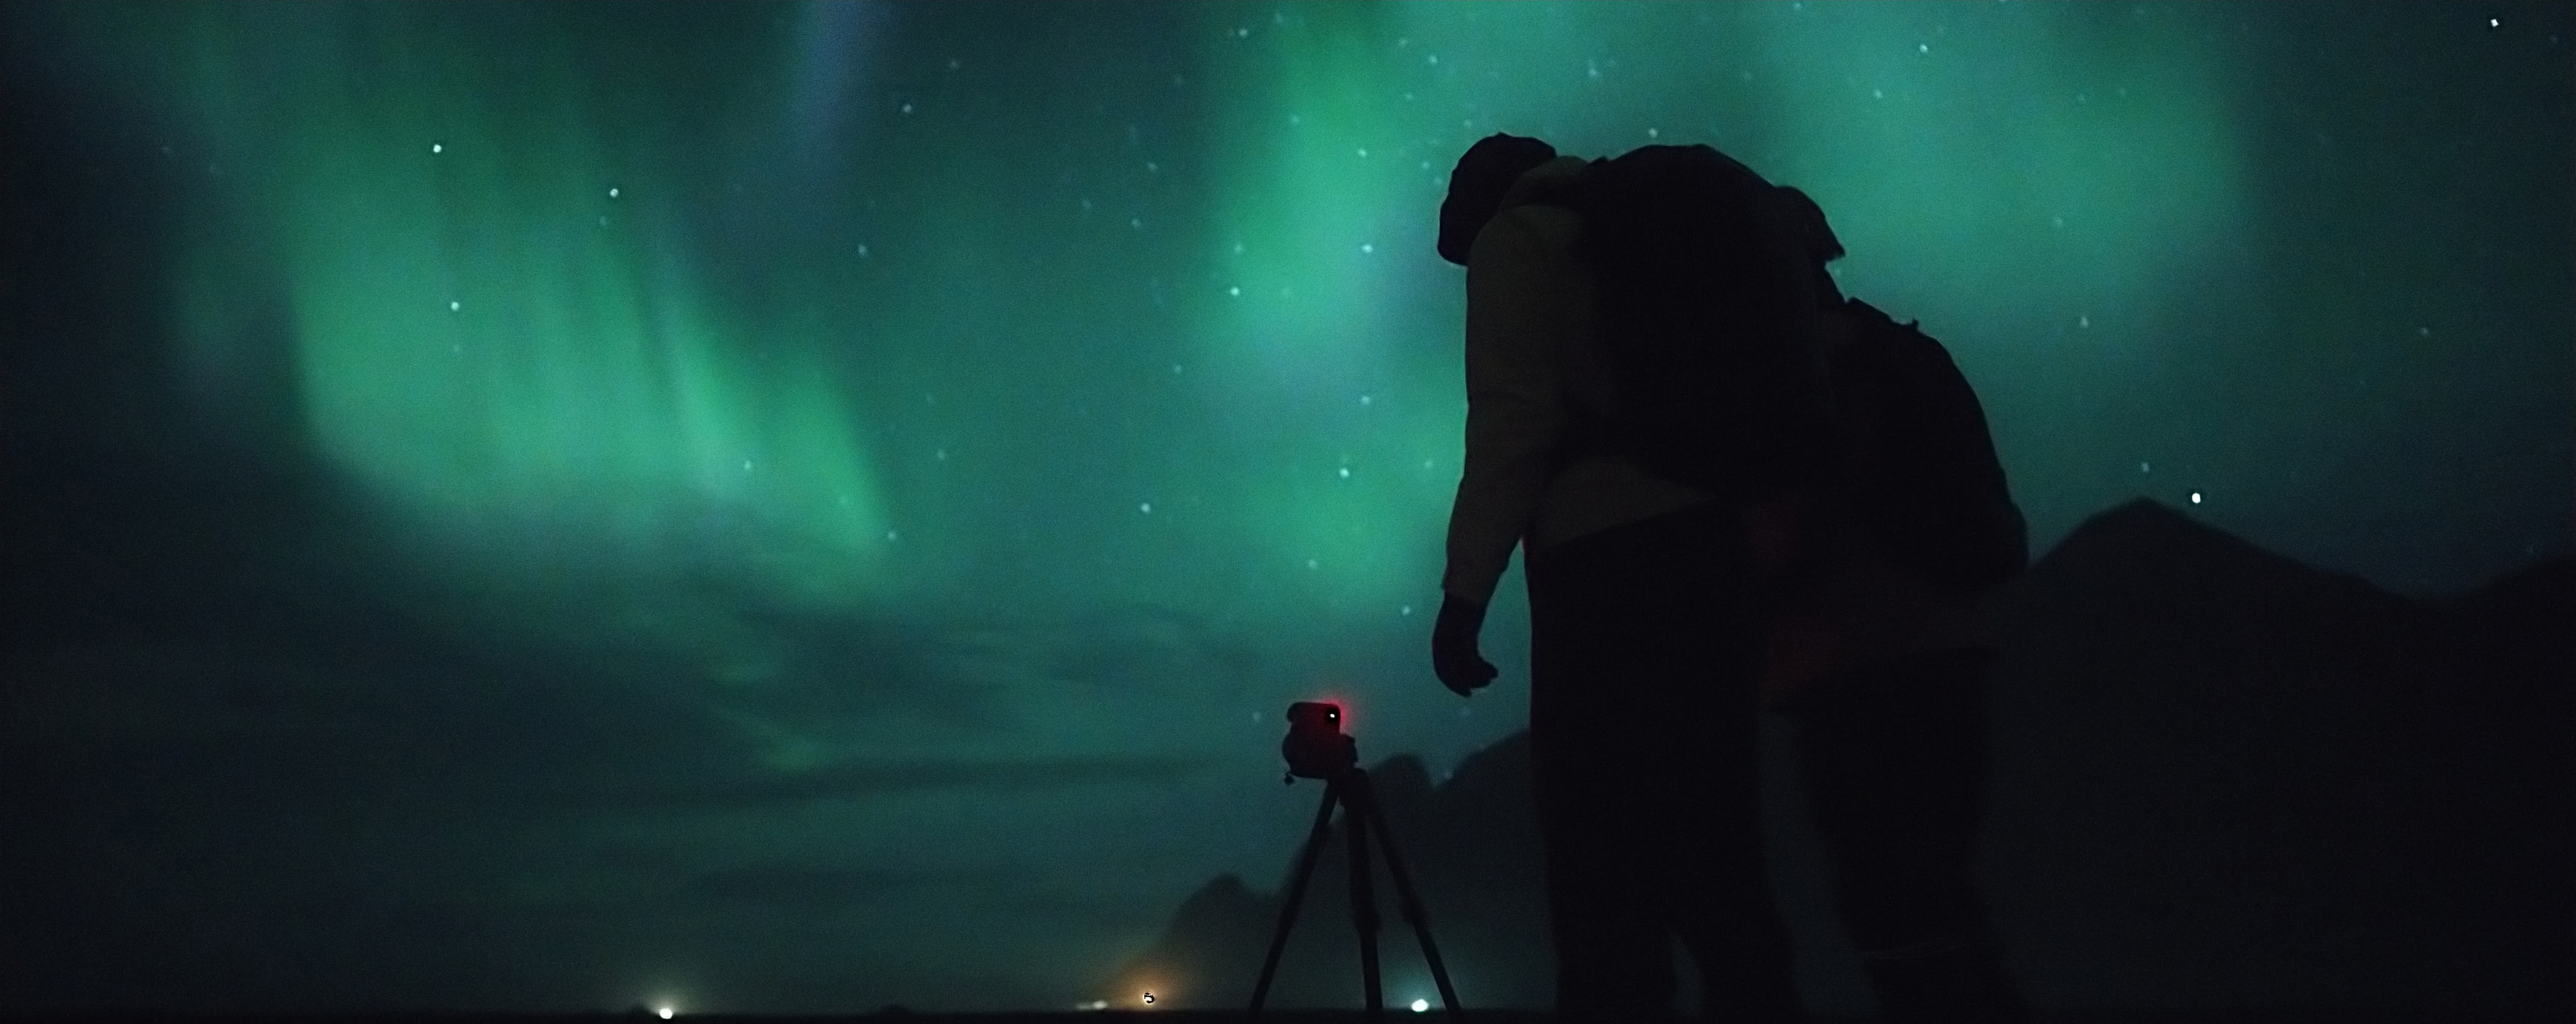
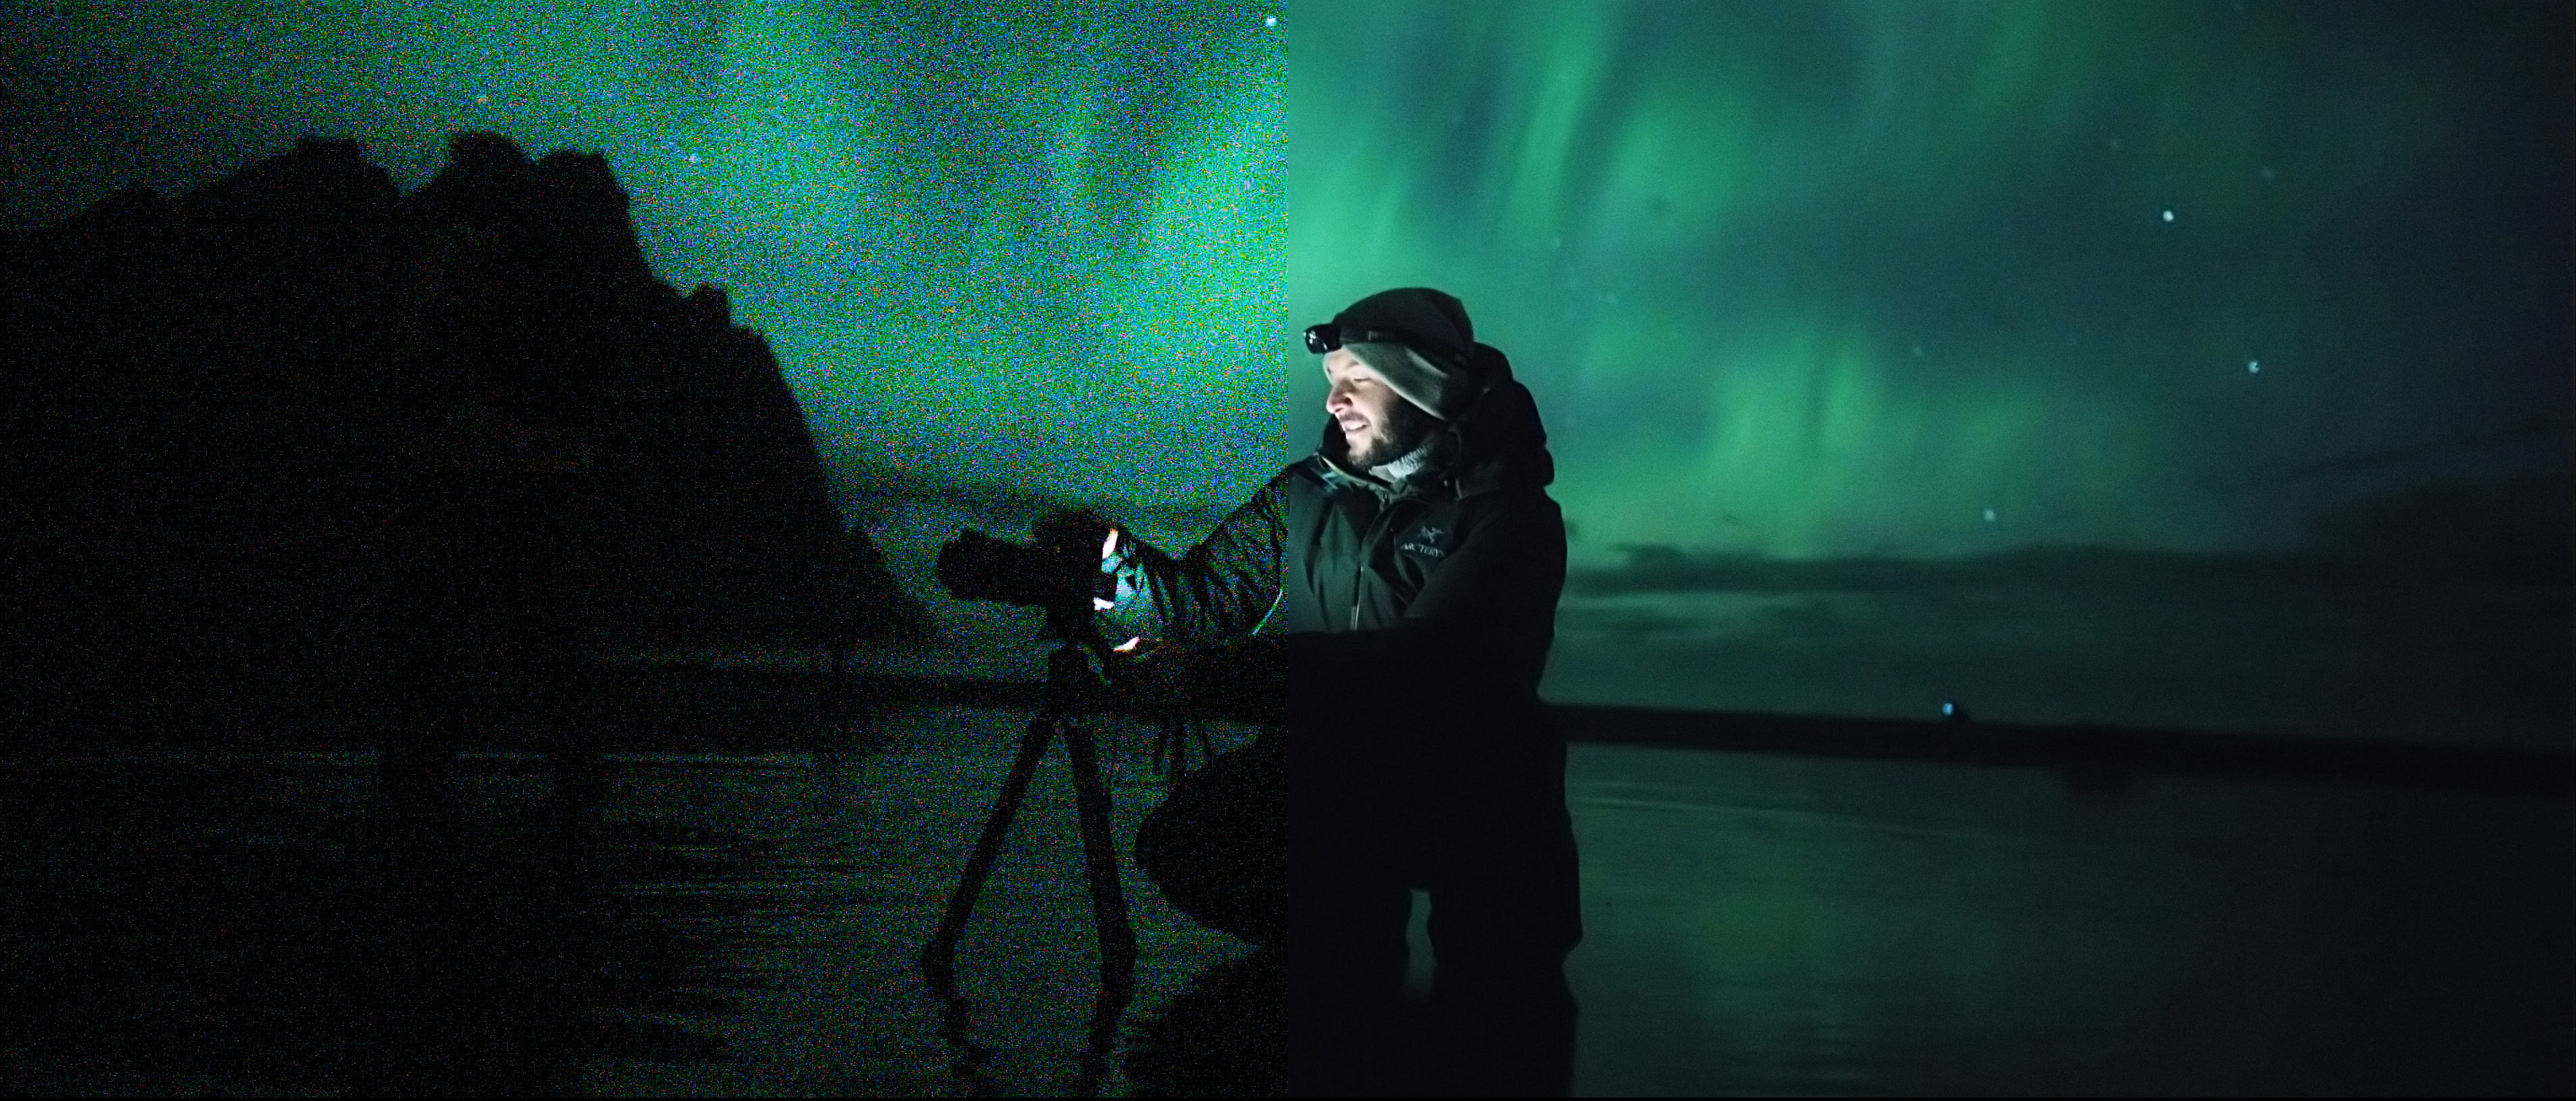
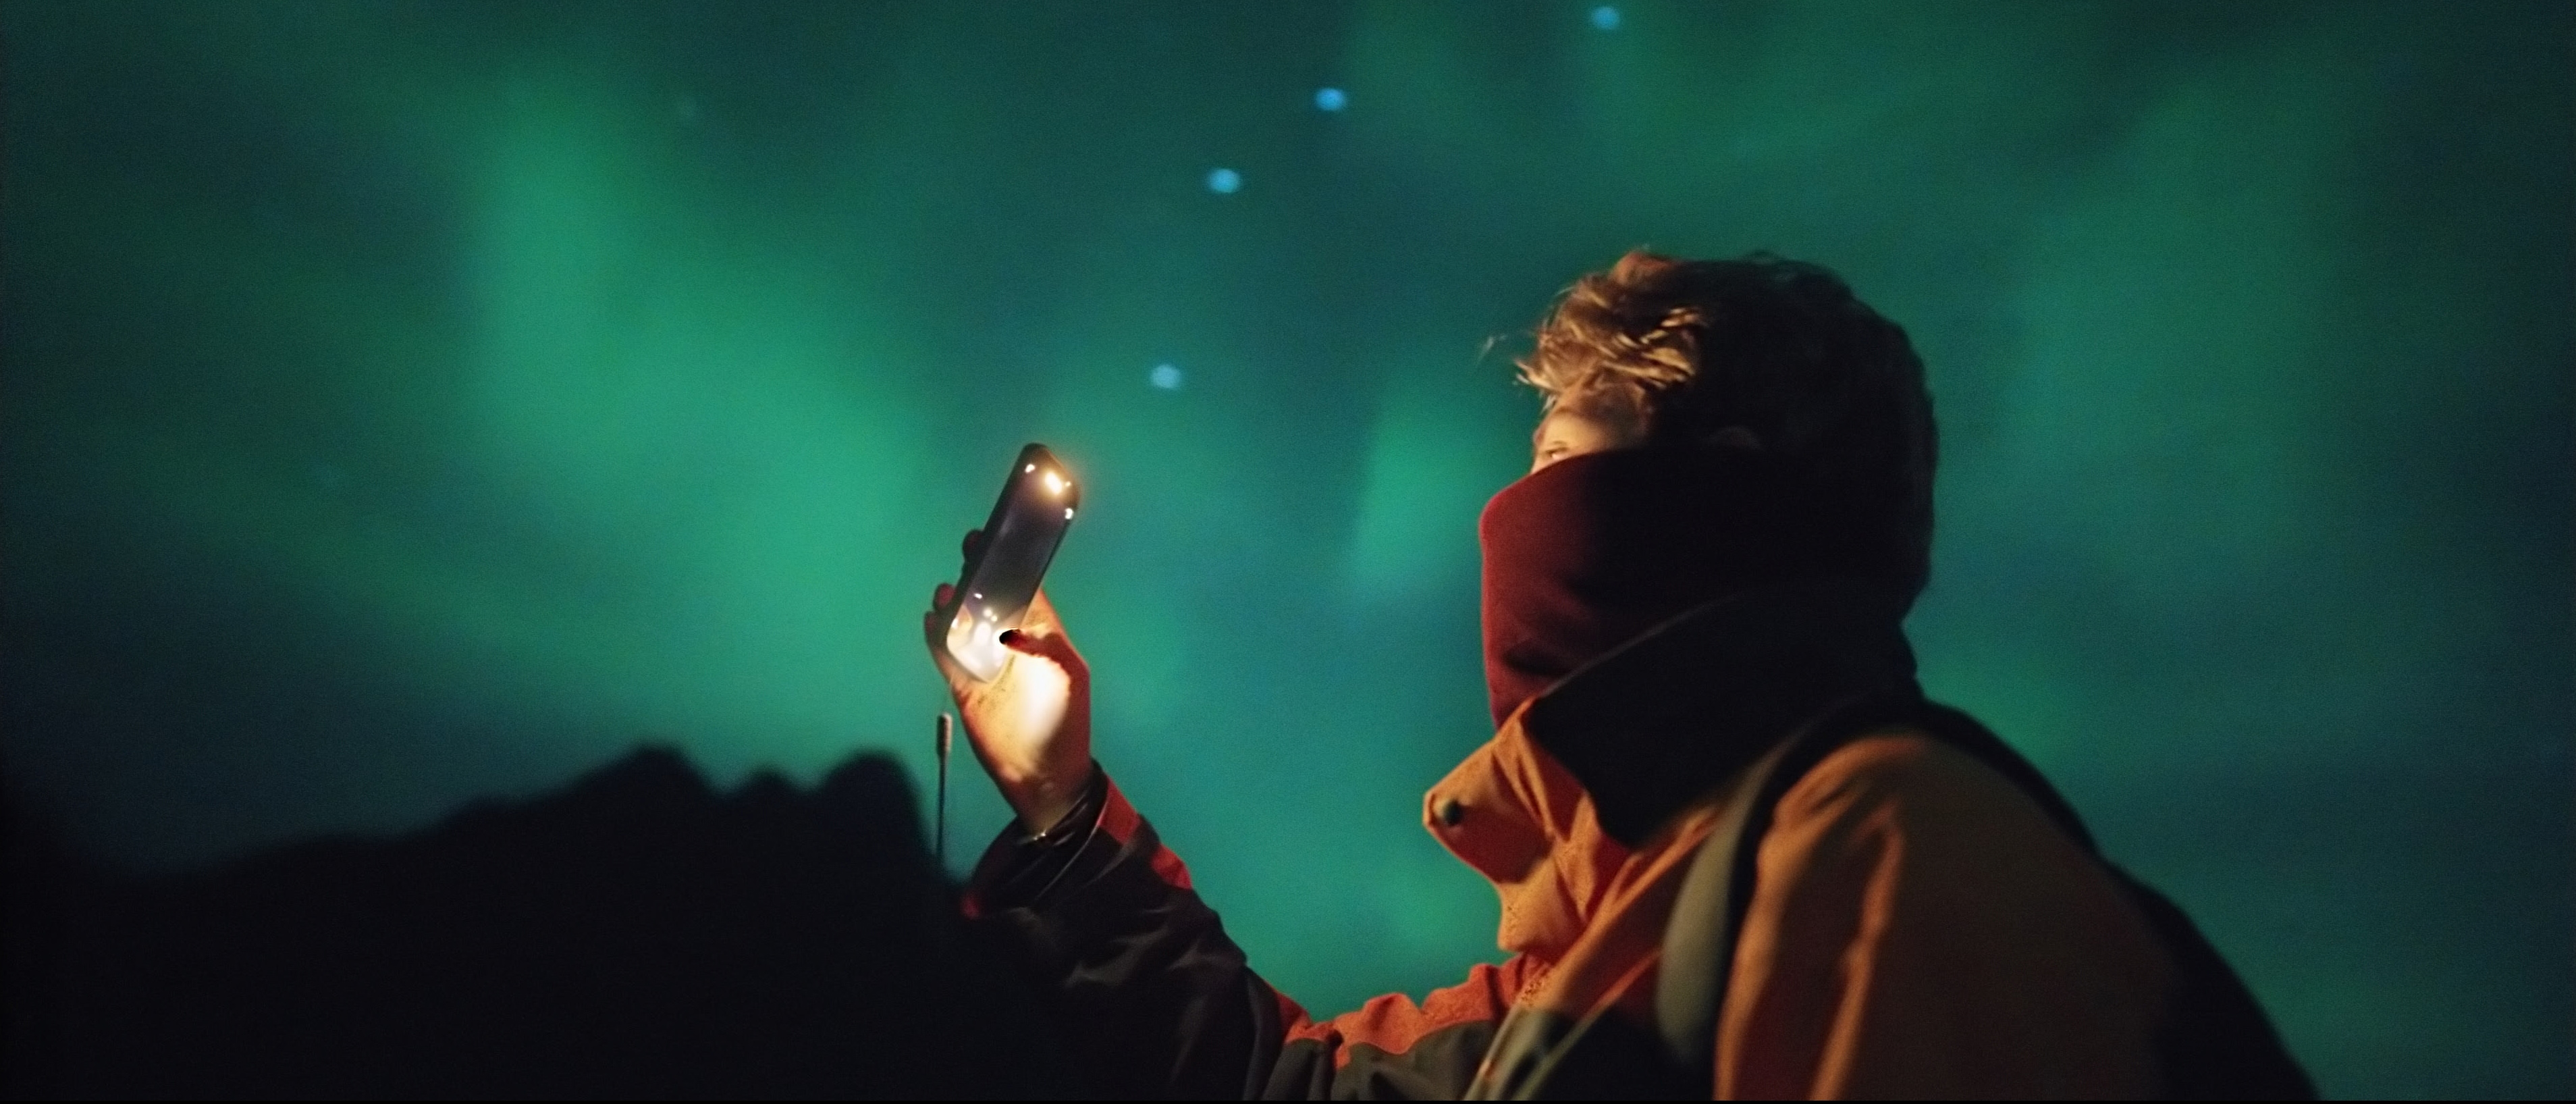
When filming Aurora I always aim to involve a subject in my shot to create depth. This can be a mountain range or a puddle to create a reflection, but preferably I focus on capturing the emotions of other people witnessing the Aurora. While doing this I’m looking for available light that can light up faces such as the back of a camera, a headlamp or flashlight from a phone.
Here are some examples that illustrate how you can use a subject to make your Aurora shots more interesting.
Timelapse
Another interesting way to capture the Aurora and its dancing is through a timelapse. One way to do this is to shoot photos at a pre-set interval and stitch those together. This technique will be covered in a future article about photographing Aurora in the field. But if you want to easily match the grade of your timelapse with your other shots, you could also choose to film a timelapse.
If you want to do this with your camera, you essentially need to film a scene for a longer duration and speed that up in post-processing. The benefit to this is that you’re flexible in post-production and can adjust the speed at which it plays to your own convenience. You’re also not limited to the 1 second intervalometer, which is usually the lowest interval you can pick. However, as you can imagine, filming for a long duration also means a lot of heavy video files. That’s why I prefer to use a monitor such as the Ninja V to allow a direct timelapse recording which means much smaller files. Filming a direct timelapse also allows you to calculate the necessary shutter speed for your interval to adhere to the 180 degree shutter rule or even use a 360 degree shutter, something that you can’t do in traditional still timelapses. This means you have a lot more control over the motion blur which, to me, is a very important aspect for realism.
To get the best effect of a timelapse, make sure there’s enough movement in the sky and be wary of potential clouds moving in. Position your tripod in a sturdy location to prevent it from sinking, communicate with others not to use headlamps (or any light in general) and bring an extra body if possible to maximize your window at shooting Aurora.
Chapter 3: The next morning
After getting back from a night of shooting Aurora, there’s a couple of things you want to do before heading out again.
Backup
Always back up your files from your camera or monitor. When you’re out in harsh environments, anything can happen, and you don’t want to risk going home empty handed. If you have the luxury, bring a second drive to do a second backup just in case.
Review footage
Drop your shots into a timeline and start creating a micro-story. Doing this will give you insight into potential shots or compositions you might have missed and still need to film.
Convert your LOG footage into Rec709 and take a good look at your parades and vectorscope to understand if you’ve exposed correctly. Getting the exposure right will take some practice and reviewing your exposures will help you do better the next night you have a chance at filming Aurora.
Chapter 4: Editing your footage
Now that you’re back from your trip it’s time to edit your footage and make it come to life. In the next article we’ll go deep into converting your raw footage into ready-to-deliver Rec709 footage and I’ll be sharing tips and tricks on how to get the most out of your grade!
Author: Justin Nederkoorn
Justin is a freelance travel photographer from Apeldoorn, NL. Justin always aims to evoke a feeling of awe and inspire his audience to go out and explore and experience valuable moments in nature where everything comes together. Justin also has been teaching others on the subject of photo and video capturing and has received a number of awards for his outstanding work.