Host application has not provided input frames to Neat Video. WHY?
Most professional video editing software such as Adobe Premiere Pro, After Effects, DaVinci Resolve, Final Cut, Nuke, Media Composer… allow external plug-ins. Neat Video is only one of many examples.
In this article, we will try to explain a little bit of behind the scene interactions between Neat Video and host applications. Understanding the interactions between host and plug-ins will not only improve your user experience but also eliminate unnecessary delays and frustration.
Plug-ins always depend on the host as they need to receive one or more frames from the host to work on and then return the processed data to the big editing brother. If for any reason, this exchange is not possible or incomplete, plug-ins are unable to implement their magic.
As you can imagine, the more frames a plug-in needs for its work, the more input frame preparation work has to be done by the host and the higher the chance that something might go wrong on the side of the host. For example, some of the frames may be not decoded properly from the source clip or there may be not enough free memory to prepare and accommodate them all.
Many other possible causes may lead to the same result where the host application fails or refuses to provide all required frames to the plug-in. This tends to happen more often with temporal plug-ins (like Neat Video) because such plug-ins need to receive multiple frames, not just one. When this happens, Neat Video reports that to the user via a message box with a list of possible causes intended to help users check those points on the host side and hopefully resolve the problem there.
Let's check the most typical causes of problems on the side of the host application leading to the situation when some or all of the required frames are not provided to the plug-in and you receive a message about that when trying to open Neat Video window.
All-round Principles
Current Frame
The first thing we would like to cover is the current frame. The current frame is the frame you see in the program monitor of the host application and the frame selected by the playhead in the timeline. It is also the frame which is usually sent to plug-ins to work with at the moment when the host application is preparing its preview or opening the window of the plug-in in case of Neat Video. When you want to open Neat Video’s window to build a noise profile and/or adjust filter settings, the current frame has to be within the clip where you are applying that instance of Neat Video effect. Otherwise, the video editing software will attempt to send Neat Video a frame from a different clip that denoiser is not applied to and is therefore inaccessible.
The host application will fail to provide the input frame to Neat Video, Neat Video will show a message about that and the only solution then is to return to the host application and choose a frame within the clip that you want to denoise using that instance of Neat Video. This will resolve the original issue and the host application will then be able to supply the input frame (actually several frames) to Neat Video for processing.
This is one of the most common reasons why you can receive a warning message saying that the host application has not provided input frames from the video.
Disabled Effect
Another obvious, but yet often overlooked requirement is making adjustments to an effect that is enabled in the Effects panel, Inspector panel, etc. Most host applications completely ignore the effects that are disabled, so they will simply not bother to prepare and supply any input frames to an effect that is currently disabled. This means if you disable Neat Video during editing (for example to save some computing power), then you will likely not be able to open its window because the host will not provide those input frames. Therefore it may be necessary (depending on the specific host) to switch the instance of Neat Video back on to be able to open its window and make adjustments.
It is also important to make sure all such instances are enabled before the final export. Otherwise, it is like charging a phone with an unplugged charger.
Premiere Pro Specific Rules
Upper Tracks
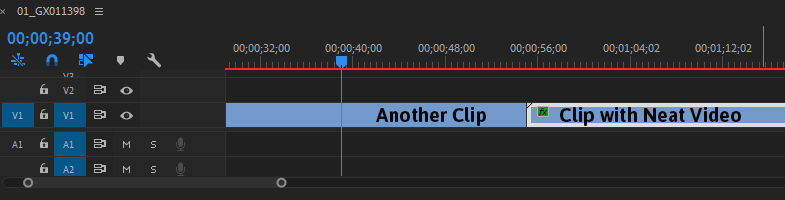
We also see that Adobe Premiere Pro often has troubles supplying the correct frames if the clip that needs to be denoised is fully covered by some content in the upper tracks (if they are enabled). This scenario actually brings us back to the current frame idea because, in this case, the program monitor is demonstrating the frame of the clip that is placed on the top layer, which is a different clip than one where Neat Video is applied. So Premiere will not send that frame to Neat Video, the plug-in will show the message saying it has not received the frames and you will have to stop it, fix the issue (for example by temporarily disabling those upper tracks) and try to open Neat Video’s window again.

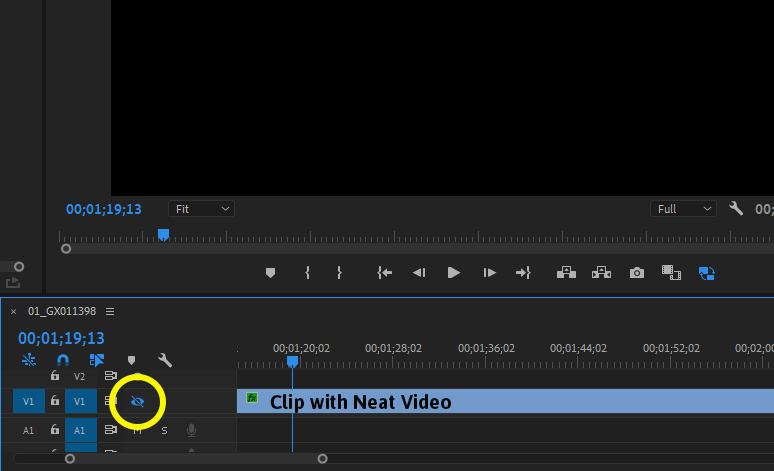
Disabled Track
Building a noise profile/adjusting Neat Video’s filter settings for a clip that is located on a disabled track is also impossible in Premiere Pro. If the track with the clip you want to denoise is disabled, then the program monitor will either show a black frame or a frame from another clip. In either case, Premiere will not send any frames to Neat Video at all. So it is necessary to make the track enabled before you try to open Neat Video in it.
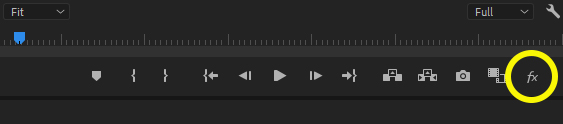
Global FX Button
Global FX button inside Adobe Premiere Pro can also be the culprit when Premiere is not supplying frames to the plug-in. This button mutes all the effects in the host. And the result is the same as if you have disabled Neat Video in the Effects panel: Premiere will not provide the denoiser with any input frames. Turn that button back on to be able to open Neat Video’s window. It is also important to make sure Global FX is enabled before the final export.
Clicks Order
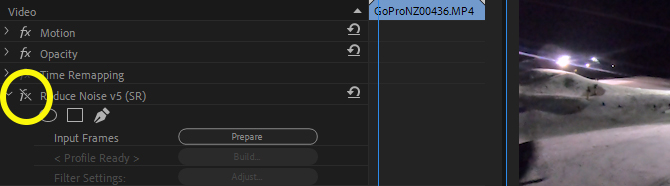
Neat Video SR plug-in for Premiere is based on Premiere’s newer API and was developed to overcome some bugs of Premiere related to cut/trimmed clips and adjustment layers. Unfortunately, those improvements came at a price of an extra step you have to take before opening the denoiser’s window. When using this SR plug-in, you have to click the "Prepare" button first, wait a couple of seconds, then click the "Build..." or "Adjust..." buttons depending on what you would like to do. If the “Prepare” step is skipped, Premiere Pro will not prepare nor supply any frames to Neat Video as well. So the right order of button clicks is important here.

DaVinci Resolve and Nuke Specific Rules
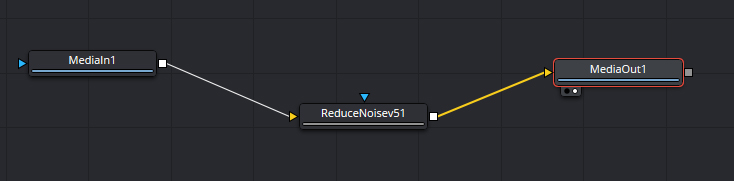
Video editing software that works with nodes, like DaVinci Resolve or Nuke, usually requires input and output of the Reduce Noise v5 node to be connected, for example to the source clip and viewer. If those connections are missing, the host may not be unable to send any frames to the plug-in. So if you receive a message saying that the plug-in has not selected a frame within the clip, don’t panic and check if Reduce Noise v5 node has required connections.