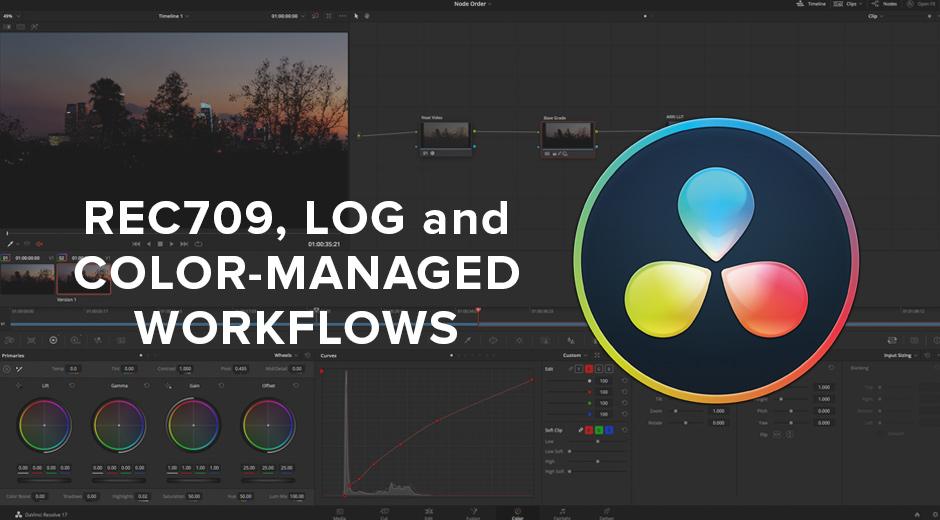
Neat Video in Resolve: best practices for Rec709, Log and Color-Managed workflows
When it comes to pro video applications, few offer a value proposition as compelling as Blackmagic Design’s DaVinci Resolve. An industry-standard in the area of color correction and grading for years, Resolve has recently added robust tools for editing, VFX, motion graphics and sound mixing, making it a powerful all-in-one post-production powerhouse.
In addition to its extensive toolset, one of Resolve’s biggest strengths is its ability to add functionality through 3rd party plug-ins. The Neat Video plug-in for Resolve is a powerful solution for noisy footage. This new blog series will cover tips and techniques for getting the best results from Neat Video inside Resolve.
In this first post, we’ll cover the basics of using Neat Video in Resolve, including where to apply the plug-in and how to integrate it into various color workflows including Rec709, Log and Color-Managed (such as ACES and DaVinci YRGB Color-Managed). By the end, you’ll know how to apply Neat Video in ways that optimize its performance while integrating into your specific color grading workflow.
Apply Neat Video on the Color page
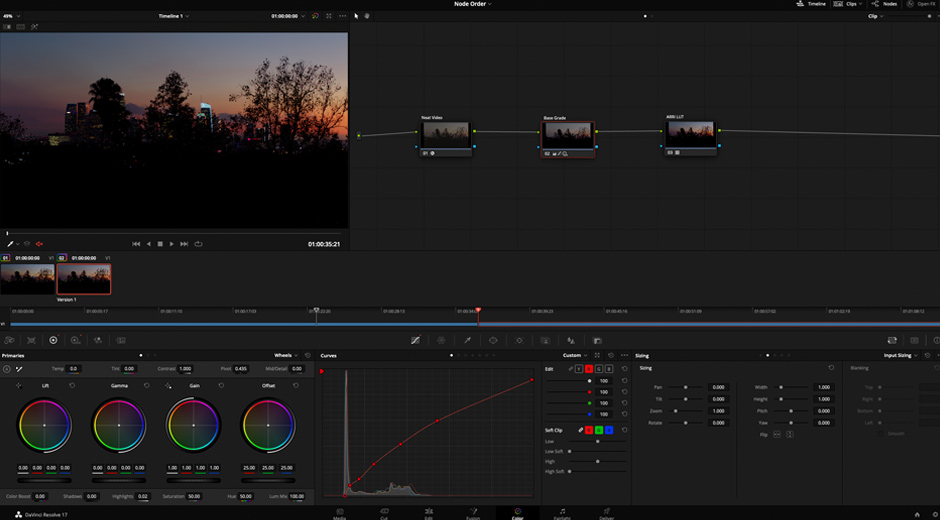
Unlike many other host applications, Resolve offers multiple places to apply effects, each with their own nuances in the way that they’re processed. OFX plug-ins may be placed on clips in the Edit timeline, on nodes in the Color page, or in Fusion compositions, but each of these methods differ in the way the video data is prepared by Resolve and passed to the plug-in.
Currently, Neat Video is optimized to work best when placed in a node on the Color page. This gives the plug-in access to all the video data it’s expecting, including adjacent frames necessary for temporal noise reduction, and enables its optimal placement in relation to other color grading operations. Resolve itself is also most efficient when such temporal effects are applied on the Color page. Due to its architecture, Resolve may require more GPU memory on other pages, so when efficiency is important it is best to apply on the Color page.
Place Neat Video on the first node (most of the time)
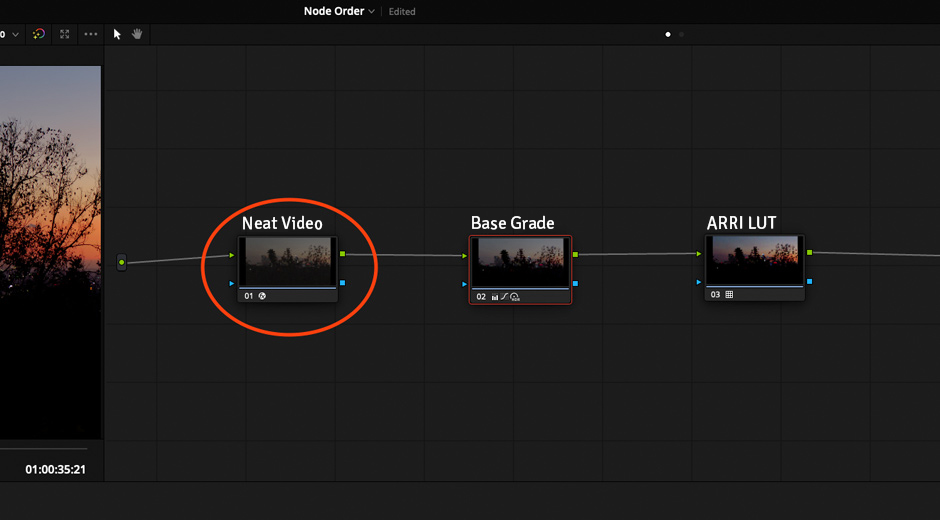
In most color grading scenarios, it’s best to perform the Neat Video noise reduction process on the first node in the tree, placing subsequent grading operations after it. This gives the plug-in access to the original, unaltered video signal and allows us to work downstream of the noise reduction process without worrying that our color corrections might reduce the accuracy of the de-noising.
By placing the noise reduction operation first, we’re creating a clean foundation for the rest of our technical and creative color grading operations. Chroma and Luma keying, custom curves and the Color Warper tool all benefit greatly from a low-noise signal, generating much cleaner results. And there are additional benefits to this approach when it comes to caching and performance optimization, which we’ll address in a future post.
There are some exceptions to this rule, specifically in Log and color-managed grading workflows. In these cases, the Neat Video node is still placed early in the tree, but may be preceded by LUTs or Color Space Transforms to convert the video data into a format optimized for the Neat Video plug-in.
Working In Rec709, Log and Color-Managed workflows
Setting the input data type
The Neat Video plug-in is designed to work most accurately with either Rec709 gamma-corrected video or linear video data. These two options ensure that the plug-in fits into both traditional Rec709 and more complex Log and color-managed workflows.
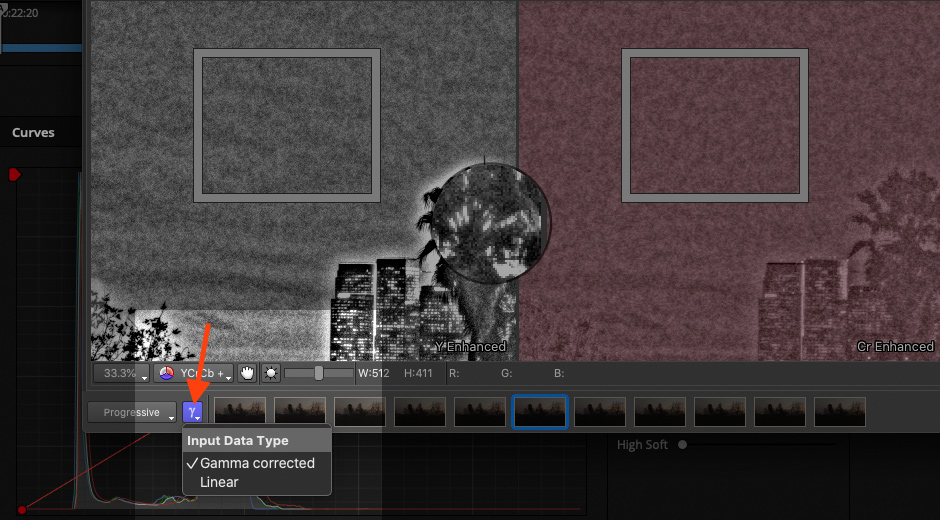
Inside the plug-in, the Input Data Type dropdown at the bottom-left of the interface allows the user to choose the correct format for each clip. Doing so will set the correct processing algorithms for that format, and will enable the proper display of the image in the plug-in’s viewer window.
Rec709 workflow
When working with Rec709 footage in a traditional DaVinci YRGB project, place the Neat Video plug-in on the first node in your tree. In the Neat Video plug-in, set the Input Data Type to “Gamma Corrected” (the default option) and dial in your noise reduction settings. Once you’re satisfied, you can add additional downstream nodes and continue color grading on top of a solid noise-reduced foundation.
Log workflow
When working with Log footage, it’s optimal to convert the image to linear data using a Color Space Transform (CST) node before processing with the Neat Video plug-in. This ensures the most accurate noise analysis and processing, regardless of the specific Log format you’re working with. Then, using another CST node, we’ll convert the linear video back to its original Log format in preparation for other grading operations. Here are the steps for this process:
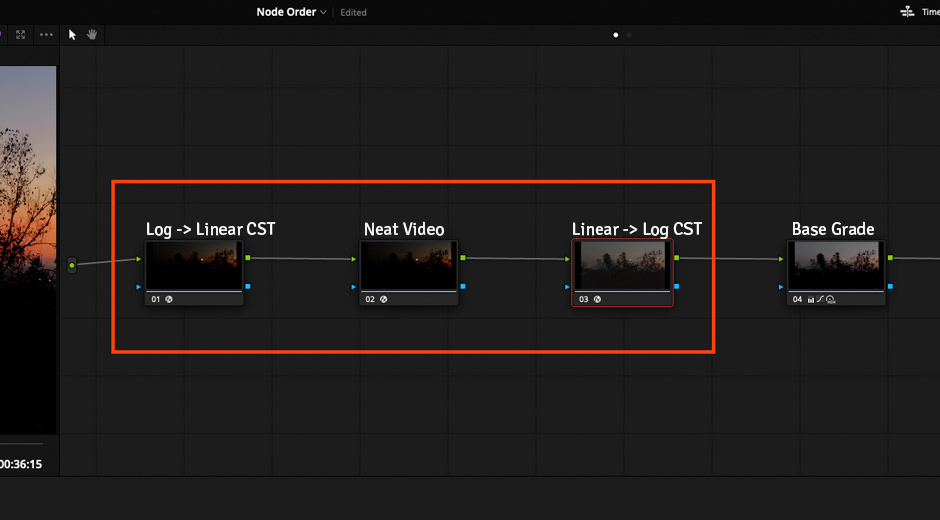
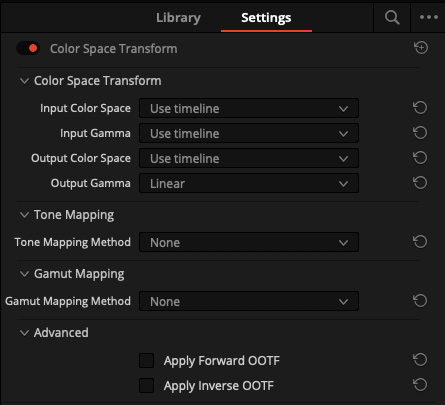
Transform Log to Linear
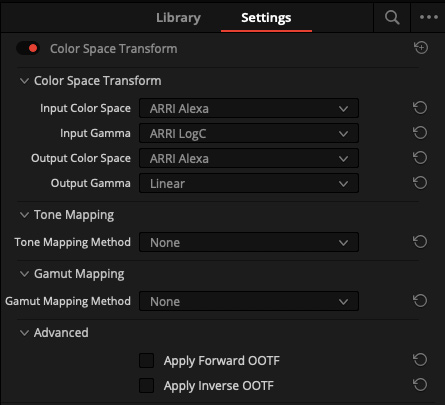
On the first node, add a Color Space Transform OFX plug-in. In the Color Space Transform settings, set the Input Color Space, Input Gamma and Output Color Space to match the clip’s specific Log format. Then set Output Gamma to “Linear.” The rest of the options should be set to “None” or unchecked. This combination of settings will convert the clip to linear gamma while maintaining its original color space. The image at this point will look very dark, which is normal.
Setup Neat Video plug-in
Add a serial node, and apply the Neat Video plug-in. In the Neat Video interface, set the Input Data Type to “Linear”. Notice that the image in the plug-in viewer will appear normal again. Proceed with the noise reduction workflow, then click "Apply" to exit the plug-in window. The image in the Resolve viewer window will still appear dark.
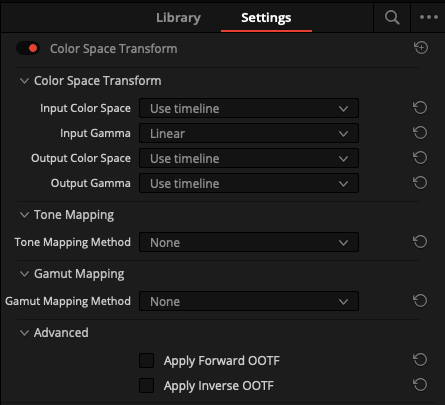
Transform Linear to Log
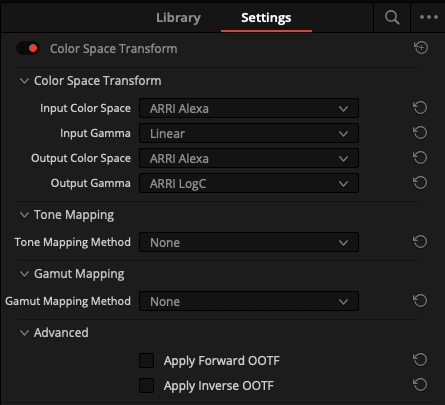
Add another serial node after the Neat Video node, and apply the CST plug-in. For this one, set the Input Color Space, Output Color space and Output Gamma to match the clip’s original Log format. Then set Input Gamma to “Linear”. The rest of the options should be set to “None” or unchecked. This will convert the image back to its original Log format with the noise reduction applied, ready for grading.
Convert to Compound node (optional)
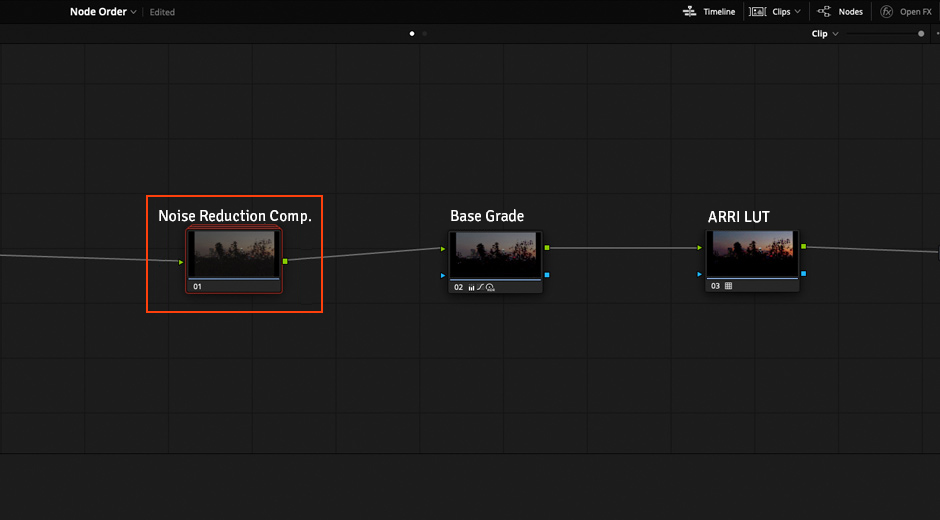
If desired, you can select the two CST nodes and the Neat Video node, right-click, and create a Compound Node. This will group the operations into a single node, removing clutter from your node tree. Rename this node “Noise Reduction” or something similar. If for some reason you need to change the settings on any of the nodes, right-click on the compound node and select “Show Compound Node” to display the individual nodes again.
Color-Managed workflow
Working with Neat Video in color-managed projects (either ACES or DaVinci YRGB Color-Managed) is similar to the Log workflow. We still need to convert the image to Linear data using CST nodes before processing, then convert it back. However, because color-managed workflows employ a unified timeline working color space, our settings in the CST are simpler.
Instead of matching the settings to a clip’s specific color space and gamma profile, we can simply select “Use Timeline” and let the underlying color management system perform the correct transform. We just set the first CST’s Output Gamma and the second CST’s Input Gamma to “Linear”. As long as the clips have the correct Input Color Space (DaVinci YRGB Color-Managed) or ACES Input Transform set, the system will take care of the rest.
Linear Conversion - "In"
Linear Conversion - "Out"
Summary
There’s a lot to this post, so let's boil it down to the key points:
- Apply Neat Video in a node on the Color Page, not on the Edit timeline or in a Fusion comp
- Neat Video should come first in the node tree unless an image conversion is required beforehand
-
Working in Rec709 is simple:
- Place Neat Video on the first node
- Set the Input Data Type to “Gamma Corrected”
- Grade downstream of the Neat Video node
-
Working with Log footage is more complex:
- Convert Log footage to Linear using a Color Space Transform Node
- Apply Neat Video to a new node and set the Input Data Type to “Linear”
- Convert Linear image back to original Log format using another CST node
- Group all three nodes into a new Compound Node (optional)
- Grade downstream from there
-
Working in a Color-Managed project is similar to working with Log, but simpler:
- Uses the same CST -> Neat Video -> CST node structure
- CST nodes’ color space and gamma set to “Use Timeline”
- First CST’s Output Gamma set to “Linear”
- Second CST’s Input Gamma set to “Linear”
- Make sure each clip’s Input Color Space or ACES Input Transform is set correctly
That’s it! We hope this gets you started using Neat Video inside DaVinci Resolve. In future posts we’ll explore topics like strategic node caching to improve performance, and bringing filmic texture to digital video through a de-noise / re-grain workflow.
In the meantime, if you have any questions or ideas for posts, let us know!
Author: Peder Morgenthaler
Peder Morgenthaler is an experienced colorist, editor and post supervisor specializing in advanced color-managed workflows and finishing for commercials, reality TV, narratives, documentary film & streaming media. Based in Colorado, USA, he collaborates on projects globally. In addition to his post work, Peder is a contributor on MixingLight.com and works as a consultant on high-performance postproduction shared-storage systems for Seagate Technologies. You can find him and his work at framelinear.com