Optimize Edit page performance in DaVinci Resolve
In Part 1 & Part 2 of our series on using Neat Video in DaVinci Resolve we looked at methods for applying and optimizing the Neat Video plugin in Resolve’s Color page. In this installment, we’ll examine ways to optimize performance in the Edit page to smooth playback and make the timeline more responsive.
Optimize Neat Video
When applying the Neat Video plugin to footage in an Edit Page timeline, the first step is to optimize performance of Neat Video itself. This process guarantees that Neat Video is using your computer’s hardware resources in the most efficient way.
For a detailed walkthrough check out our blog entry on the topic: Optimized Performance. Better Performance.
The best part is, once you’ve completed this process Neat Video is optimized wherever you use it on that system while working with the same frame size.
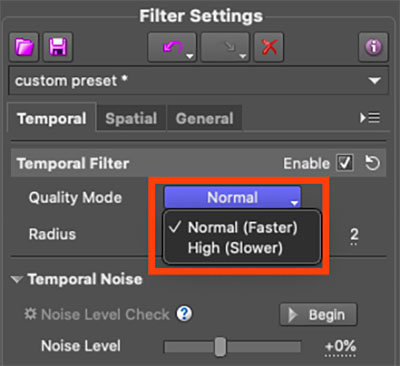
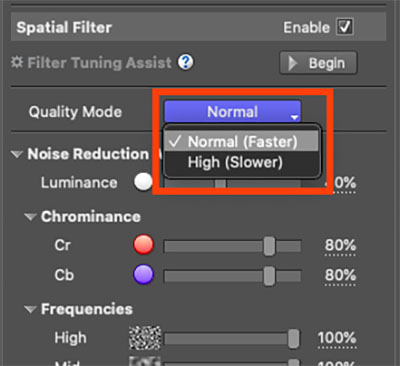
Leave “High Quality” mode Off
In the Neat Video interface there are “Quality Mode” setting dropdowns for both Temporal and Spatial noise reduction. For most situations the “Normal” setting is sufficient, and will provide good results. The “High” setting yields significantly slower performance, and should be reserved for situations where “Normal” mode isn’t sufficient.
For general playback purposes in the Resolve timeline, make sure to leave the “Quality Mode” set to “Normal” instead of “High.”
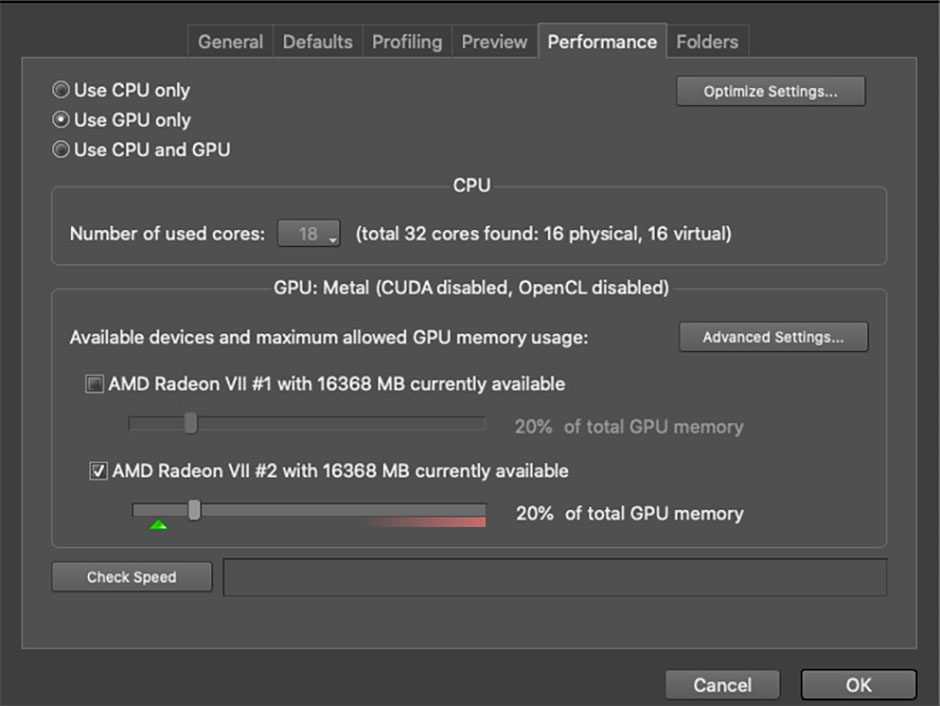
Assign multiple GPUs
If you're working on a system with multiple GPUs and find that playback of clips with Neat Video applied is slowing down, you can potentially improve performance by dedicating individual GPUs exclusively to Resolve & Neat Video. This allows Resolve and Neat Video to run their processes on separate GPUs without interference from the other.
Here’s how to set it up:
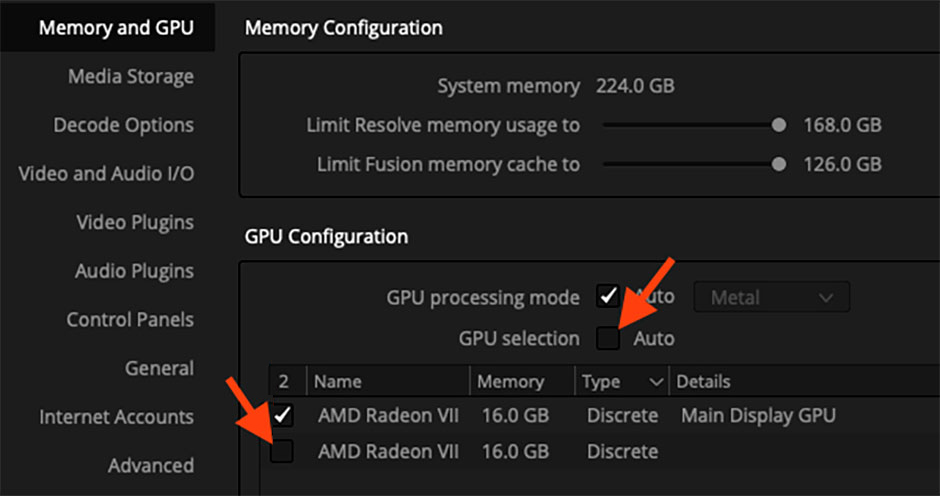
Open the Preferences window in Resolve
- Select “Memory and GPU” from the left menu
- Uncheck the “Auto” checkbox“ next to “GPU Selection”
- In the GPU list, uncheck the box next to a GPU that’s NOT listed as the Main Display GPU (We want to keep the Main Display GPU as the Resolve GPU)
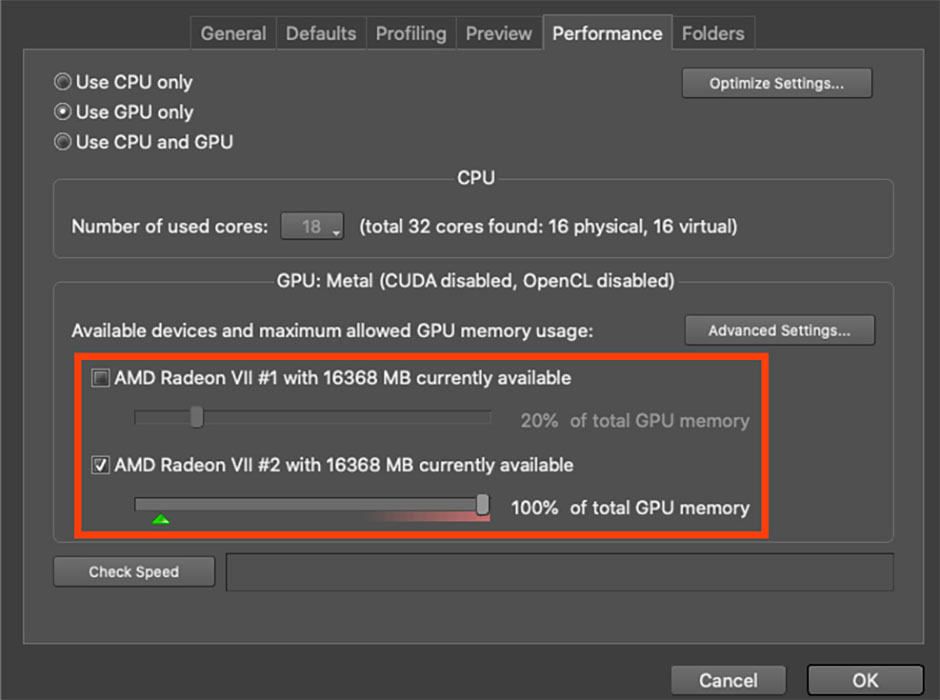
- Next, open the Neat Video plugin interface
- Under the “Tools” menu, select Preferences
- Click the “Performance” tab
- Uncheck the boxes next to the GPUs you’re reserving for Resolve, leaving only the GPU you’d like to dedicate to Neat Video checked
- Increase the Memory slider of that GPU to 100%, guaranteeing that all of that GPU’s VRAM will be available to Neat Video
- Press OK and exit Neat Video
Now you’ve dedicated GPUs to Resolve and Neat Video, which will increase performance in the timeline by avoiding simultaneous operations. This setup is good for situations where you’re noise-reducing a lot of clips in the edit timeline, but may not be optimal for complex color grading operations where you need the power of all GPUs for Resolve’s operations. In these cases, its best to revert back and give Resolve access to the extra GPU.
Turn Off heavy FX while editing
Depending on your hardware setup, it may not be possible to play certain intensive effects like Neat Video in real time, regardless of the optimizations you make. In these cases you can simply turn off these effects while editing, then turn them back on for review and export.
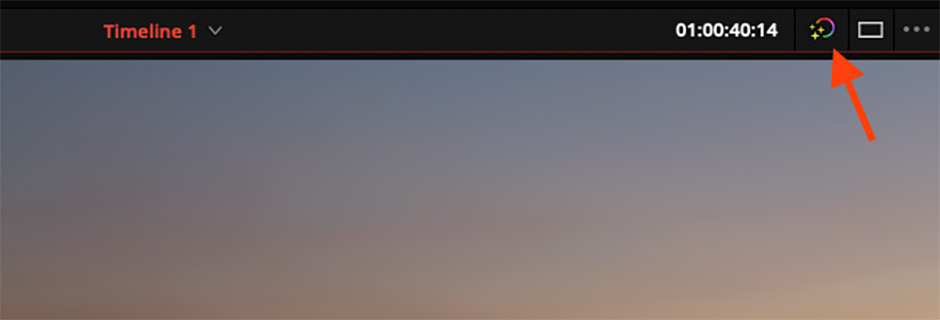
You can easily turn off all timeline, Fusion & color grading effects by clicking the “Bypass Color Grades and Fusion Effects” button above the timeline viewer. This will make playback much smoother. Just make sure to turn the button back on before exporting.
Edit with footage matching your output specs
It may seem obvious, but working with footage that’s the same frame-rate and resolution of your timeline in Resolve yields the best performance. When the footage and timeline match, Resolve doesn’t have to do extra calculation work to display each frame. The same goes for RAW media. RAW media, like R3D or CinemaDNG, require large processing overheads for playback. However, with Resolve’s flexible timeline, its easy to mix RAW & standard media, resolutions and frame-rates without realizing the performance hit it creates.
Fortunately there are multiple ways to prep your footage to match your timeline resolution, including:
- Create Optimized Media or Proxies in Resolve
- Transcode RAW or high-res footage to create new editorial master files
Use optimized media or proxies
Resolve has an amazingly efficient playback engine, but there are certain situations where you might consider using Optimized Media or Proxies to improve performance:
- High-resolution footage (4k, 8k etc.)
- Processor-intensive compressed codecs (MP4, H.264, H.265, etc.)
- Low-performance editing system hardware
All of these situations can benefit from transcoding the original clips into an intermediate lower-resolution clip in an easy-to-play-back codec, like ProRes Proxy. Resolve provides two different methods for achieving this: Optimized Media and Proxies.
Optimized Media is meant to seamlessly replace original clips in processor-intensive codecs with high-quality versions in a more optimized codec. Once created, these high-quality optimized files will serve as the new master clips until the final export of your finished video. They should be high enough quality for you to do most of the necessary work on a project without switching back to the original media.
Here are the steps for creating and using Optimized Media in Resolve:
- Open the Project Settings window
- Click “Master Settings” and scroll down to “Optimized Media and Render Cache”
-
Under “Optimized media resolution” select a resolution from the dropdown.
- The “Original” option maintains the resolution of the original source clip
- The “Choose Automatically” option balances visual quality with efficiency by only reducing the resolution of media files that are larger than the currently selected Timeline resolution, using whatever reduction ratio best matches the Timeline resolution.
- Select a lower resolution (Half or Quarter) to improve playback performance only. In this case, Optimized Media must be disabled when profiling clips for Neat Video
- Under “Optimized media format” select a high-quality intermediate codec such as ProRes 422 HQ & exit the Project Settings window

- In the Media Pool window, select all the clips you’d like to optimize, right click and select “Generate Optimized Media”. Resolve will start the process of creating the optimized clips
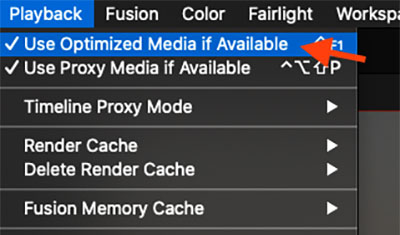
- To toggle Optimized Media clips on and off, open the “Playback” menu and choose “Use Optimized Media If Available”
Proxies are generally lower resolution, low bitrate files meant to ease playback on low-spec systems such as laptops. Proxies are generally visually inferior to the original footage, but can be easily toggled on and off if necessary to view the clips at full quality and resolution.
Here are the steps for creating and using Proxies in Resolve
- Open the Project Settings window
- Click “Master Settings” and scroll down to “Optimized Media and Render Cache”
-
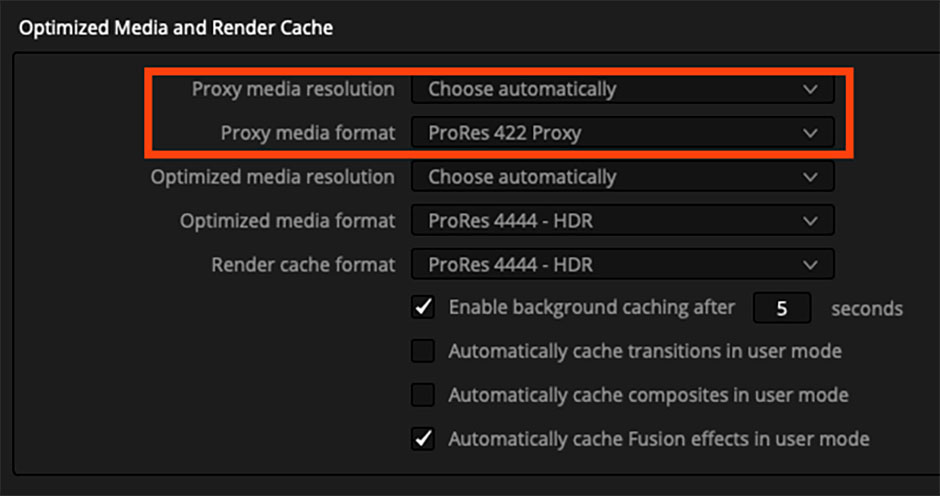
Under “Proxy media resolution” select a resolution from the dropdown.
- The “Choose Automatically” option balances visual quality with efficiency by only reducing the resolution of media files that are larger than the currently selected Timeline resolution, using whatever reduction ratio best matches the Timeline resolution. This is best for playing back at the timeline resolution without the overhead of downscaling higher resolution clips.
- Select a lower resolution (Half or Quarter) if you know the specific resolution you want to work at
- Under “Proxy media format” select a proxy-quality intermediate codec such as ProRes 422 Proxy & exit the Project Settings window
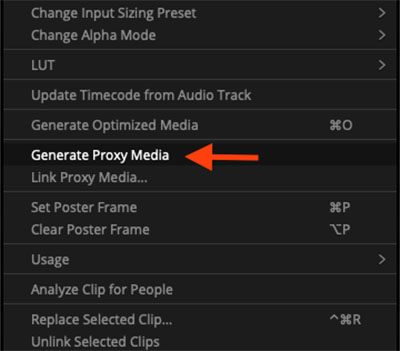
- In the Media Pool window, select all the clips you’d like to create proxies, right click and select “Generate Proxy Media”. Resolve will start the process of creating the proxies
- You can easily identify which clips have proxy media attached by enabling the Proxy” column in the Media Pool list view. Right-click the column headers in the Media Pool and check the box next to “Proxy” to show this column.
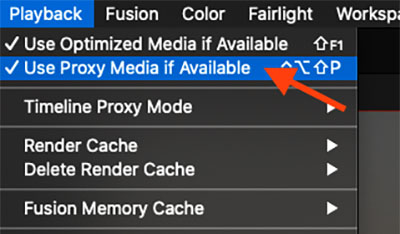
- To toggle Proxy clips on and off, open the “Playback” menu and choose Use Proxy Media If Available”
A Note When Using Proxies & Optimized Media With Neat Video
It’s important to temporarily disable low-resolution proxies and optimized media when profiling clips for noise reduction in Neat Video. For the best results, make sure you’re using the full resolution clips when profiling, then turn your proxies or optimized media back on.
For more details on this process, check out this article:
Reduced Preview Resolution & Proxy with Neat Video
Transcode RAW Media
RAW media, such as BRAW or R3D, require significant system resources to decode and display in real-time. You can improve overall performance by transcoding these clips to a high quality intermediate codec, creating new master clips with which to edit. This is similar to a proxy workflow, but you’re creating the clips manually. And since these will become your new master files, you’ll want to pay special attention to the settings used for export. Here are some guidelines to follow:
- Adjust your clips’ RAW settings before transcoding. Use this opportunity to fix exposure, temperature and tint issues using the RAW controls, which won't be available after you transcode to a different codec.
- Choose the correct output colorspace and gamma profile. You’ll want to plan ahead for color grading by selecting the right color output settings for your color workflow. For example, if you’re using R3D material, and you want to grade using a LOG workflow, you might choose IPP2 / REDWideGamutRGB / Log3G10 as your output settings.
- Choose an output resolution. RAW clips often come from cameras that capture at high resolutions (4k, 6k, 8k, etc.) Select an output resolution that balances performance, file size & reframing flexibility. For example, if you’re finishing at 1080p resolution, 8k master clips are probably overkill. 4k masters will greatly reduce your file sizes while giving you plenty of room for reframing.
- Choose an output codec with sufficient quality for your final product. If you’re producing SDR (standard dynamic range) material, a 10bit 422 codec such as ProRes 422 HQ is sufficient. But if you’re working in HDR (high dynamic range) you’ll need a 12bit or higher codec like ProRes 4444 to store the extra dynamic range.
- Maintain the same clip names as your camera originals. If you do need to reconnect to the original RAW media at some point having the same clip names will make that much easier.
Once you’ve transcoded your RAW media, you can use the new clips as your edit and finishing masters through the rest of the process, without worrying about the extra playback requirements of the RAW codec.
Match frame rates
Matching your clips’ and timeline’s frame rates can also improve performance. There are times when you might be working with media at a higher frame rate than your final timeline. It might be stock footage, or clips that were shot as slo-mo but you need to play back in real-time. Resolve and Neat video must process every frame of a clip as its played back, regardless of that clip’s frame rate. This means that, for example, when you place a 59.94 clip in a 23.98 timeline, your system must process 2.5 source frames for every resulting frame it displays in the timeline.
In some cases, when you know you won’t need the additional frames for speed ramps or slow motion, it may make sense to convert the clips’ frame rate prior to editing. This will reduce playback overhead, especially when using Neat Video.
Use “Fusion output caching”
Formerly called “Source Caching”, this confusingly named setting automatically caches clips at the Timeline level matching these criteria:
- Clips in media formats DaVinci Resolve considers to be processor-intensive to decode, such as H.264, HEVC, and various raw camera formats
- Clips with Speed or Retime effects
- Clips with Fusion Effects that have been added in the Fusion page
- Titles and Generators that are processor intensive
When paired with a fast cache disk, such as an SSD, this can be an effective strategy for improving playback in the timeline.
Fusion Output Caching is set to “Auto” by default on all clips in a Timeline. To take advantage of this caching, go to the “Playback” menu, go to “Render Cache” and choose “Smart”. Resolve will automatically determine which clips to cache in the timeline, highlighting them with a thin red line that will turn blue as those frames are cached in the background.

To manually cache clips with intensive plugins, like Neat Video, right-click the clip in the timeline, select “Render Cache Fusion Output” and choose “On”. This will force Resolve to cache that clip, regardless of its properties.

For a deeper guide to caching in Resolve, check out this article: Neat Video in Resolve, Part 2: Strategic Caching for Performance
Wrapping it up
There are a lot of ways to improve performance in the Edit Timeline in Resolve. Hopefully this collection of tips improves your editing experience both while using Neat Video and in general.
Author: Peder Morgenthaler
Peder Morgenthaler is an experienced colorist, editor and post supervisor specializing in advanced color-managed workflows and finishing for commercials, reality TV, narratives, documentary film & streaming media. Based in Colorado, USA, he collaborates on projects globally. In addition to his post work, Peder is a contributor on MixingLight.com and works as a consultant on high-performance postproduction shared-storage systems for Seagate Technologies. You can find him and his work at framelinear.com