Neat Video & Premiere Pro: order of effects matters
The goal of this blog post is to tell you more about Neat Video and best practices of using it, different ways of applying effects in Premiere Pro, and emphasize the importance of the order in which effects are actually processed. Knowing that can improve the overall performance of Premiere Pro, especially when using such heavy effects as Neat Video. Let us get started.
The best practice when you edit a clip in a host application such as Premiere Pro would be to make sure Premiere processes (renders) Neat Video first, before any other effect. First of all, that allows getting the best possible noise reduction. Second, processing certain effects before Neat Video or before other temporal effects can make Premiere Pro extremely slow or even cause it to crash. In particular, Lumetri Color and Warp Stabilizer are those guys which, if processed before temporal effects, can cause significant slowdowns and sometimes crash Premiere Pro altogether. So the order in which Premiere processes effects is important.
Now let’s check the order in which Premiere Pro processes effects depending on their placement in the components of your project. Generally, effects can be added to such components of a project as:
- A regular clip in a sequence in the timeline
- A nested sequence
- A clip inside a nested sequence
- A master clip
- An adjustment layer
Each of these components can have its own set of applied effects and those are listed in the ’Effect Controls’ panel shown when you select the corresponding component in Premiere Pro.
Now let's see what effects Premiere Pro puts into the render pipeline first. In the examples below, you will see different scenarios of using effects. In each scenario, the numbers added by us to the effects in the screenshots indicate the order in which Premiere Pro actually processes those effects. The goal is to make Premiere process Neat Video (Reduce Noise v5) before Lumetri Color and Warp Stabilizer. When this order of effects is ensured, Reduce Noise v5 has a smaller number standing next to it than Lumetri Color and Warp Stabilizer have.
Effects applied to the clip in the timeline
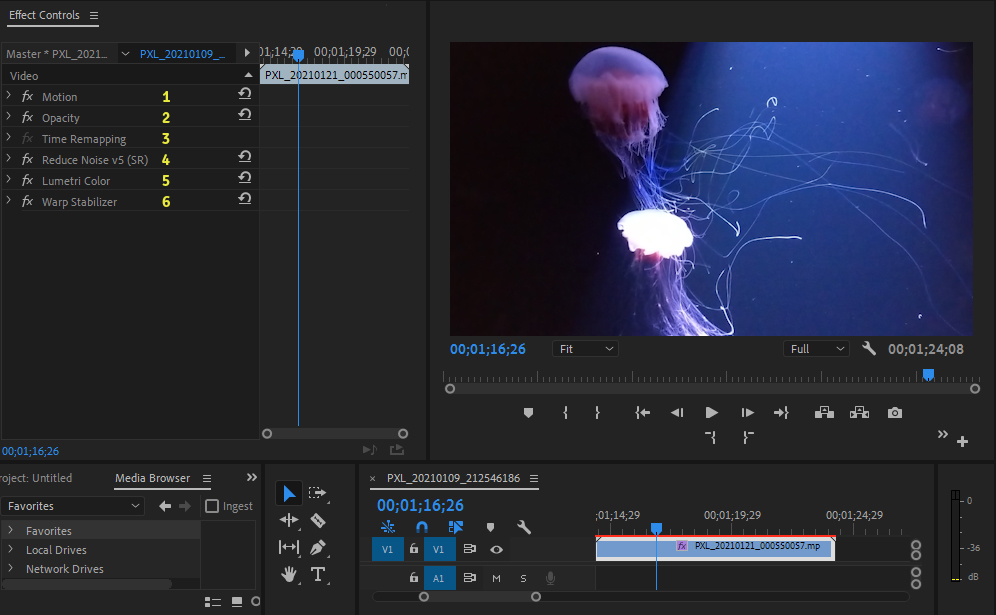
In the simplest case scenario when effects are added directly to a clip in the timeline (and so the effects are placed in the Effect Control panel of the clip), Premiere Pro processes those effects from top to bottom. In the example below, Motion is processed first, then goes Opacity, Time Remapping (if enabled), Reduce Noise v5 (Neat Video), Lumetri Color, and finally Warp Stabilizer. In this particular case, Reduce Noise v5 is processed in step 4, so before Lumetri Color (step 5) and Warp Stabilizer (step 6), which is the right order that will prevent unnecessary slowdown of Premiere’s render process.
Effects applied to the clip and nested sequence
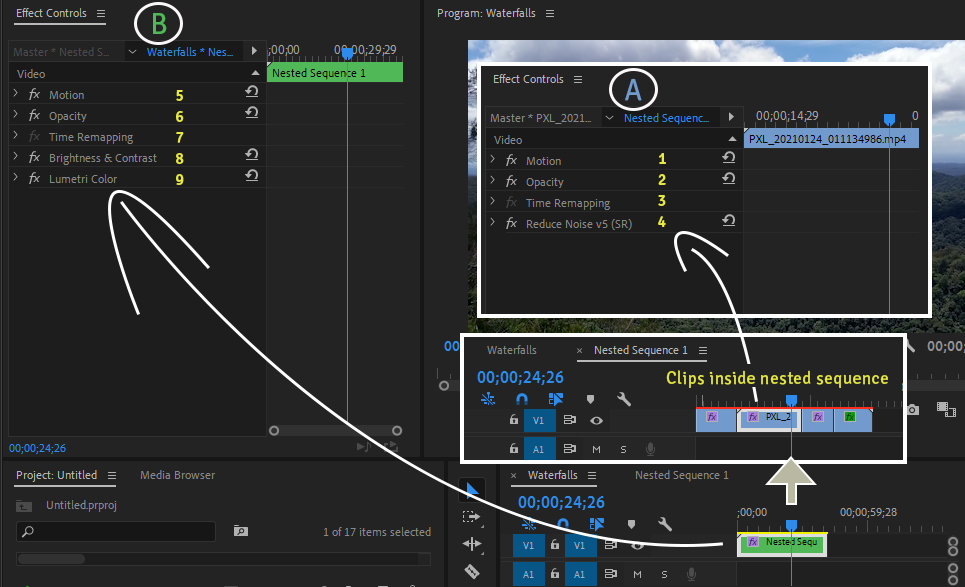
What is going to happen when you nest a clip and then apply some effects to the clip inside the nested sequence and other effects to the nested sequence itself? The effects applied to the clip inside the nested sequence (see the box A in the picture below) are going into the render pipeline first. Then follow the effects applied to the nested sequence itself (B). In each Effect Control panel, the effects are processed from top to bottom.
In the picture below, Neat Video (Reduce Noise v5) is applied to the clip inside the nested sequence and Lumetri Color is applied to the nested sequence itself. So the noise reduction is going to be rendered in step 4, which is before Lumetri Color (step 9). This order will ensure better render and export speeds.
Effects applied to the clip and master clip
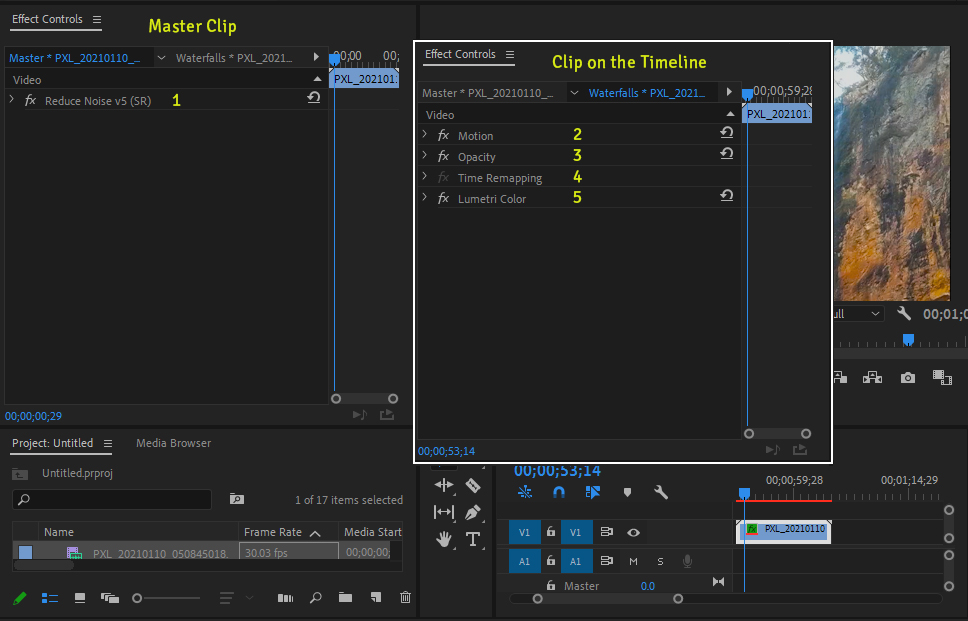
The benefit of applying effects to a master clip is that effects applied this way will stick to every instance of the clip throughout your project. It is not always needed, but can be handy at times. Effects applied to a master clip are always the first effects Premiere Pro renders. Within a master clip’s Effect Controls panel, the effects are also processed going from top to bottom.
When done with the effects applied to a master clip, Premiere Pro processes the effects applied directly to the clip in the sequence in the timeline. When you select the clip in the timeline, you see its Effect Controls panel showing those effects. And again, render goes in the top to bottom order in that Effect Controls panel. If you apply Neat Video to the master clip and Lumetri or Warp Stabilizer are placed in the clip’s Effect Controls panel, then the denoiser is going to be rendered in the master clip first (step 1) as it supposed to, and Lumetri will be rendered later (step 5).
Effects applied to the clip, nested sequence and adjustment layer
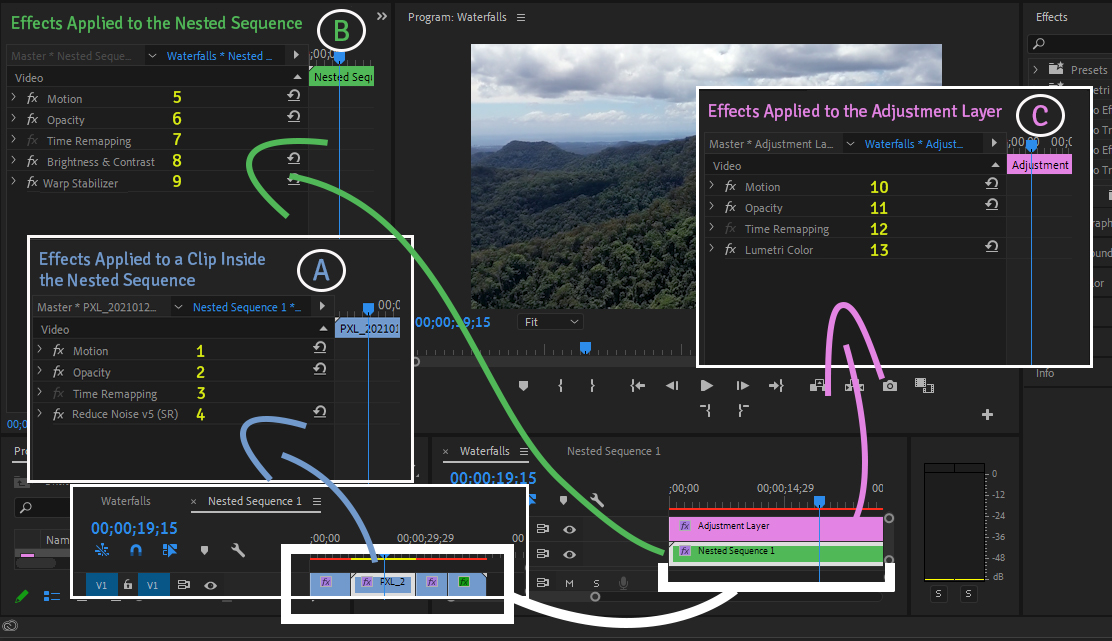
Things get more interesting when your timeline becomes multi-leveled and multi-colored. For example, in the screenshot below the timeline has a nested sequence and an adjustment layer. Several effects are applied to both the nested sequence and adjustment layer, but also to the clip inside of that nested sequence.
When you have a similar structure, Premiere Pro is going to process the effects from the clip inside the nested sequence (A) first, then it turns to the effects applied to the nested sequence (B) itself, and the last effects sent to render queue are the ones applied to the adjustment layer (C). As usual, Premiere Pro processes effects within each Effect Controls panel going from top to bottom.
Effects applied to multiple adjustment layers
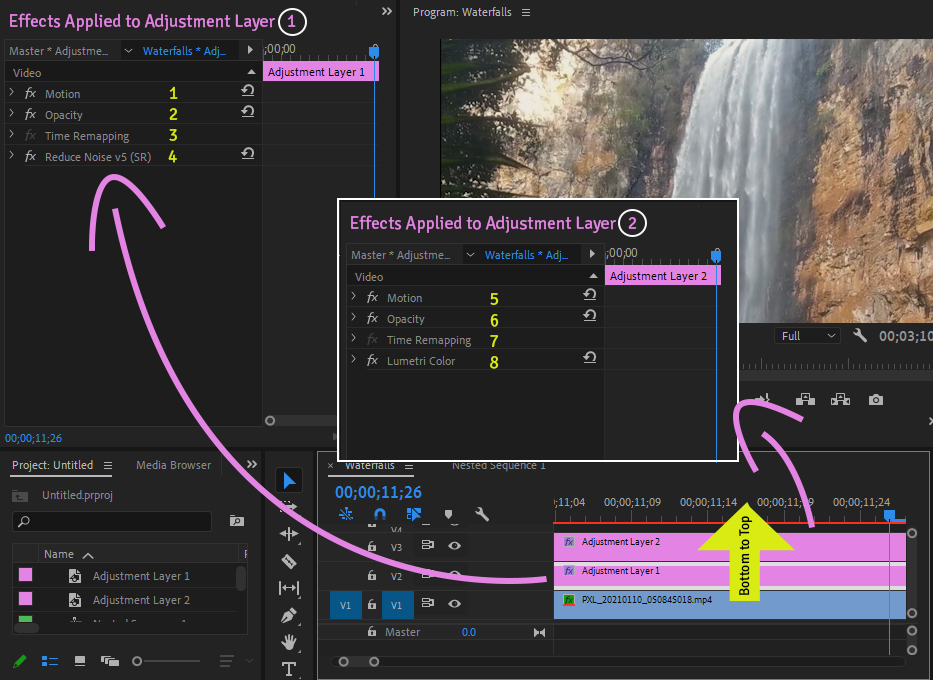
Stacking one adjustment layer on top of another is also a very common thing editors do. How are effects processed in this case? Premiere Pro starts by rendering all effects applied to the lower adjustment layer first and then moves up one layer at a time. As usual, Premiere Pro processes the effects within each adjustment layer going from top to bottom in the corresponding Effect Controls panel.
All components gathered together
Let’s gather all components together and summarize what we have learned above.
If several effects applied to different components of a project including::
- A master clip
- A clip inside a nested sequence
- The nested sequence in the timeline, or a regular clip in the timeline
- An adjustment layer right on top of the timeline
- Another adjustment layer on top of the first one
- Yet another adjustment layer above the first two, etc.
then Premiere renders the applied effects in the above order, going from 1 to 6.
If some of the components are not used in your project or effects are not applied to them, then Premiere simply goes to the next component in the above list.
Multiple effects applied to each individual component are rendered in the order they appear in the Effect Controls panel of that component, from top to bottom.
Conclusion
There are few important things to keep in mind when using Neat Video with Premiere Pro.
The first one is that the order in which Premiere Pro processes effects depends on where they are placed. Use the summary above as quick guidance. This is generally useful to know because you may want to make Premiere process your effects in a specific order for a particular artistic or technical purpose.
The other important thing to remember is that it is best to make Premiere process Neat Video before other effects, especially before Lumetri and Warp Stabilizer (because of limitations of those specific effects). Knowing the processing order used by Premiere you can easily adjust the placement of effects in the components of your project to ensure the right render order and in this way avoid unnecessary slowdowns.
Try these ideas out for yourself and let us know if that has helped you.
If you have more ideas or tricks you use in your work to help Neat Video and Premiere Pro (or other host applications) work better together, please share those with us.