How to shorten render time: best practices

As both hardware and software continue to improve very rapidly it may seem as though the life of the film creator is getting easier and easier. However, this is not always the case because increasing consumer expectations means the demand for new video content is also becoming higher every day. The bottom line is that we need to get to the results, faster.
In this article we try to offer some recommendations on how to make rendering faster and shorten the overall processing time. To do that, we’ll describe a typical render pipeline first and then give you some tips on how to make it more efficient.
Where does the time go when you render a video?
First, let's have a look at a render pipeline of a video editing application. This is the queue of tasks that most video editing programs follow to go from original media to the output of the final file.
It starts with reading encoded video frames from a video file stored on a local hard drive or over the network. Then, the application decompresses those frames using the corresponding input codec - which reads these frames for further processing. Then it’s time to do some processing, we like this part the most. At this stage, video frames can be modified in countless ways to achieve our creative goals. Frames can be resized, color-corrected, denoised, the speed of the clip can be changed, different effects can be applied, transitions can be added and much more.
Once all the desirable effects and transformations are applied to the video frames, the stream of those processed frames is compressed once again using a chosen output codec. At the very end, the output video file is written to a local hard drive or a network location.
All these steps in the pipeline are organized and managed by the video editing application. The overall render time depends on what happens at each of these steps and the whole is always longer than the time taken by any one of those individual steps. That means if you use Neat Video in a project, the overall render time is always longer than the time Neat Video itself takes to do its part of the work.
When you run the Check Speed test in the Neat Video plug-in (or use NeatBench as a standalone speed test) you’re only measuring the speed of Neat Video itself, without the other steps of the render pipeline. As you can imagine, if you add the time taken by all other steps, then the overall render time will be longer and correspondingly, the overall render speed will be lower than the speed of Neat Video alone. That is normal and to be expected.
Real-life examples
To offer some real-life examples, we have done several direct tests with a timer. In the table below you can see the speeds of two similar projects rendered and exported in Premiere Pro CC 2019 and in Resolve 15 when applying Neat Video to a 1080p clip as compared to the speed of Neat Video itself.
| Process | Speed, frames per second |
| Neat Video itself without overhead of video editing application | 40 |
| Premiere Pro rendering a simple project with Neat Video | 38 |
| Resolve 15 rendering a simple project with Neat Video | 20 |
As you can see, each video editing application renders/exports the test project at a speed that is somewhat lower than the speed of Neat Video alone. Again, this difference is normal. However, the size of this difference should be questioned further because it offers clues about the efficiency of the video editing application.
As we have discussed above, the overall render/export speed in a video editing application depends not only on Neat Video, but also on other components in the render pipeline. These include the input and output codecs used in the project, the application itself, effects and transitions and so on. The speed at which the application does each of these things influences the final export time. Certain applications can organize the render/export process more efficiently than others, some codecs are faster than others, etc. Any inefficiency of the application during any specific component of the render/export process will cause the overall speed to be reduced. That’s when you may lose time unnecessarily.
Ok, with that in mind, let's check the efficiency of a video editing application. To do this, we’ll render/export a simple project with Neat Video applied to one clip. We’ll compare the overall render/export speed of the video editing application to the speed at which Neat Video performs its’ task.
For example, if Neat Video’s speed is reported as 40 frames/second by Check Speed, while the video editing application exports/renders at a speed of 20 frames/second, then the efficiency of that application is 50%.
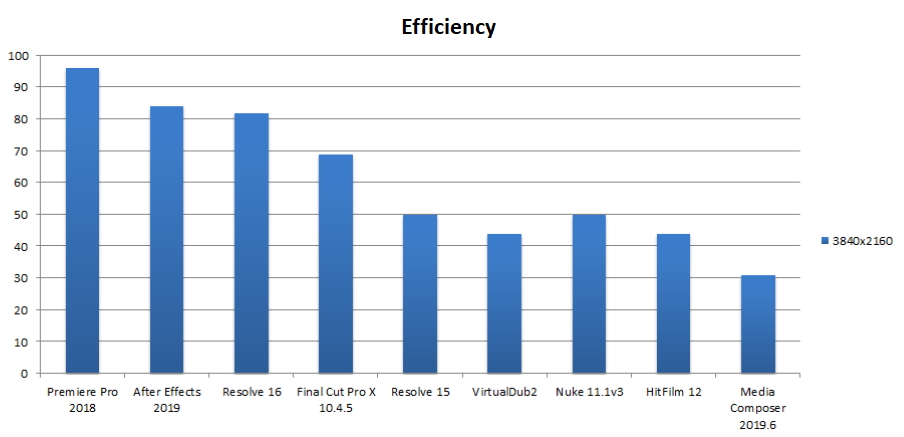
The efficiency depends on a video editing application quite a lot. Here are some figures we measured on our computers:
| Video Editing Application | Frame Size | Efficiency of Video Editing Application |
Input | Output Codec |
| Premiere Pro 2018 | 3840x2160 | 93% | H.264 | H.264 |
| Premiere Pro 2018 | 1920x1080 | 95% | H.264 | H.264 |
| After Effects 2019 | 3840x2160 | 84% | H.264 | H.264 |
| After Effects 2019 | 1920x1080 | 82% | H.264 | H.264 |
| Resolve 16 | 3840x2160 | 82% | H.264 | H.264 |
| Resolve 16 | 1920x1080 | 82% | H.264 | H.264 |
| Final Cut Pro X 10.4.5 | 3840x2160 | 69% | H.264 | H.264 |
| Final Cut Pro X 10.4.5 | 1920x1080 | 69% | H.264 | H.264 |
| Resolve 15 | 3840x2160 | 50% | H.264 | H.264 |
| Resolve 15 | 1920x1080 | 49% | H.264 | H.264 |
| VirtualDub 2 | 3840x2160 | 67% | H.264 | H.264 |
| VirtualDub 2 | 1920x1080 | 70% | H.264; MPEG-1 | H.264 |
| Nuke 11.1v3 | 3840x2160 | 56% | H.264 | H.264 |
| Nuke 11.1v3 | 1920x1080 | 38% | H.264 | H.264 |
| HitFilm 12 | 3840x2160 | 44% | H.264 | H.264 |
| HitFilm 12 | 1920x1080 | 35% | H.264 | H.264 |
As you can see the spread of efficiency figures is quite significant. Premiere Pro is a champ in terms of efficient organization of the render process, while other applications may be somewhat less efficient at that task. For example, it takes nearly half as long to render the same video in Premiere Pro 2018 than it does in Resolve 15 (when applying just Neat Video noise reduction to a clip). On the other hand, the newer Resolve 16 shows improved efficiency, which again indicates that the overall render time greatly depends on what is going on inside the video editing software itself, and on how well it organizes the render process.
Check your efficiency
Here’s a simple test that will help you to better understand whether or not you are losing any time unnecessarily, and whether or not you can squeeze more speed out of your render pipeline.
Step One:
Pick a clip, apply Neat Video (this includes profiling and adjusting filter settings) and then run Neat Video’s Check Speed tool: Neat Video window’s menu Tools > Preferences > Performance > Check Speed. Write down the speed measured by the test.
(We assume that you have already used Optimize Settings to find the best CPU/GPU settings for your hardware and for your project. If you haven’t, then please do that first and then measure the speed using Check Speed.)
Step Two:
Next, render/export that clip in the video editing application and measure the time it takes to process the whole clip. Then calculate the number of frames in the clip by multiplying the length of the clip in seconds to the frame rate of the clip. For example, 10 sec x 25 fps = 250 frames.
Then divide the number of frames by the measured render/export time (in seconds). This will give you a figure for the overall render/export speed of the video editing application (in frames per second).
Step Three: (Efficiency Calculation)
Now divide the overall render/export speed you got in Step Two by the speed reported by Neat Video in Step One. Multiply it by 100% and that’s the efficiency of your video editing application. Compare that efficiency to the results in the table above.
How does it compare? Is it roughly similar to the figures in the table? GOOD! Is your measured efficiency number significantly lower? Then keep reading and we’ll present you with some tricks that may help to improve efficiency and thus shorten your overall render time.
Eliminate causes of inefficiency to render faster
There are several ways to go about shortening render times. Some of them are general while others depend on a specific video editing software package.
1. Optimize Neat Video settings
Make sure Neat Video is optimized to use the right number of CPU cores and GPU(s). Run the Optimize Settings tool: Neat Video window’s menu Tools > Performance > Optimize Settings… Run the test in that dialog and then choose the best combination you find. This will ensure that Neat Video itself achieves the best possible speed for your hardware.
2. Check GPU setup and drivers
Verify that the GPUs in your computer are connected to the fastest PCI Express slots (refer to the documentation of the computer/motherboard if necessary) to achieve the best possible performance. Make sure the latest version of the GPU drivers is installed.
After making any changes in hardware setup please re-do the optimization described in point 1.
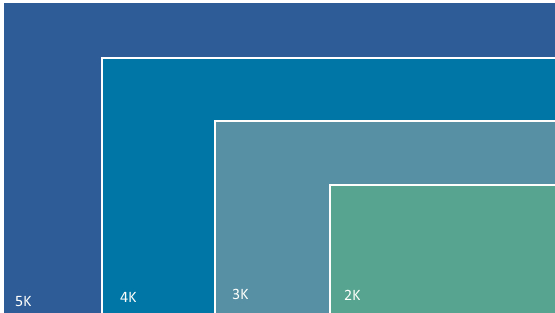
3. Reduce frame size according to your needs
For example, if your source video is 4K, but the output will be a 1080p clip, then it may be a good idea to resize the video before you apply any effects. Neat Video will process 1080p frames about 4 times faster than 4K frames. Check the resolution of the frames sent by the video editing application to Neat Video for processing using the main window of the Neat Video plug-in (see the frame size indicator under the viewer).
4. Transcode using a faster codec
If the input video is encoded with a “slow” codec or if it's a RAW video / set of frames, then it may be useful to transcode the video with a faster intermediate codec such as Apple ProRes, Cineform, DNxHD or something similar. You may want to try different codecs for that role to find the fastest one.
In some video editing applications, such as FCPX for example, you can simply request the application to optimize the source video during import and it will do the transcoding for you automatically.
Working with source video clips encoded with a faster codec may significantly improve the efficiency of the render process because it will not waste a lot of time using a slow codec component.
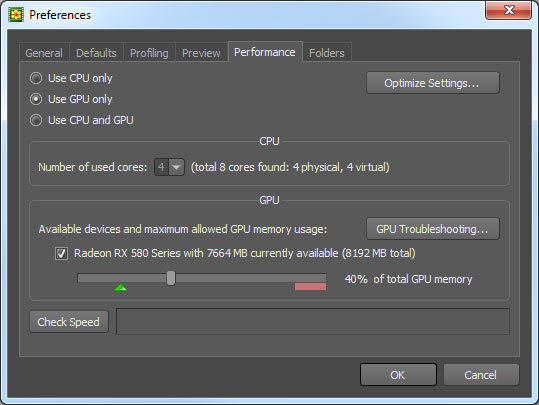
5. Limit GPU memory usage
Sometimes it may be necessary to ensure that Neat Video and the video editing application do not compete with each other for the GPU memory. You should look into this if you see one or more of the following signs:
- If the Performance tab (in Neat Video Preferences) indicates that:
(1) a significant part of GPU memory is already in use by the video editing application and OS (the occupied memory is indicated by the red line under the slider) and
(2) Neat Video also wants to use the amount of GPU memory (indicated by the green triangle) that lies in the red area.
If this is the case, it is best to lower the amount of GPU-memory allowed to Neat Video by moving the slider away from the red area. Otherwise, Neat Video may be competing with the video editing application or OS for the same GPU memory, which may lead to a very slow render speed and errors.
If the Performance tab indicates that near 100% of GPU memory is already in use (check the red line), then it may be best to switch Neat Video to CPU-only mode and leave all GPU resources for the video editing application.
- If the video editing application (for example Resolve) indicates a shortage of GPU memory when using Neat Video in your project, then decrease Neat Video’s allowance for GPU memory. If this doesn’t help, then switch Neat Video to the CPU-only mode.
- If Neat Video itself gives GPU-related errors in a terminal window and suggests to decrease the amount of used GPU memory, then follow this recommendation. It should help.
6. Allocate multiple GPUs strategically
If you have several powerful GPUs in your system and both the video editing application and Neat Video want to use one or more GPUs, then try to assign different GPUs to the video editing application and Neat Video to make sure each of them uses its own dedicated GPU and they do not compete for the same GPUs during processing. For example, this kind of manual separation may be possible in Resolve Studio where you can explicitly specify which GPUs should be used by Resolve only. In other video editing applications it may be possible to just disable the use of (all) GPUs and consequently free the GPU resources for Neat Video, which may turn out to be a more efficient setup overall. Generally, try different allocations of GPUs between the video editing application and Neat Video to find the one that delivers the best overall efficiency and fastest render speed.
7. Avoid applying several temporal effects to the same clip
Temporal effects are usually very resource-demanding and applying more than one temporal effect to the same clip at the same time can slow down the render speed dramatically. The temporal noise reduction performed by Neat video is one such effect, so try to avoid adding more than one if possible than one if possible.
8. Store video clips locally
It is always much quicker to read and save video files if they are stored locally. If you are working with files from the network, then consider moving them to your local hard drive. If you use both internal and external hard drives, then it may be faster to store video files on the internal hard drive.
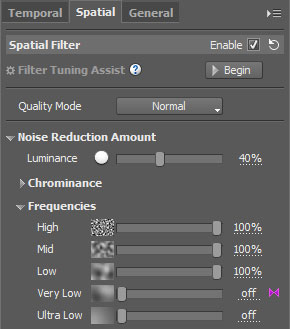
9. Turn off Very Low Frequency filtration in Neat Video
If your video doesn’t have very low frequency video noise, then turn off Very Low Frequency filtration: Spatial Filter > Noise Reduction Amount > Frequencies> Very Low = 0% (off). This may slightly increase Neat Video’s processing speed.
10. Stop any unnecessary processes
Some background processes (for example, web browsers) can use a significant amount of available system resources including GPU memory. Closing down such processes is a possible way to avoid losing speed unnecessarily.
11. Use a lower bitdepth when possible
If your video editing software allows you to choose bitdepth and the final result is not required to have a high bitdepth, then consider using a lower settings for the project. For example, Adobe After Effects allows you to choose between 8, 16 and 32 bits per channel.
12. Specific to Premiere Pro
It is best to place Neat Video above/before other effects, especially above Lumetri and Warp Stabilizer because those effects are known to slow down processing and may cause stability issues when being applied above/before Neat Video.
13. Upgrade hardware
If you have done everything possible to speed up rendering but the efficiency is still significantly lower than the figures indicated in the table above, then it may be time to upgrade your hardware. Check our recommendations on choosing the right CPU and GPU.
Keep Neat Video up to date
We hope that the tips above will bring you closer to a polished final result much faster -- allowing you to focus on more important things! However, keep in mind that Neat Video is also continually improving. With every update, we focus on making it compatible with more GPUs and the latest video editing applications. We never stop working to improve the speed and to overcome known issues. So, remember to keep Neat Video updated to benefit from these efforts.